For the end user, Apple has created a truly effective ecosystem that ensures seamless interaction and data exchange between the brand's devices. For example, if you take a photo on an iPhone, it instantly appears on your Mac through iCloud synchronization, and vice versa. Apple's built-in Photos app also automatically organizes everything.
However, for me, organizing photos is not only about being able to open a picture on different devices. It is a system that keeps memories safe and organized for many years. Each frame in this system is not just a file in a shared folder, but an element of a structured archive where the date, place, context, and even visual content are recorded.
A few years ago, I found myself in a situation where my photo archive had turned into a real digital dump. It contained about 52,000 files (photos and videos), totaling nearly 400 GB. There were pictures from my old iPhones (from the iPhone 5s to my current iPhone 15 Pro), my wife's Android smartphone (Samsung Galaxy), an old Canon DSLR, a Sony Alpha 7C mirrorless camera, plus a large number of scattered scans from old paper family albums.
Saying that my basic 256 GB MacBook Air was full would be an understatement. There was physically not enough storage, and my 200 GB iCloud plan was completely full, constantly pushing me to upgrade to the more expensive 2 TB plan.
Some folders contained duplicates of the same trips, for example, folders named “Turkey 2018,” “Turkey_copy,” and “Turkey_final,” with no clear differences between them. Quickly finding a photo from a friend's birthday five years ago was practically impossible.
A properly organized photo archive saved me from having to scroll through thousands of scattered images and made it possible to quickly find a specific moment from the past, whether it was a photo from a vacation ten years ago, a family celebration, or an important event. Search stopped depending on my memory of which folder a photo was in and turned into an intuitive query based on time, people, or objects in the image.
Stages of Organizing Photos on Mac
To keep a photo archive consistently organized, you need a reliable foundation. It is important to understand that organizing photos is not a one-time action, but a structured system of sequential steps, each of which solves a specific task.
Consolidation. This means collecting photos from all phones and cameras into a single catalog in the Mac's storage for further sorting and organization.
Duplicate removal. At this stage, all repeated photos need to be removed.
Sorting. Grouping photos into broad categories: year, trip, holiday, important life stages.
Culling. Removing unsuccessful shots, blurry images, random photos, and pictures with obvious technical defects.
Tagging. Assigning keywords, adding titles and descriptions that reflect the context of the image and make search easier.
After going through this process, your photos, just like mine once did, will stop being a pile of accumulated digital clutter and will become a system where every memory has its place and can be accessed in just a few clicks.
I would also like to separately mention face recognition when organizing photos on Mac. Having this feature in the tool you choose not only speeds up the search for photos of a specific person, but also makes browsing the archive more interactive.
Consolidating Photos on Mac
Apple device integration is great, but for me it became a real problem. I use an iPhone, while my wife uses Android. In addition, we have a shared Sony camera. Getting everything into one folder on a Mac turned out to be quite a challenge.
macOS provides seamless connection only with Apple's own devices, while importing photos from smartphones made by other manufacturers can be problematic.
Fortunately, I have already made enough mistakes to share genuinely working ways to transfer photos to a Mac.
Transferring Photos from iPhone to Mac with AirDrop
AirDrop is Apple's built-in tool that lets you instantly share files between iPhone, iPad, and Mac wirelessly, without using the internet. For me, it is effective when I do not have a cable nearby or need to transfer only a few photos.

To transfer photos successfully, you need to do the following.
Make sure Wi-Fi and Bluetooth are enabled on both devices and that Personal Hotspot is turned off.
Open Control Center (swipe down from the top of the iPhone screen) or go to “Settings” – “General” – “AirDrop.” Choose who can see you: “Contacts Only” or “Everyone.”
Open the desired photo, tap the “Share” button (the square with an arrow), choose “AirDrop,” and tap the recipient device icon.
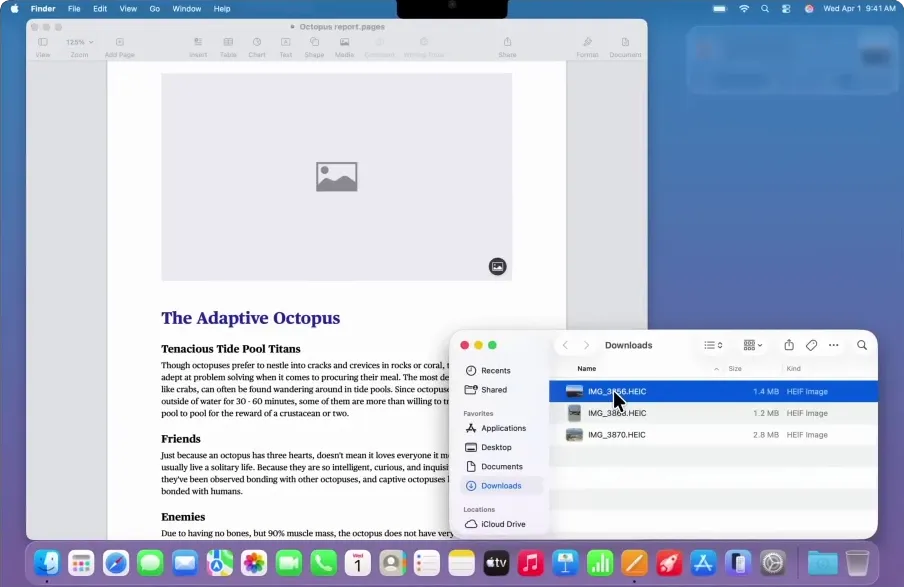
The method is good, but I want to note that all photos will automatically be saved to the Mac's “Downloads” folder, mixed together with documents and PDF instructions downloaded from the internet. You then have to spend time digging them out of there.
Importing Photos with Image Capture
Image Capture is a built-in macOS utility specifically designed for importing photos and videos from iPhone, iPad, and digital cameras. After connecting a device, you simply launch the program, select the device in the sidebar, choose the folder where the files should be saved, and wait for the list of photos to load.
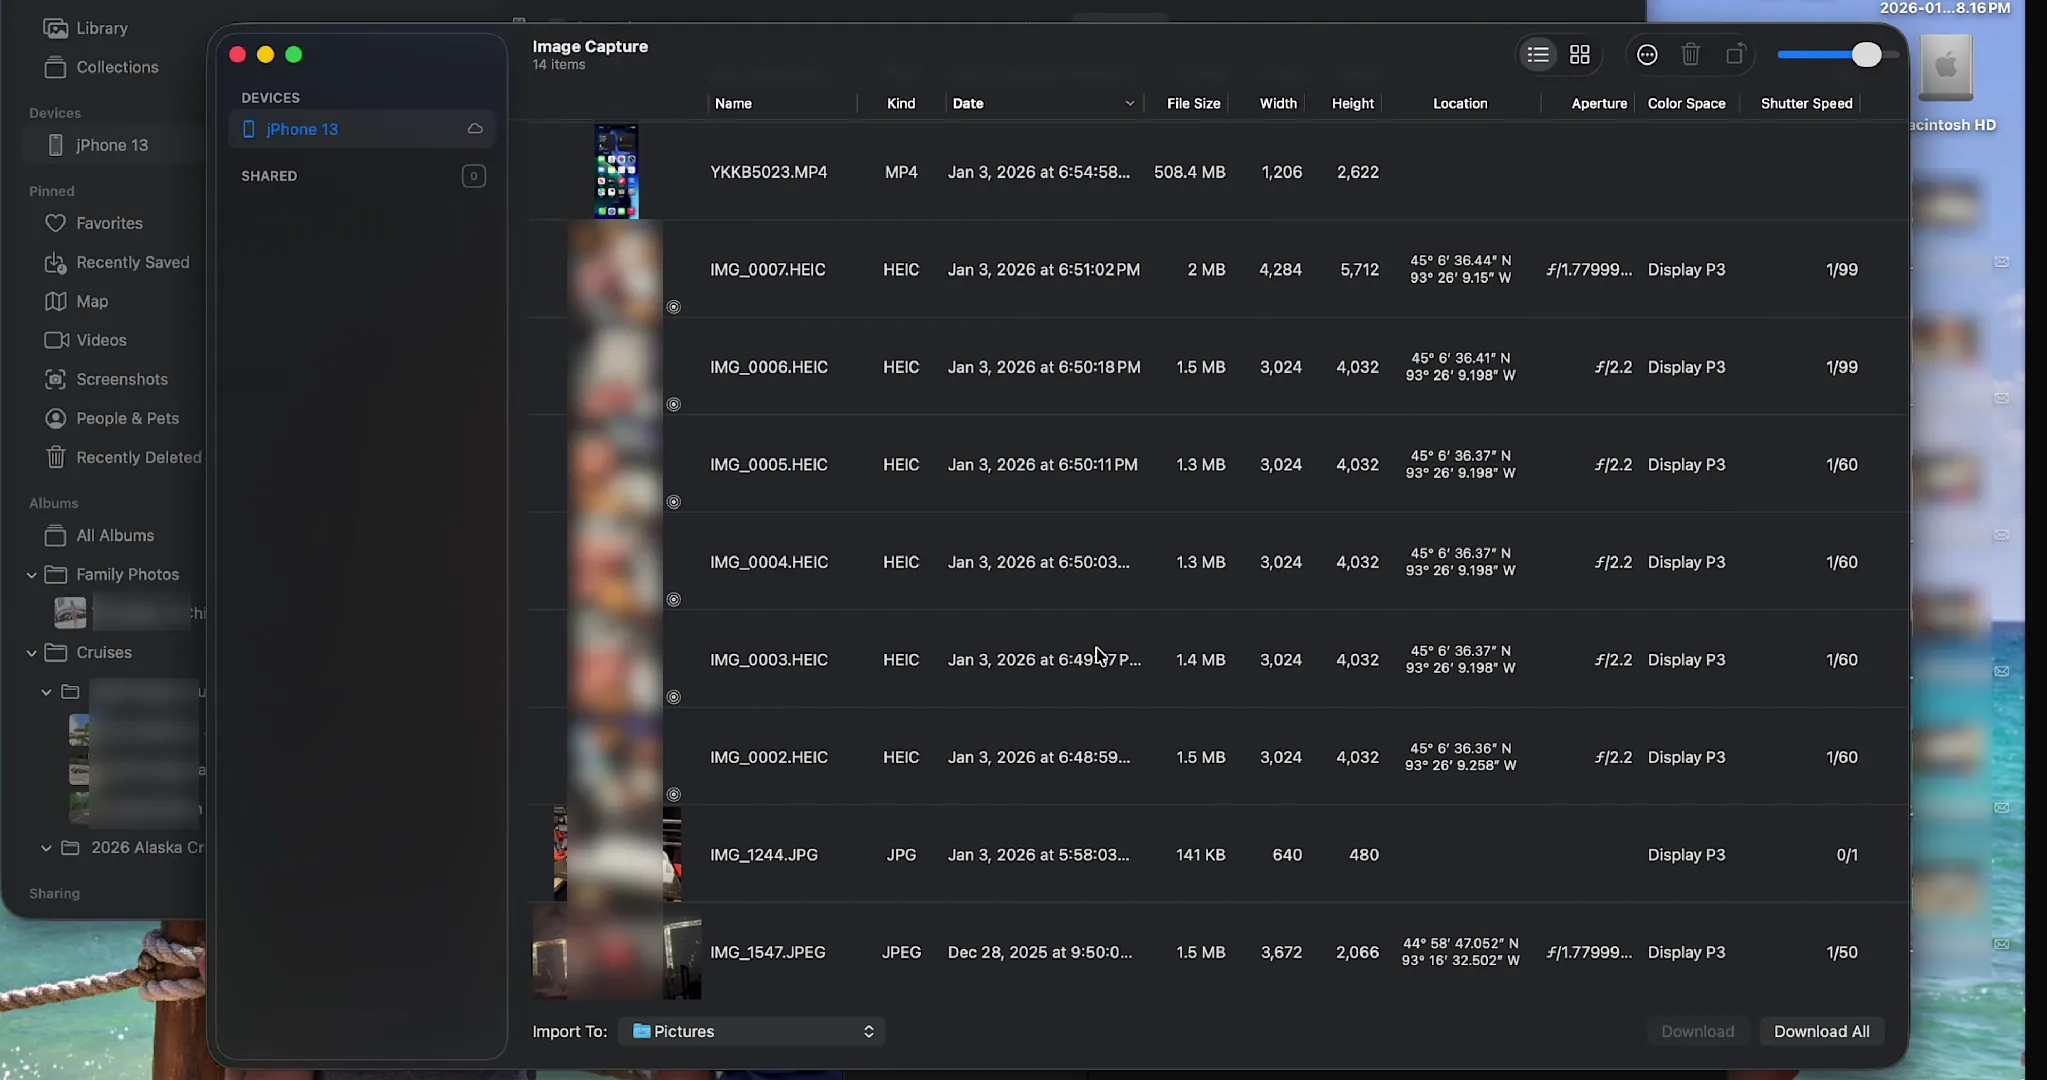
I prefer using Image Capture instead of standard copying through Finder because it immediately displays all photos and videos stored on the device. This allows me to quickly review their contents and basic metadata.
Then, depending on the situation, I click “Download All” to import all images or select only the ones I want to transfer to the Mac.
Transferring Photos from iPhone to Mac via iCloud
When I have access to a stable internet connection, I use iCloud to transfer photos from my iPhone to my Mac. This method is convenient because there is no need to connect the phone with a cable or manually copy files. You only need to set up synchronization once, and after that new photos appear on the Mac automatically.
First, I made sure that the iPhone and MacBook were signed in to the same Apple ID. Then I enabled iCloud Photos on both devices. After that, the images gradually started uploading to the cloud and syncing between devices.
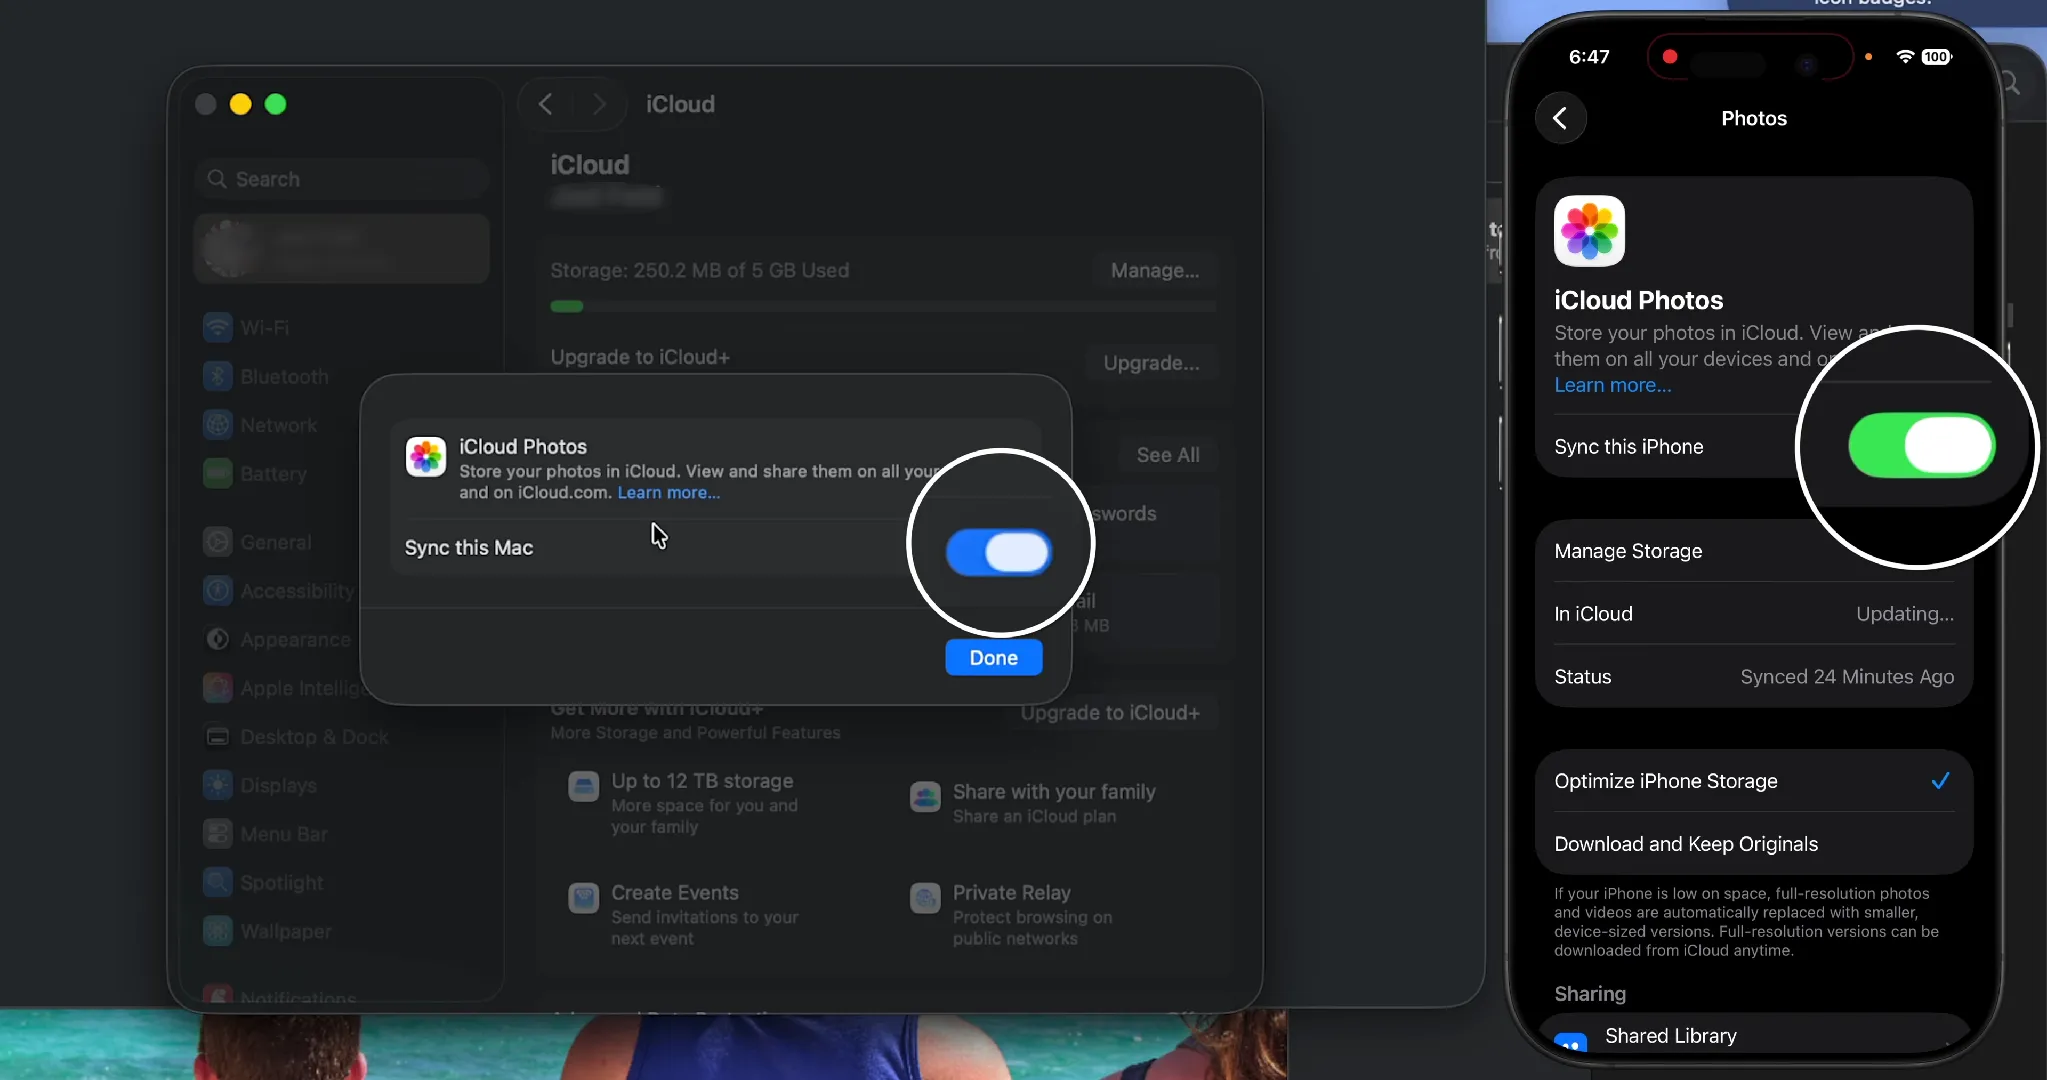
After that, I open the Photos app on the Mac, go to settings, and enable iCloud synchronization. In the additional settings, I choose “Download Originals to this Mac” so that all photos are stored on the laptop in original quality.
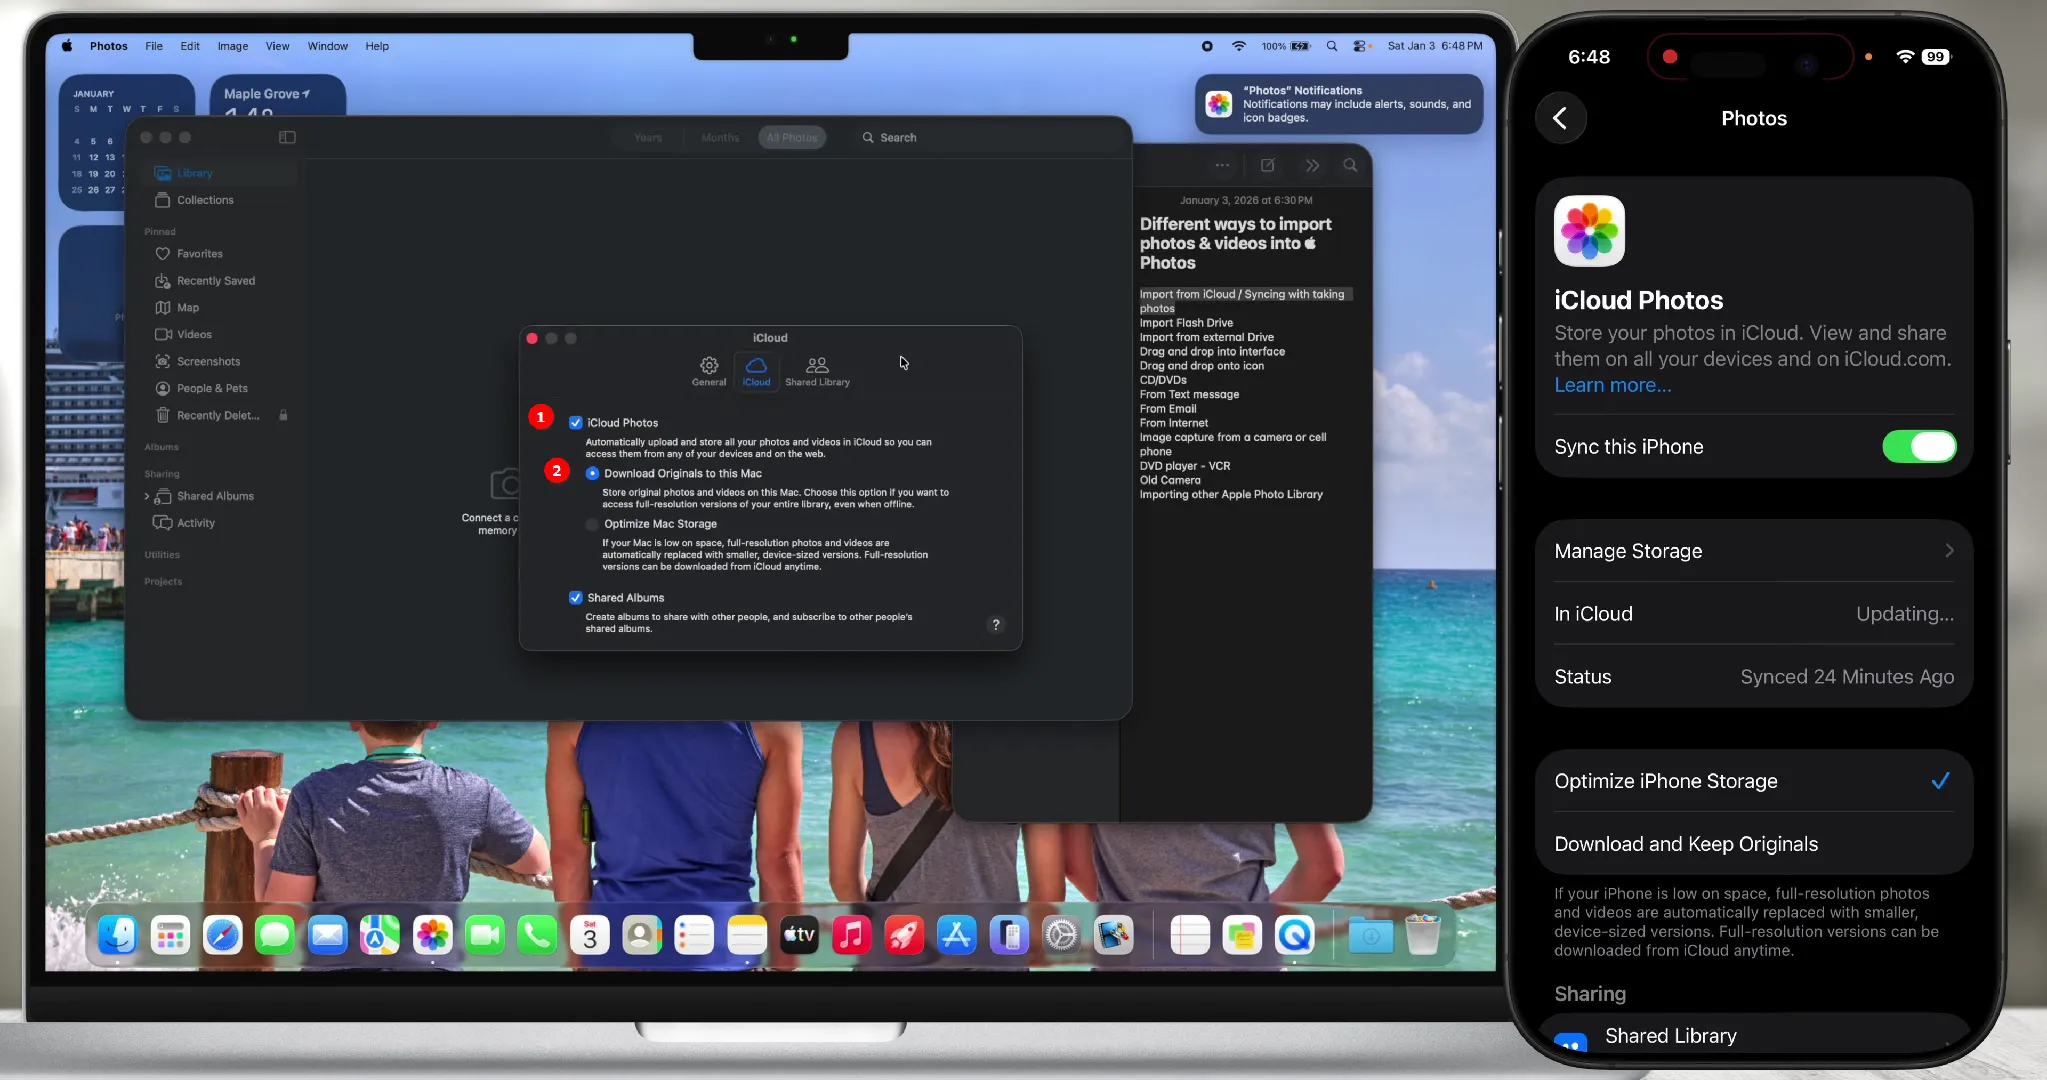
After the setup is complete, all photos automatically appear on the MacBook. For me, this turned out to be a convenient solution: the laptop is used as the main place for storing originals, while iCloud ensures synchronization between devices and serves as backup storage. The only thing I had to pay attention to was having enough free space both on the MacBook and in iCloud, because a large media library fills up storage very quickly.
If, like me, you have a small SSD in your laptop, choose the “Optimize Mac Storage” option. Only lightweight previews will remain on the computer, while originals will be downloaded from the cloud when needed.
Difficulties Importing Photos from Android to Mac
The first time I connected my wife's Android smartphone to a Mac with a cable, it seemed like an impossible task. You plug in the cable, and macOS simply pretends that nothing has happened.
As it turned out, the problem is that Mac does not natively support connecting Android devices over cable using the standard Media Transfer Protocol (MTP). As far as I understand, this is related both to Apple's reluctance to use competitors' technologies (MTP was developed by Microsoft) and to security considerations. The issue is that this protocol provides access to almost the entire internal storage of the smartphone (except Android system files), which can potentially increase the risk of spreading malware.
Fortunately, Android remains a more open and universal platform. When connecting the phone with a cable, you need to pull down the notification shade, tap “USB charging,” and switch the mode to PTP (Photo Transfer). In this mode, Android starts pretending to be a regular digital camera.
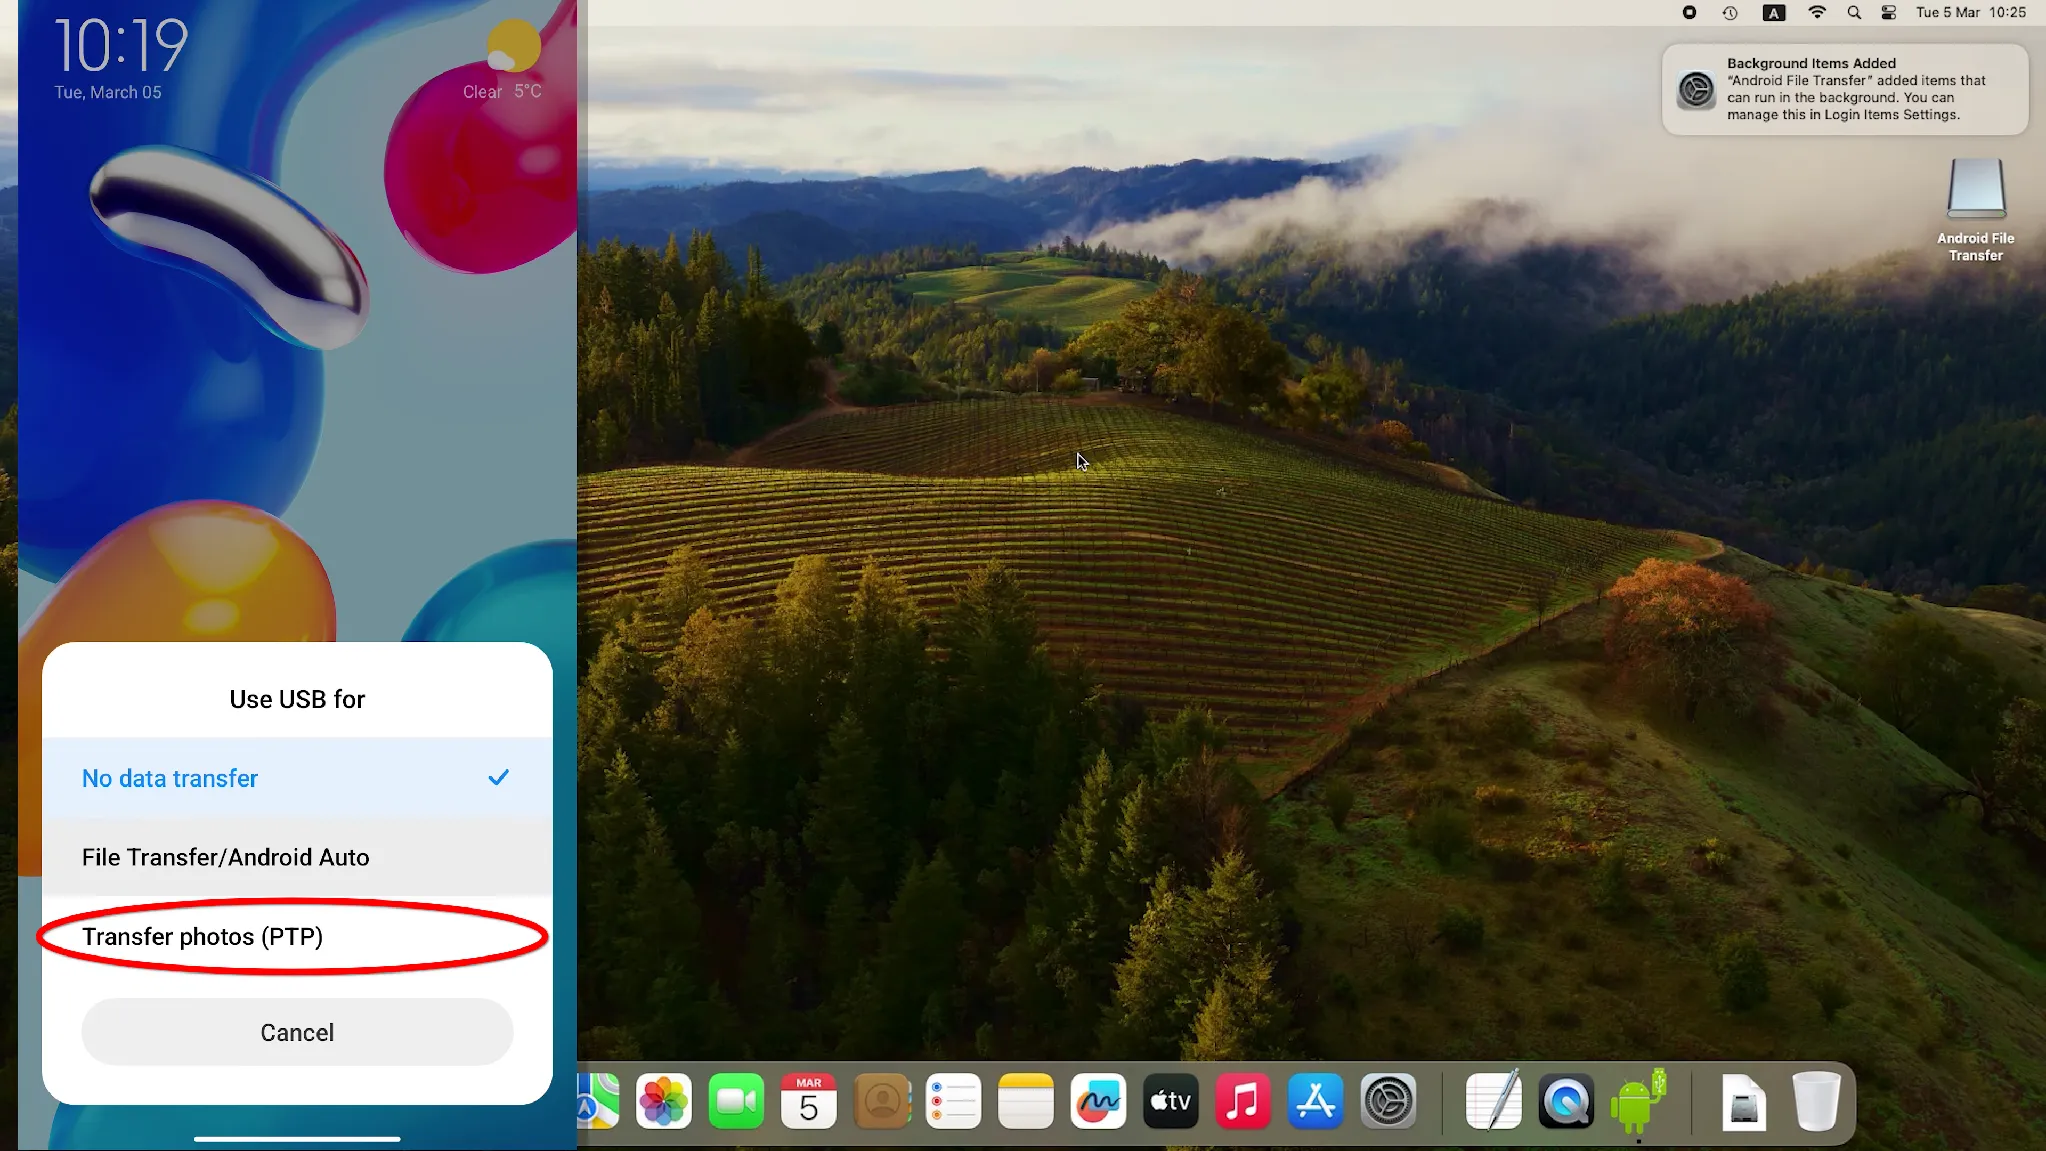
After that, macOS immediately opens the built-in Photos or Image Capture app and offers to import the images.
I would like to note that owners of modern Samsung flagship smartphones (Galaxy S26 / S26+ / S26 Ultra, Galaxy Z Fold 7 / Z Flip 7) can transfer photos to Mac via AirDrop thanks to a modified version of the Quick Share feature.

In addition to the latest Samsung phone models, this technology is available on Google Pixel 9 and 10. Such a limited number of devices is due to the complexity of implementing AirDrop compatibility. It requires not only special software, but also hardware-level support.
If AirDrop is not available and you do not want to deal with cables, I recommend using the LocalSend app. It is free and transfers files over a secure local Wi-Fi network using end-to-end TLS encryption. The only requirement is that the app must be installed and running on both devices.

Removing Duplicate Photos on Mac
When consolidating photos from different devices, there will inevitably be images duplicated across different folders. At first glance, this may seem insignificant, but in practice such copies can grow to an enormous size, taking up a significant amount of free space. This is especially true for unprocessed RAW negatives. That is why I remove duplicates immediately after every large import.
How to Remove Duplicate Photos in Photos
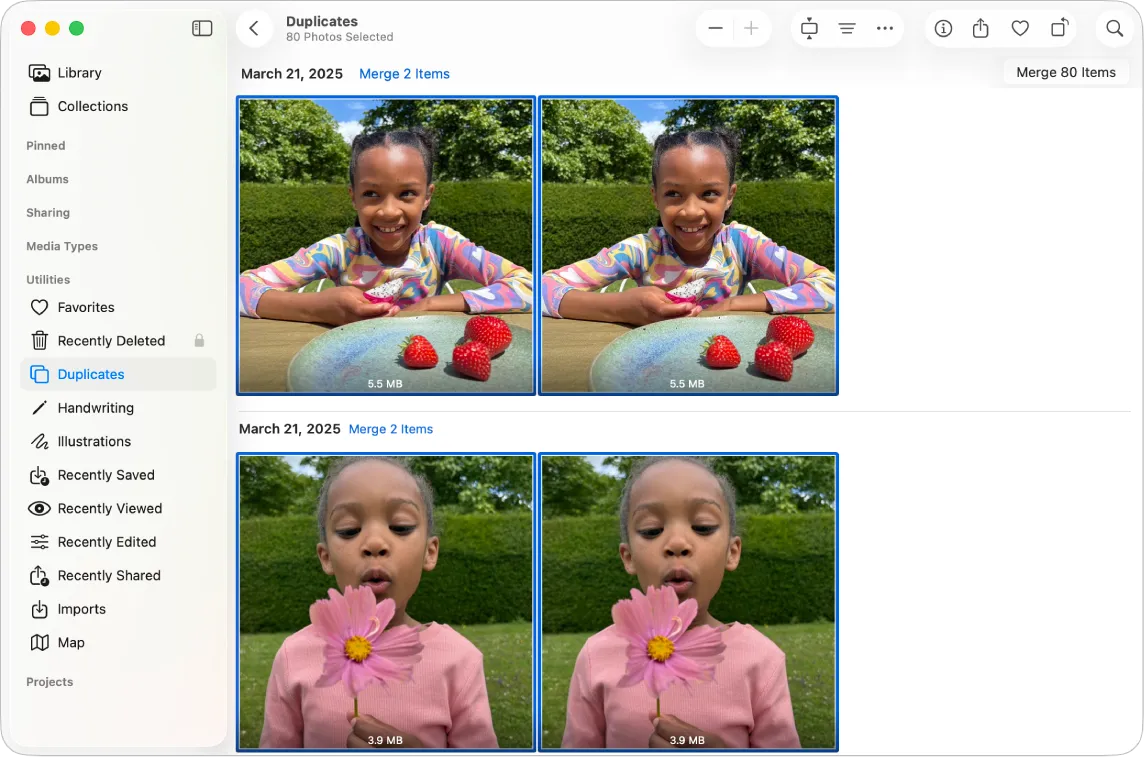
I like the way the built-in duplicate finder in Photos works. It uses machine learning algorithms to compare the visual structure of images, which provides high accuracy in identifying identical frames. The entire detection process runs independently in the background. All I need to do is review the list of found duplicates in the “Utilities” – “Duplicates” section of Apple Photos.
Removing Similar Photos with PhotoSweeper
The built-in duplicate detection tool in Photos does its job well, but in practice, a real photo archive more often contains not exact duplicates, but similar photos. For example, a burst of ten shots, several versions of the same scene with different exposure, edited images, or photos imported at different resolutions.
For this, I use the third-party utility PhotoSweeper. It is paid, but it is worth every cent.
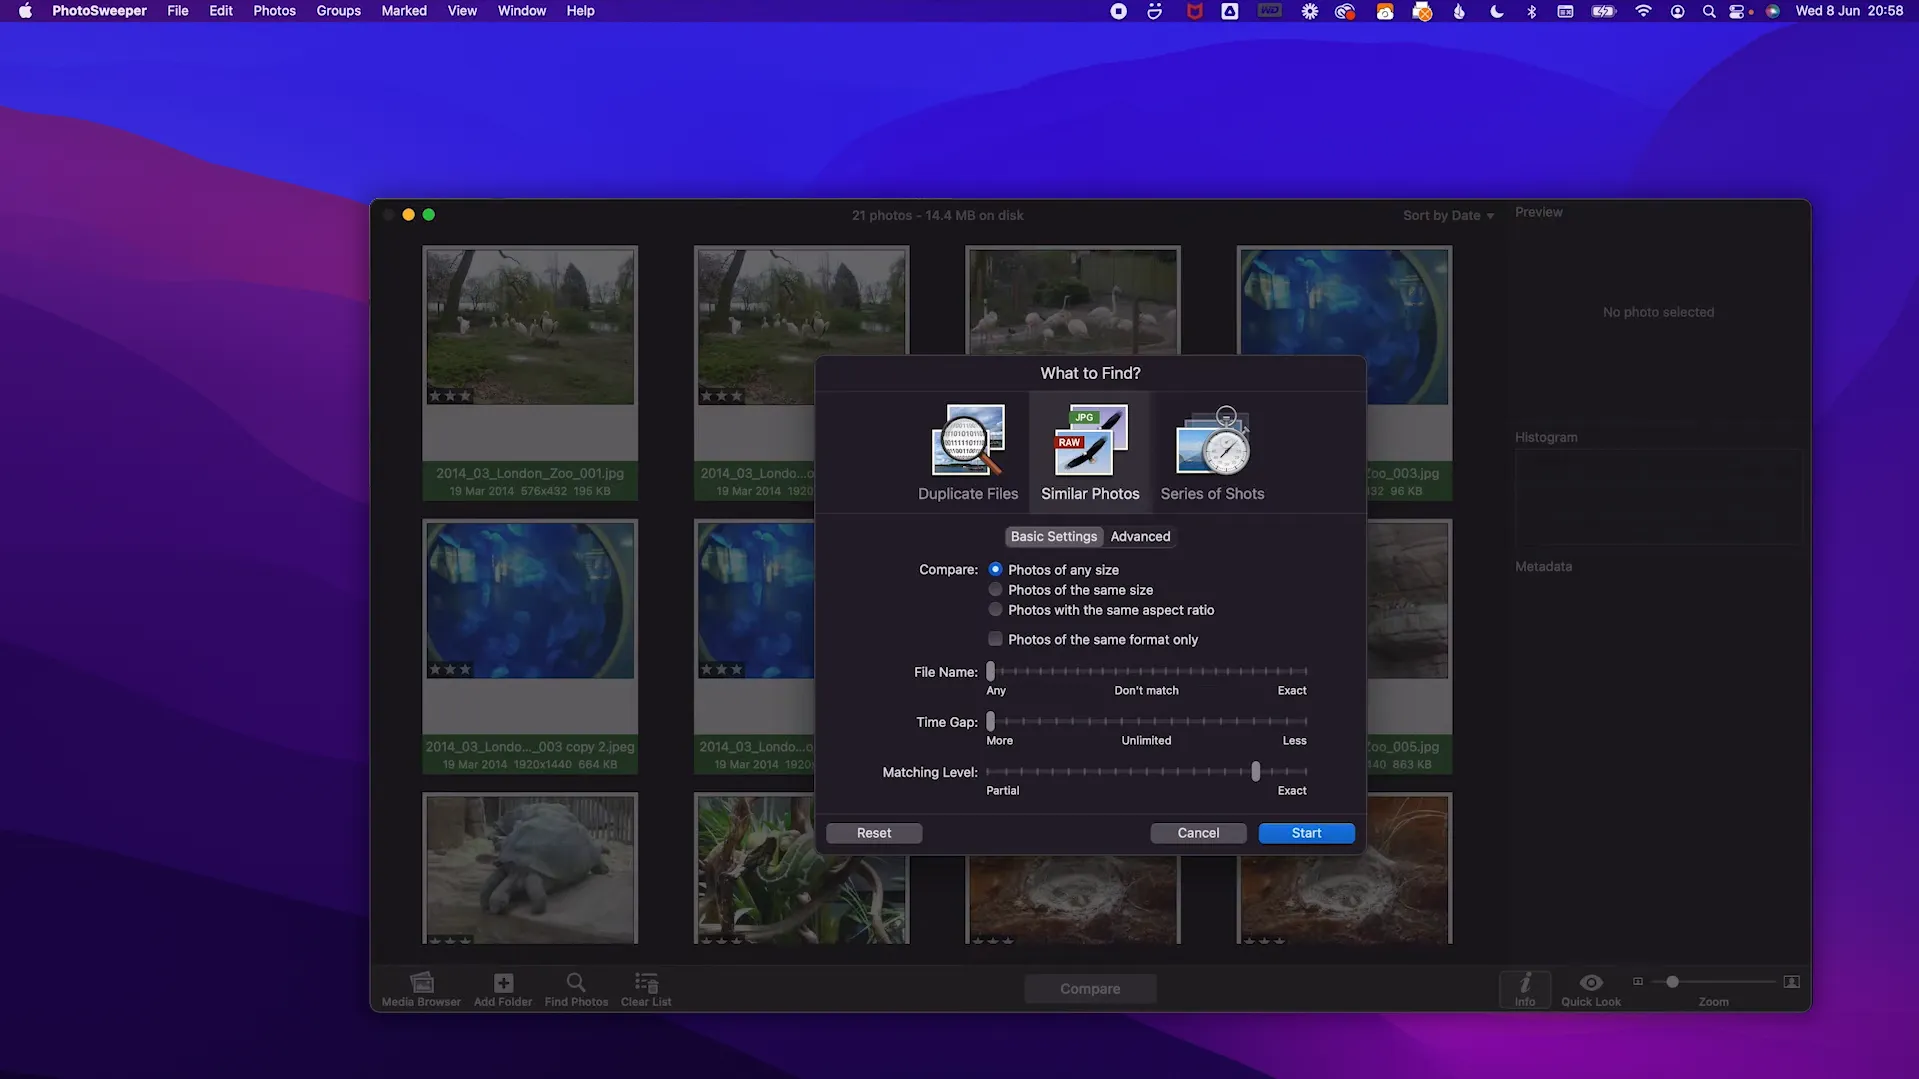
Working with the program takes only a few minutes.
Launch PhotoSweeper and add the folders or libraries you want to check.
Choose the comparison mode. For most users, the similar photo search mode will be suitable.
Adjust the sensitivity level if necessary. The higher the value, the more similar photos will be found.
Click Compare and wait for the analysis to finish.
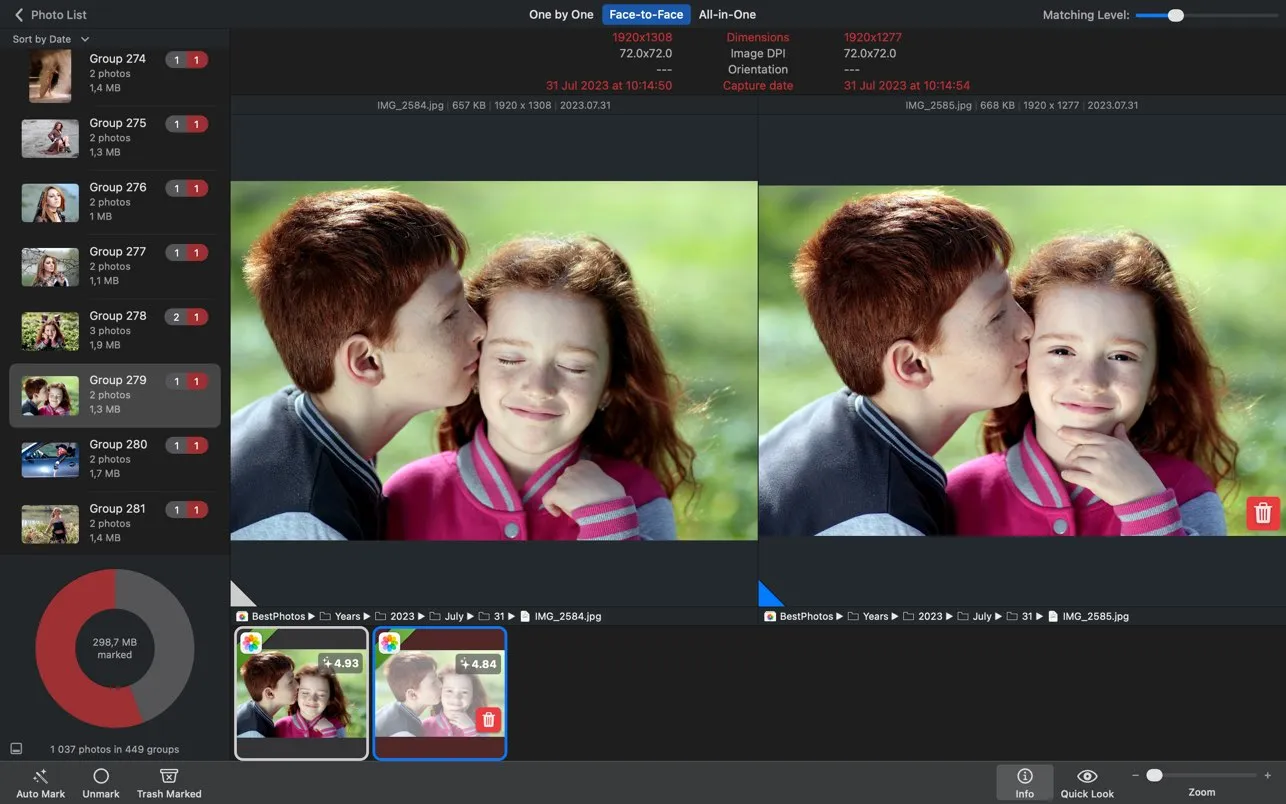
Review the groups of photos found. PhotoSweeper automatically highlights the best shot, while the others can be deleted or moved to the Trash.
It is worth noting that the program does not delete anything automatically. It highlights the sharpest and most successful frame and suggests marking the rest for deletion. This allowed me to free up about 40 GB of disk space in one evening.
Sorting Photos on Mac
Apple Photos is a truly powerful tool for organizing photos on Mac, with face recognition and contextual understanding features. The problem is that what the user sees in the application interface is not the same as what is stored on the laptop's disk.
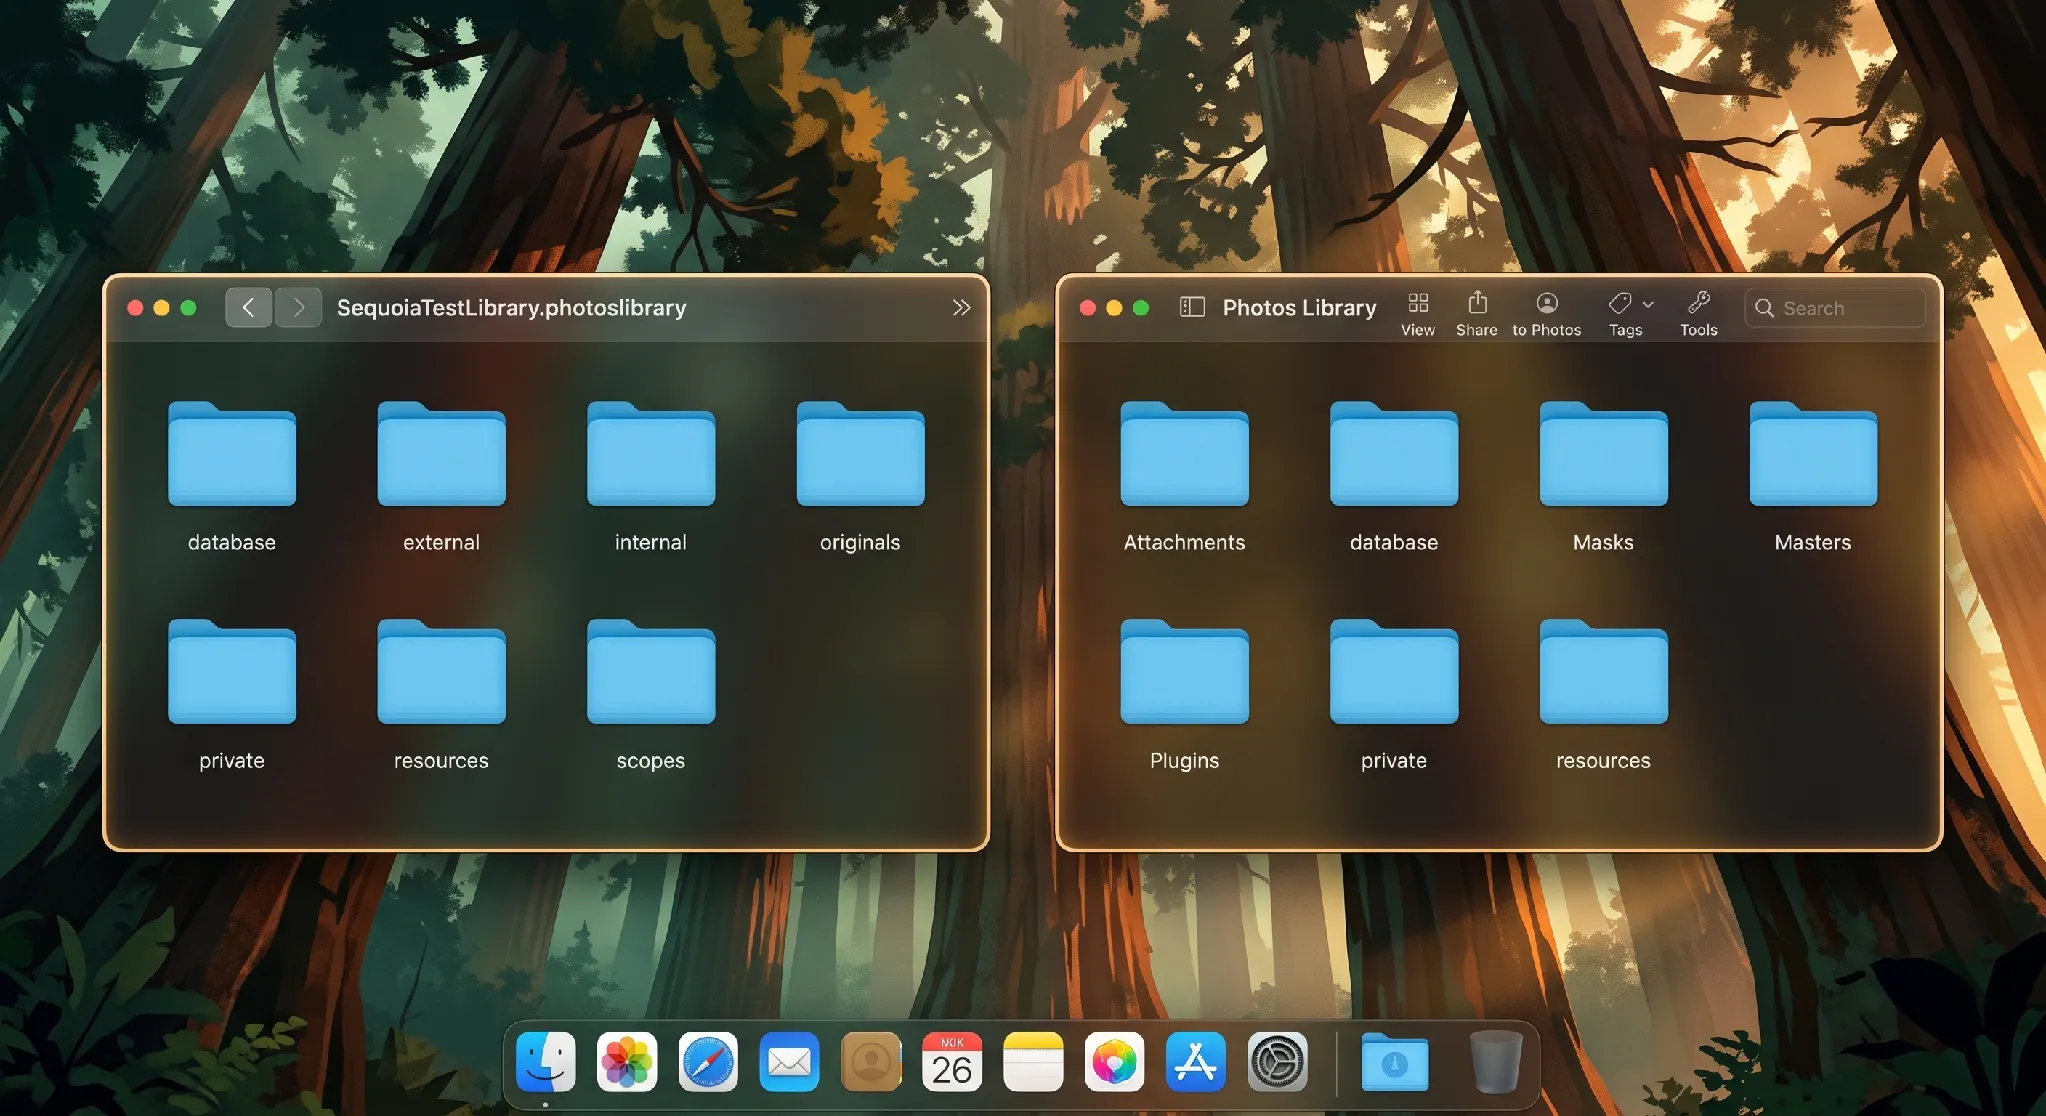
By default, the media library is created in your home folder at the following path:
~ / Users / [Your_User_Name] / Pictures / Photos Library.photoslibrary
If you want to see what is hidden inside this “file,” right-click it in Finder and choose “Show Package Contents.” Inside, there is a complex folder structure created to optimize the database's performance.
Originals. This is where original photos and videos are stored in the form in which they were imported (without compression, in original resolution, and with EXIF data preserved). However, instead of being sorted by date, the images are distributed across subfolders named from 0 to 9 and from A to F.
Resources. This is used to store temporary files needed for fast application performance. For example, reduced copies (previews) of photos that enable quick previewing while saving processor resources and battery power.
Database. This contains SQLite databases storing information about all albums, folders, and their structure created in the interface; information about faces (recognition results), geolocation, and keywords.
It is also worth mentioning the file names used inside Photos. The program renames files into unique alphanumeric identifiers (UUIDs), for example, A1B2C3D4-E5F6-....jpg. This is done to avoid conflicts when two different photos with the same name are uploaded (for example, IMG_0001.jpg).
Of course, if you live entirely within the Apple ecosystem, such a complex folder organization inside the Photos app does not create problems. In that case, you work calmly with a clear interface, while iCloud is used as backup storage. Problems begin when you want to use a third-party cloud service or another storage device (external drive or NAS) as permanent or backup storage.
It is especially dangerous if the database becomes corrupted: you will end up with a pile of files with strange names scattered across hundreds of folders without any logic. Extracting them manually in a normal form would be a nightmare.
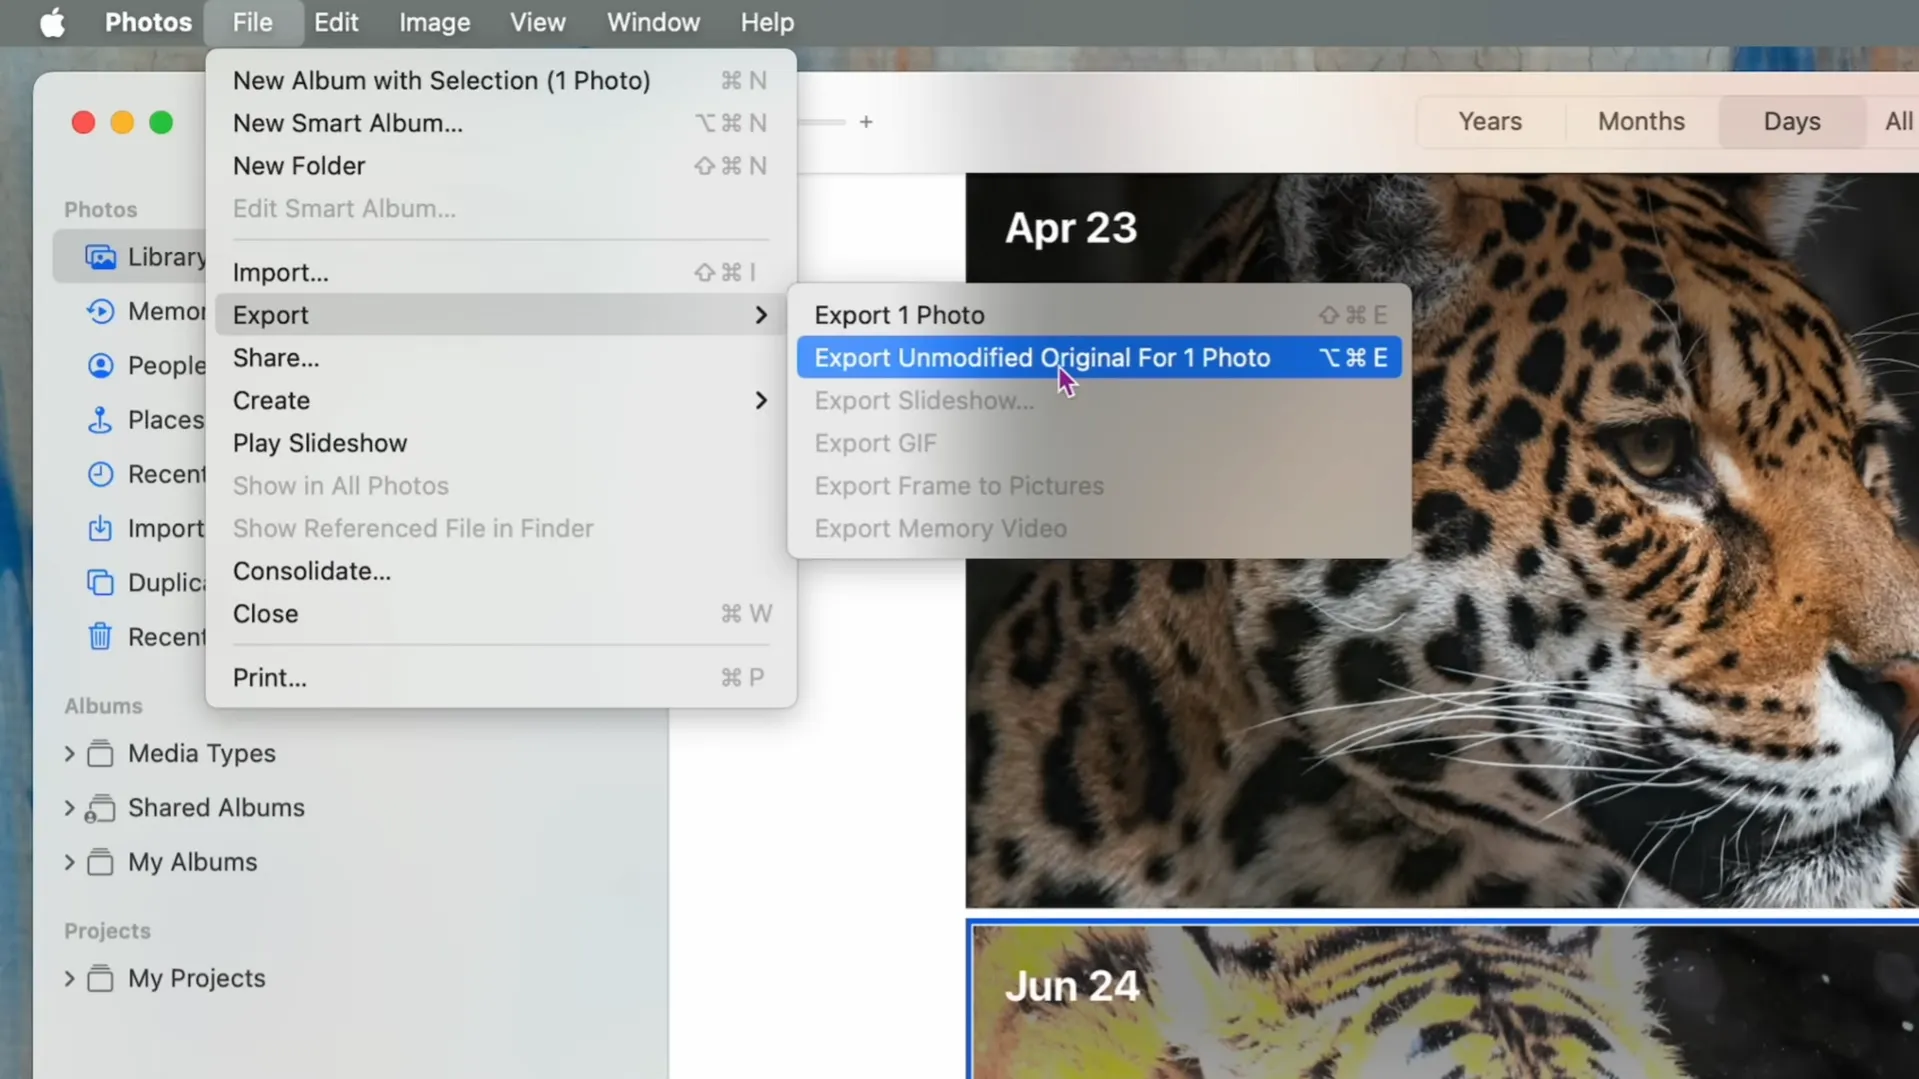
For any program to work with photos from the Photos library, they must first be exported. Fortunately, Apple provides a dedicated tool for this.
Open Apple Photos and select the desired photos (or press Cmd + A to select everything). In the top menu, choose: “File” – “Export” – “Export Unmodified Original.”
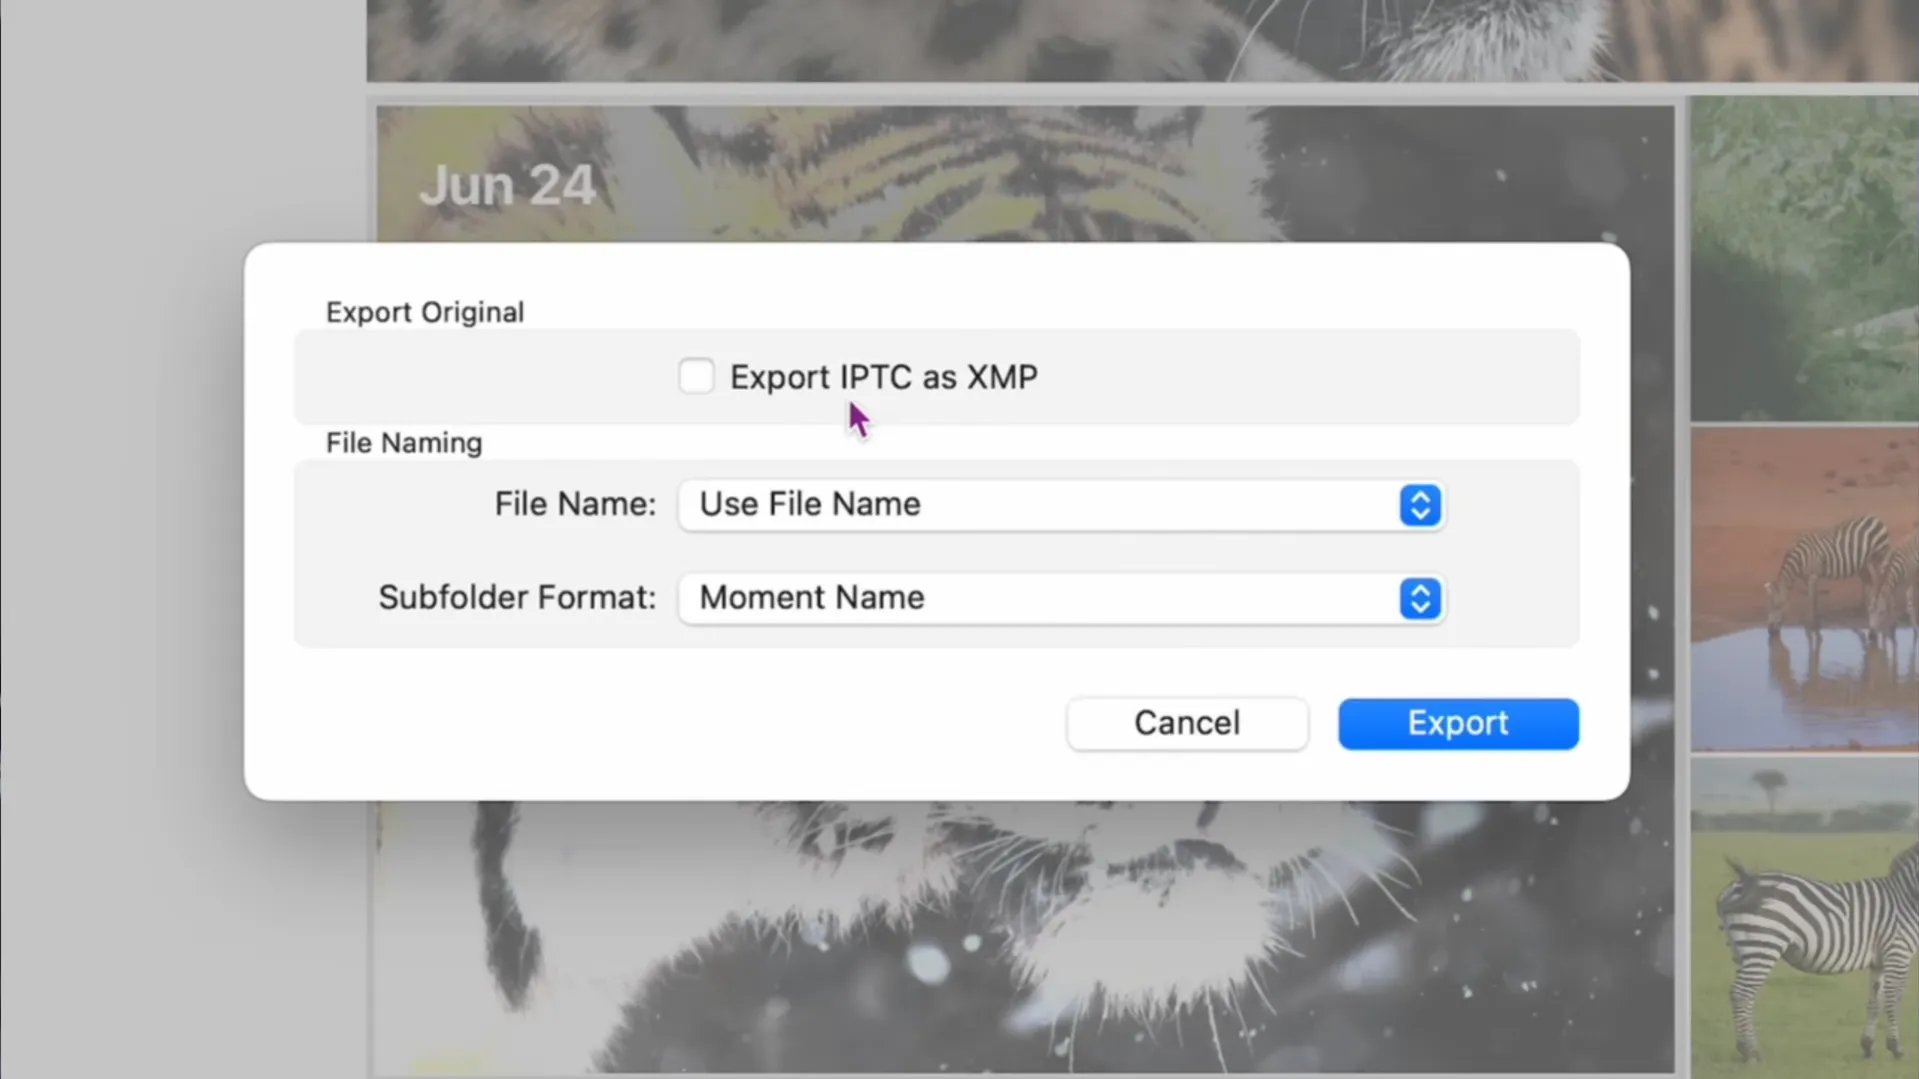
In the settings window that opens, pay attention to the “Subfolder Format” item, where you need to select Moment Name. This tells the program to automatically arrange photos into folders according to the date and place of shooting.
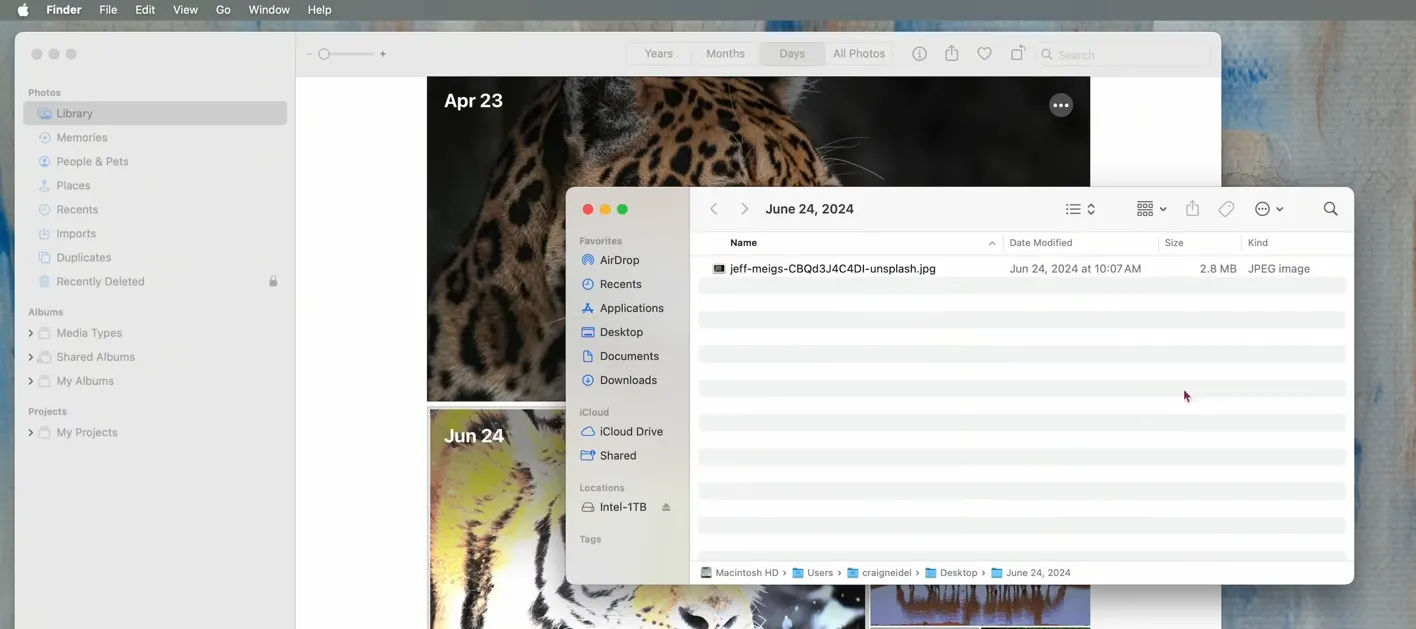
Exported photo files get back the original names they had before being added to the Photos library.
Culling Photos on Mac
During any family celebration, vacation, or walk, taking multiple similar photos is normal. Among them, there are blurry images, accidental shots of the ground or sky, frames with closed eyes, incorrect exposure, missed autofocus, digital noise, or other technical defects. There is no point in keeping them.
The main task of culling is to leave only the photos that truly convey the event. Instead of fifty almost identical frames, it is enough to keep five to ten of the best ones that reveal the atmosphere, emotions, and key moments. This approach makes the photo archive more compact and easier to browse.
The practical side is no less important. The fewer failed shots there are in the library, the easier it is to use search, work with face recognition, create albums, and find the necessary photos years later.
Unfortunately, macOS does not have a built-in tool for culling photos on Mac. You need to use third-party solutions.
ApolloOne is a free tool for quickly sorting large volumes of photos on Mac. Its high speed is achieved by not using a separate library with a database and instead working directly with photo files in the computer's file system.
There are two methods available for culling photos: rating and color labels. The choice depends on personal preference.
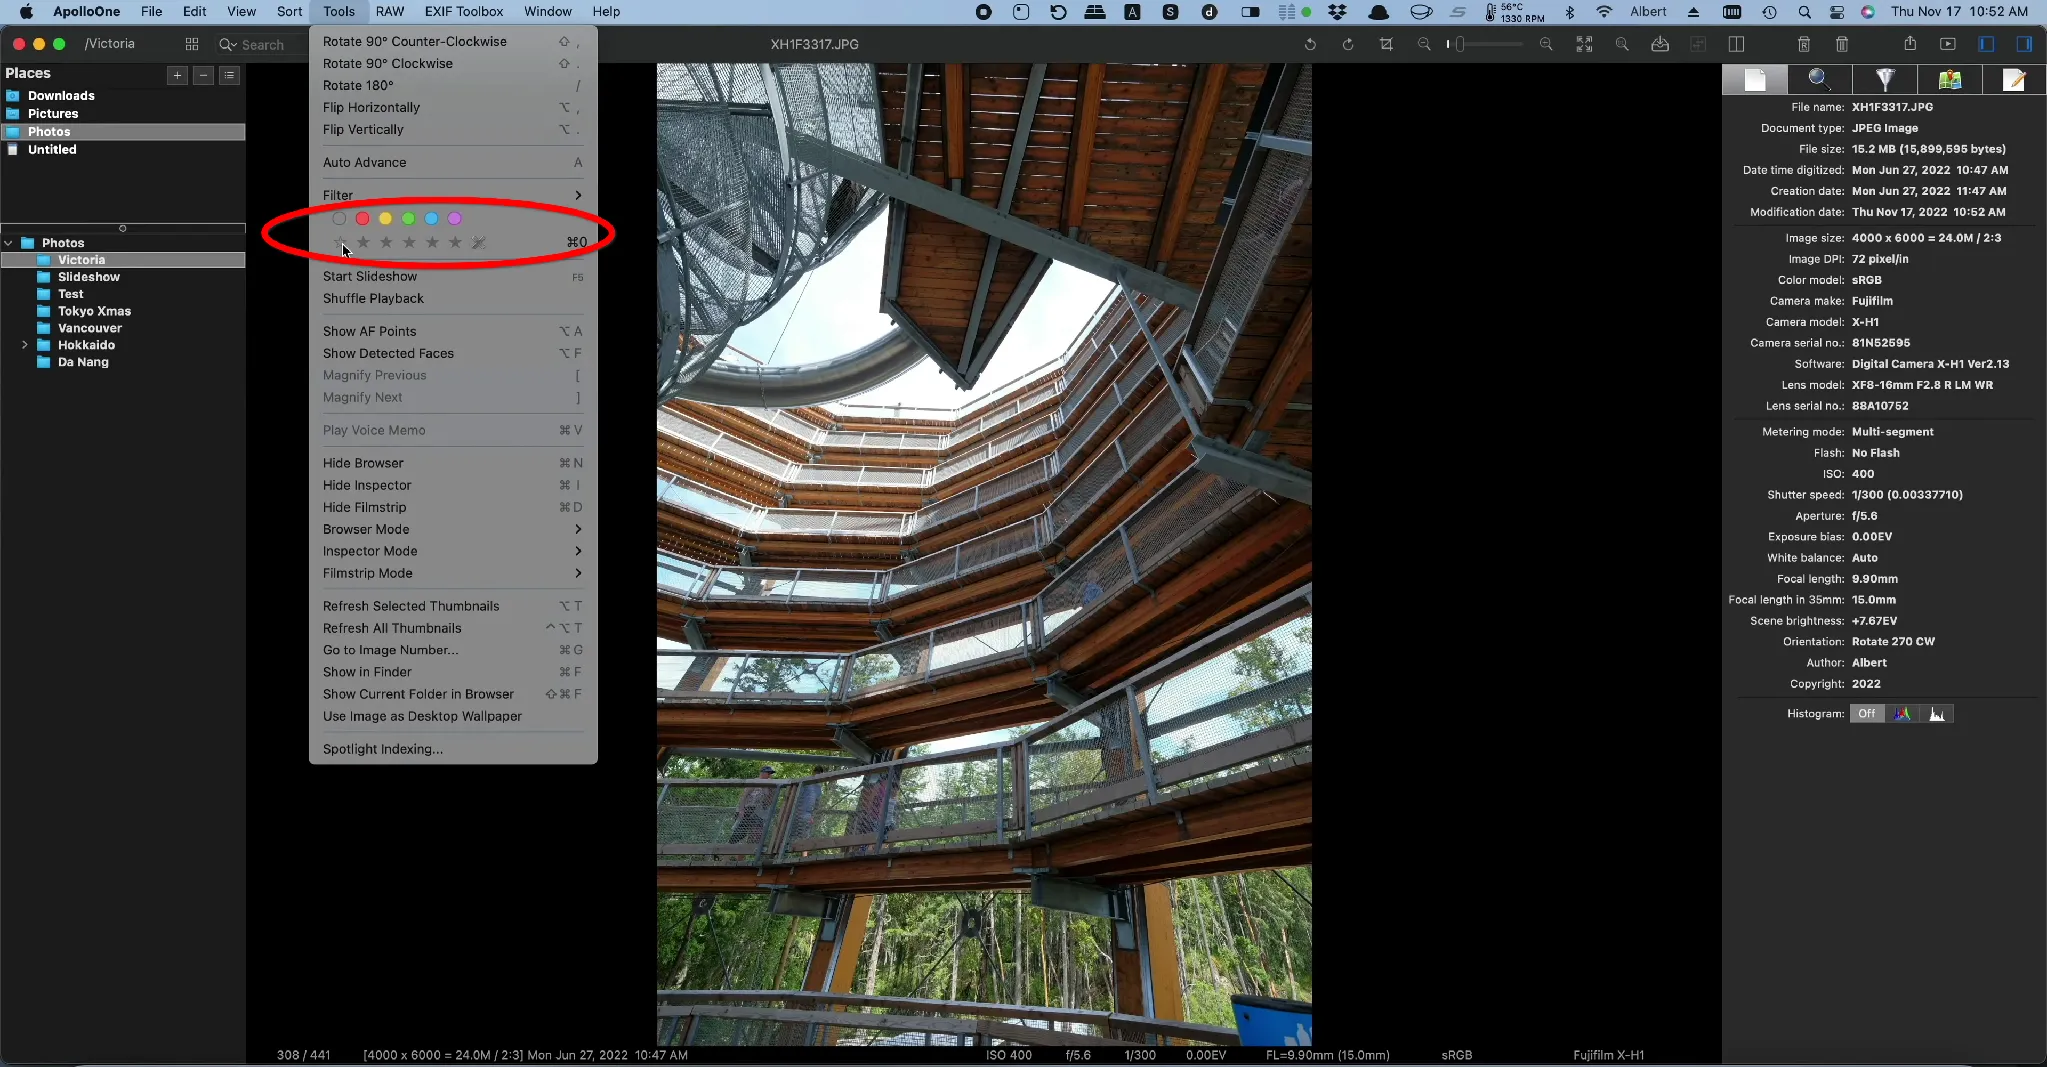
For example, I more often use star ratings because they support the Cmd + 1-5 hotkeys. Once the review is complete, I filter files by the corresponding label.

Tagging Photos on MacBook
Tagging is an important stage in organizing a digital photo archive on Mac. Unlike a traditional folder structure, which limits each file to only one physical location, tags create a flexible multidimensional system of meanings.
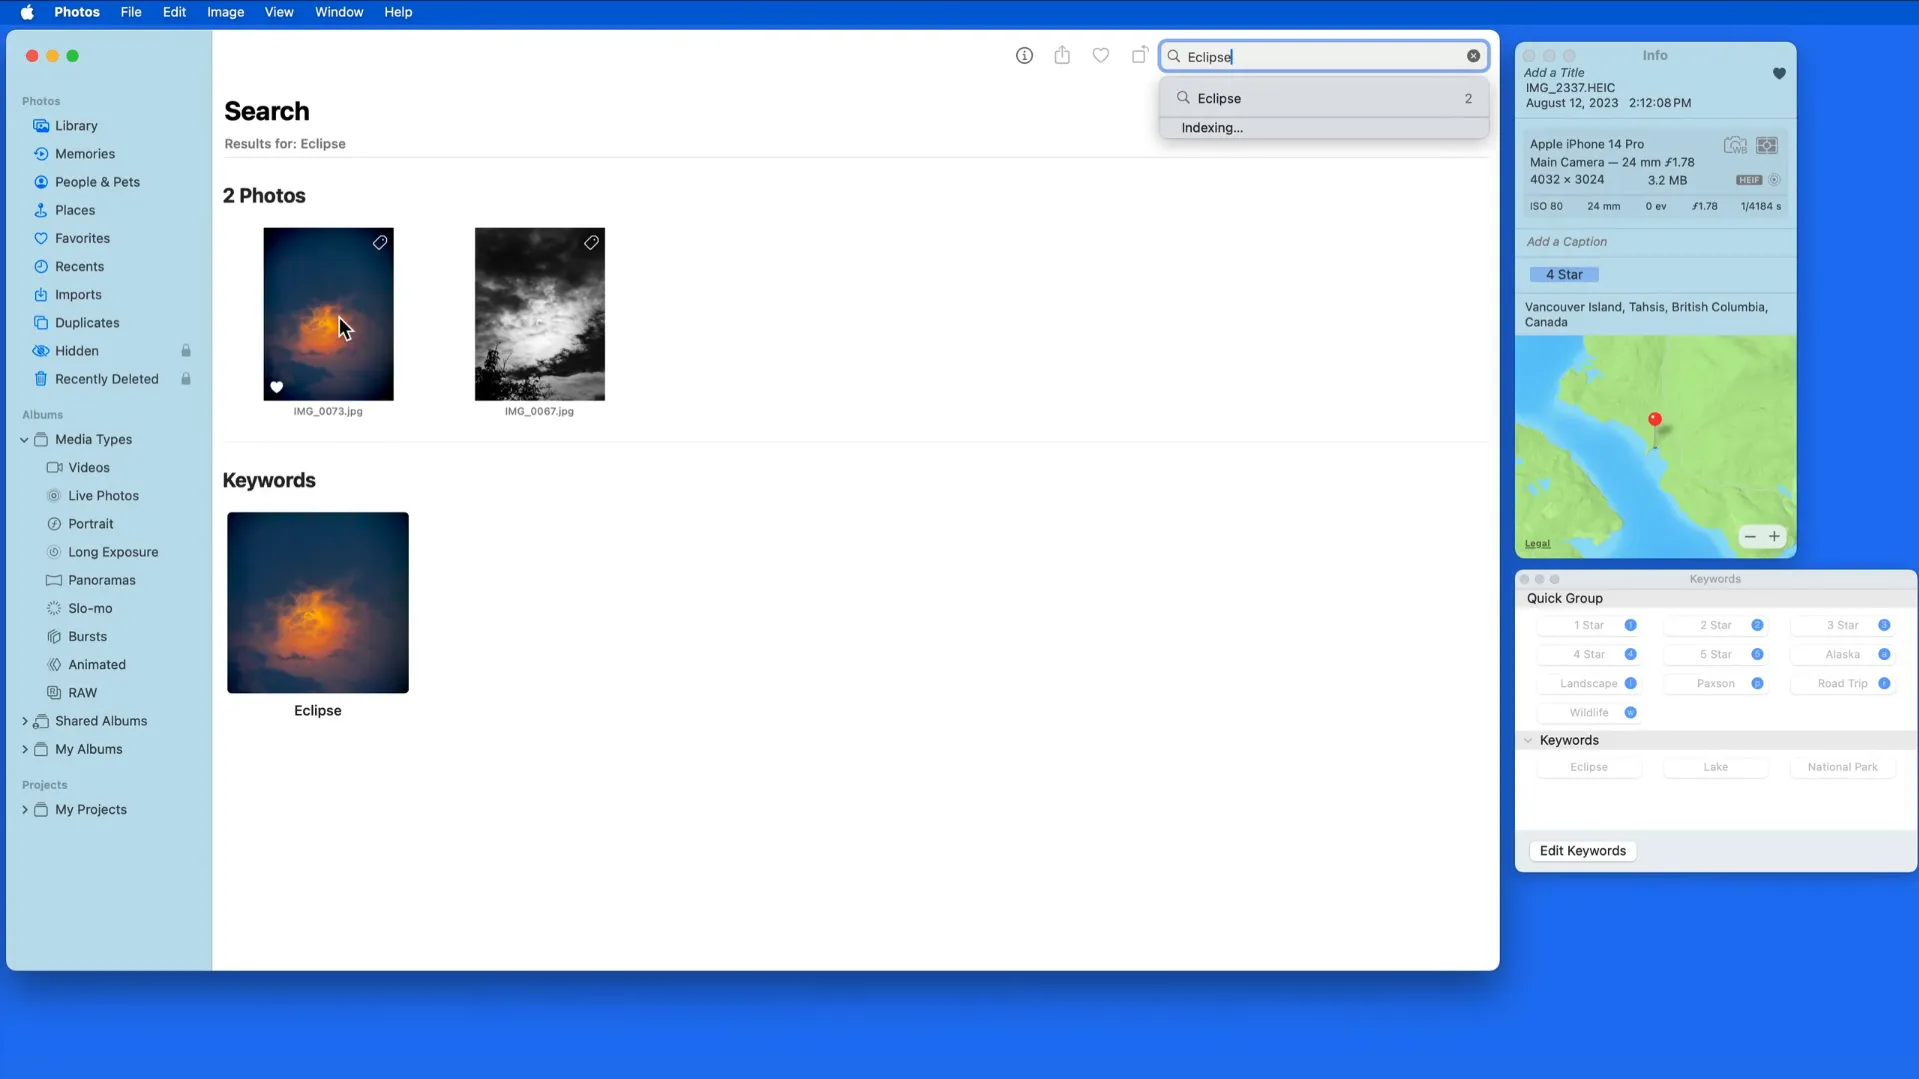
Apple Photos uses local neural networks to analyze images directly on the Mac, performing tasks such as face, scene, and object recognition. You do not even necessarily need to manually tag photos with words like “beach,” “cat,” “car,” or “sunset.” Just enter these words into search, and the Mac's built-in AI will automatically recognize them in the photos.
However, as with folder-based photo organization discussed earlier, the results of this automatic analysis are not written into the metadata of the files themselves. All information is stored exclusively in the internal Apple Photos database. This means that when photos are transferred to another program or platform, these automatically detected categories will not be preserved.
When I need to add tags that will be written directly into photo metadata, I use the “Keyword Manager” tool. It can be opened through the main Apple Photos menu.

After launch, a small floating window opens. Here I click “Edit Keywords” and create my own tags, for example: “Family,” “Travel,” “Work,” or “Documents.”
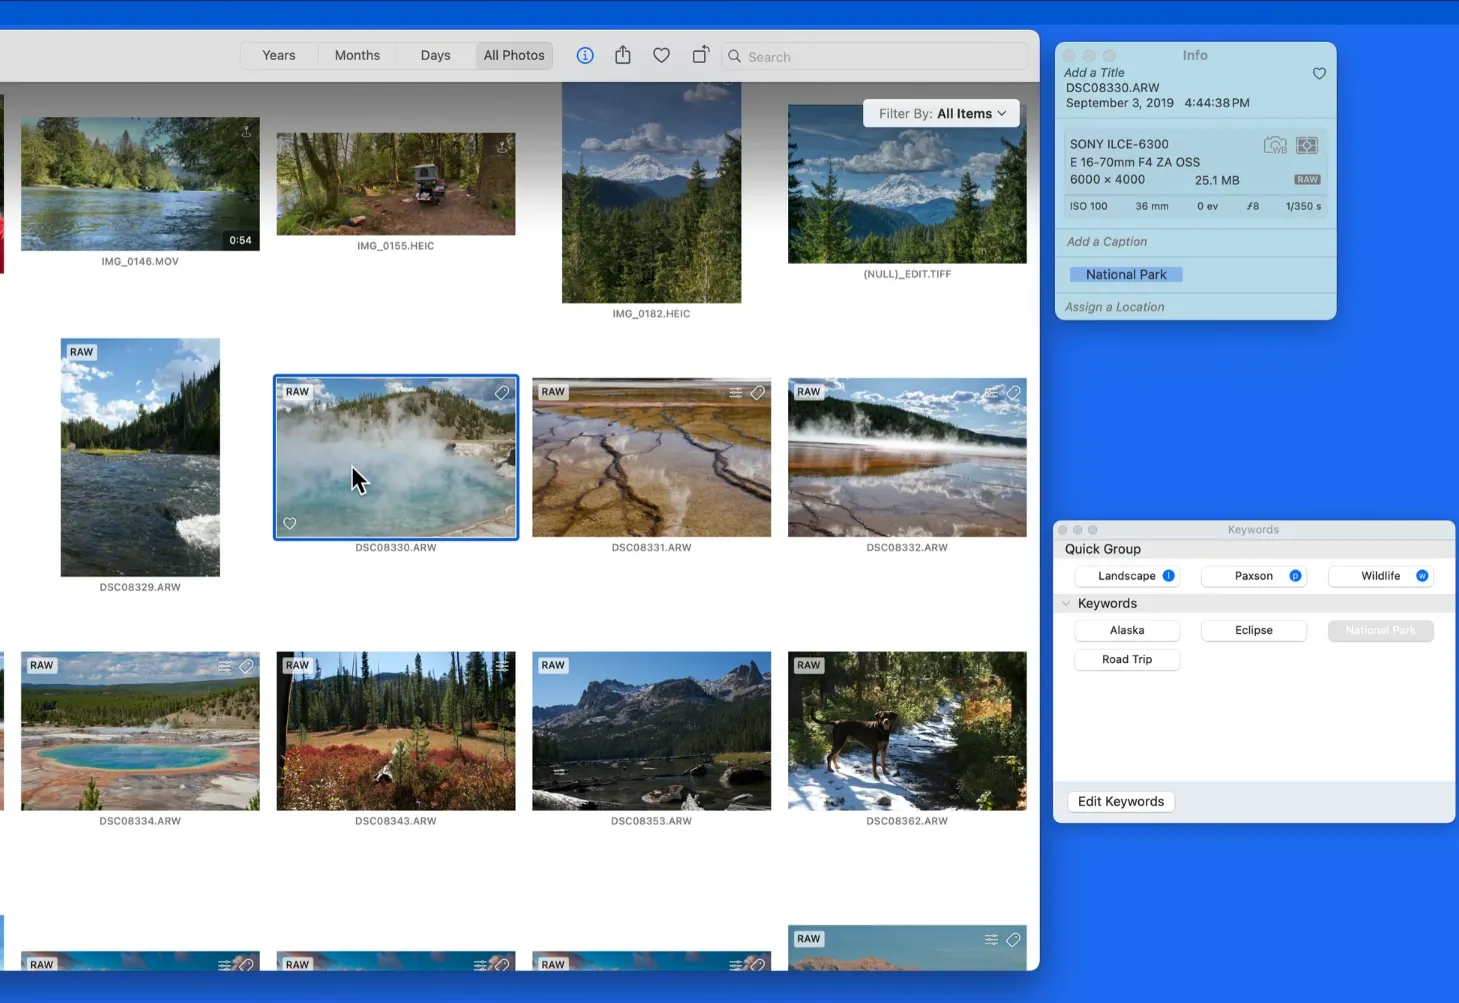
I try to describe the content of images as thoroughly as possible. The more accurately the keywords are chosen, the faster I can later find the necessary photos through search or automatically group them into smart albums.
A Comprehensive Approach to Organizing Photos
After getting familiar with individual macOS tools, I had the impression that each stage of organizing photos required its own program: one for importing, another for finding duplicates, and a third for sorting and culling. But in practice, it turned out that there are solutions that combine almost all the necessary functions in one place. I chose Tonfotos as my main tool because it allowed me to go through all stages of organizing my photo archive with almost no need to switch between different applications.
Importing and Creating a Photo Structure in Tonfotos on Mac
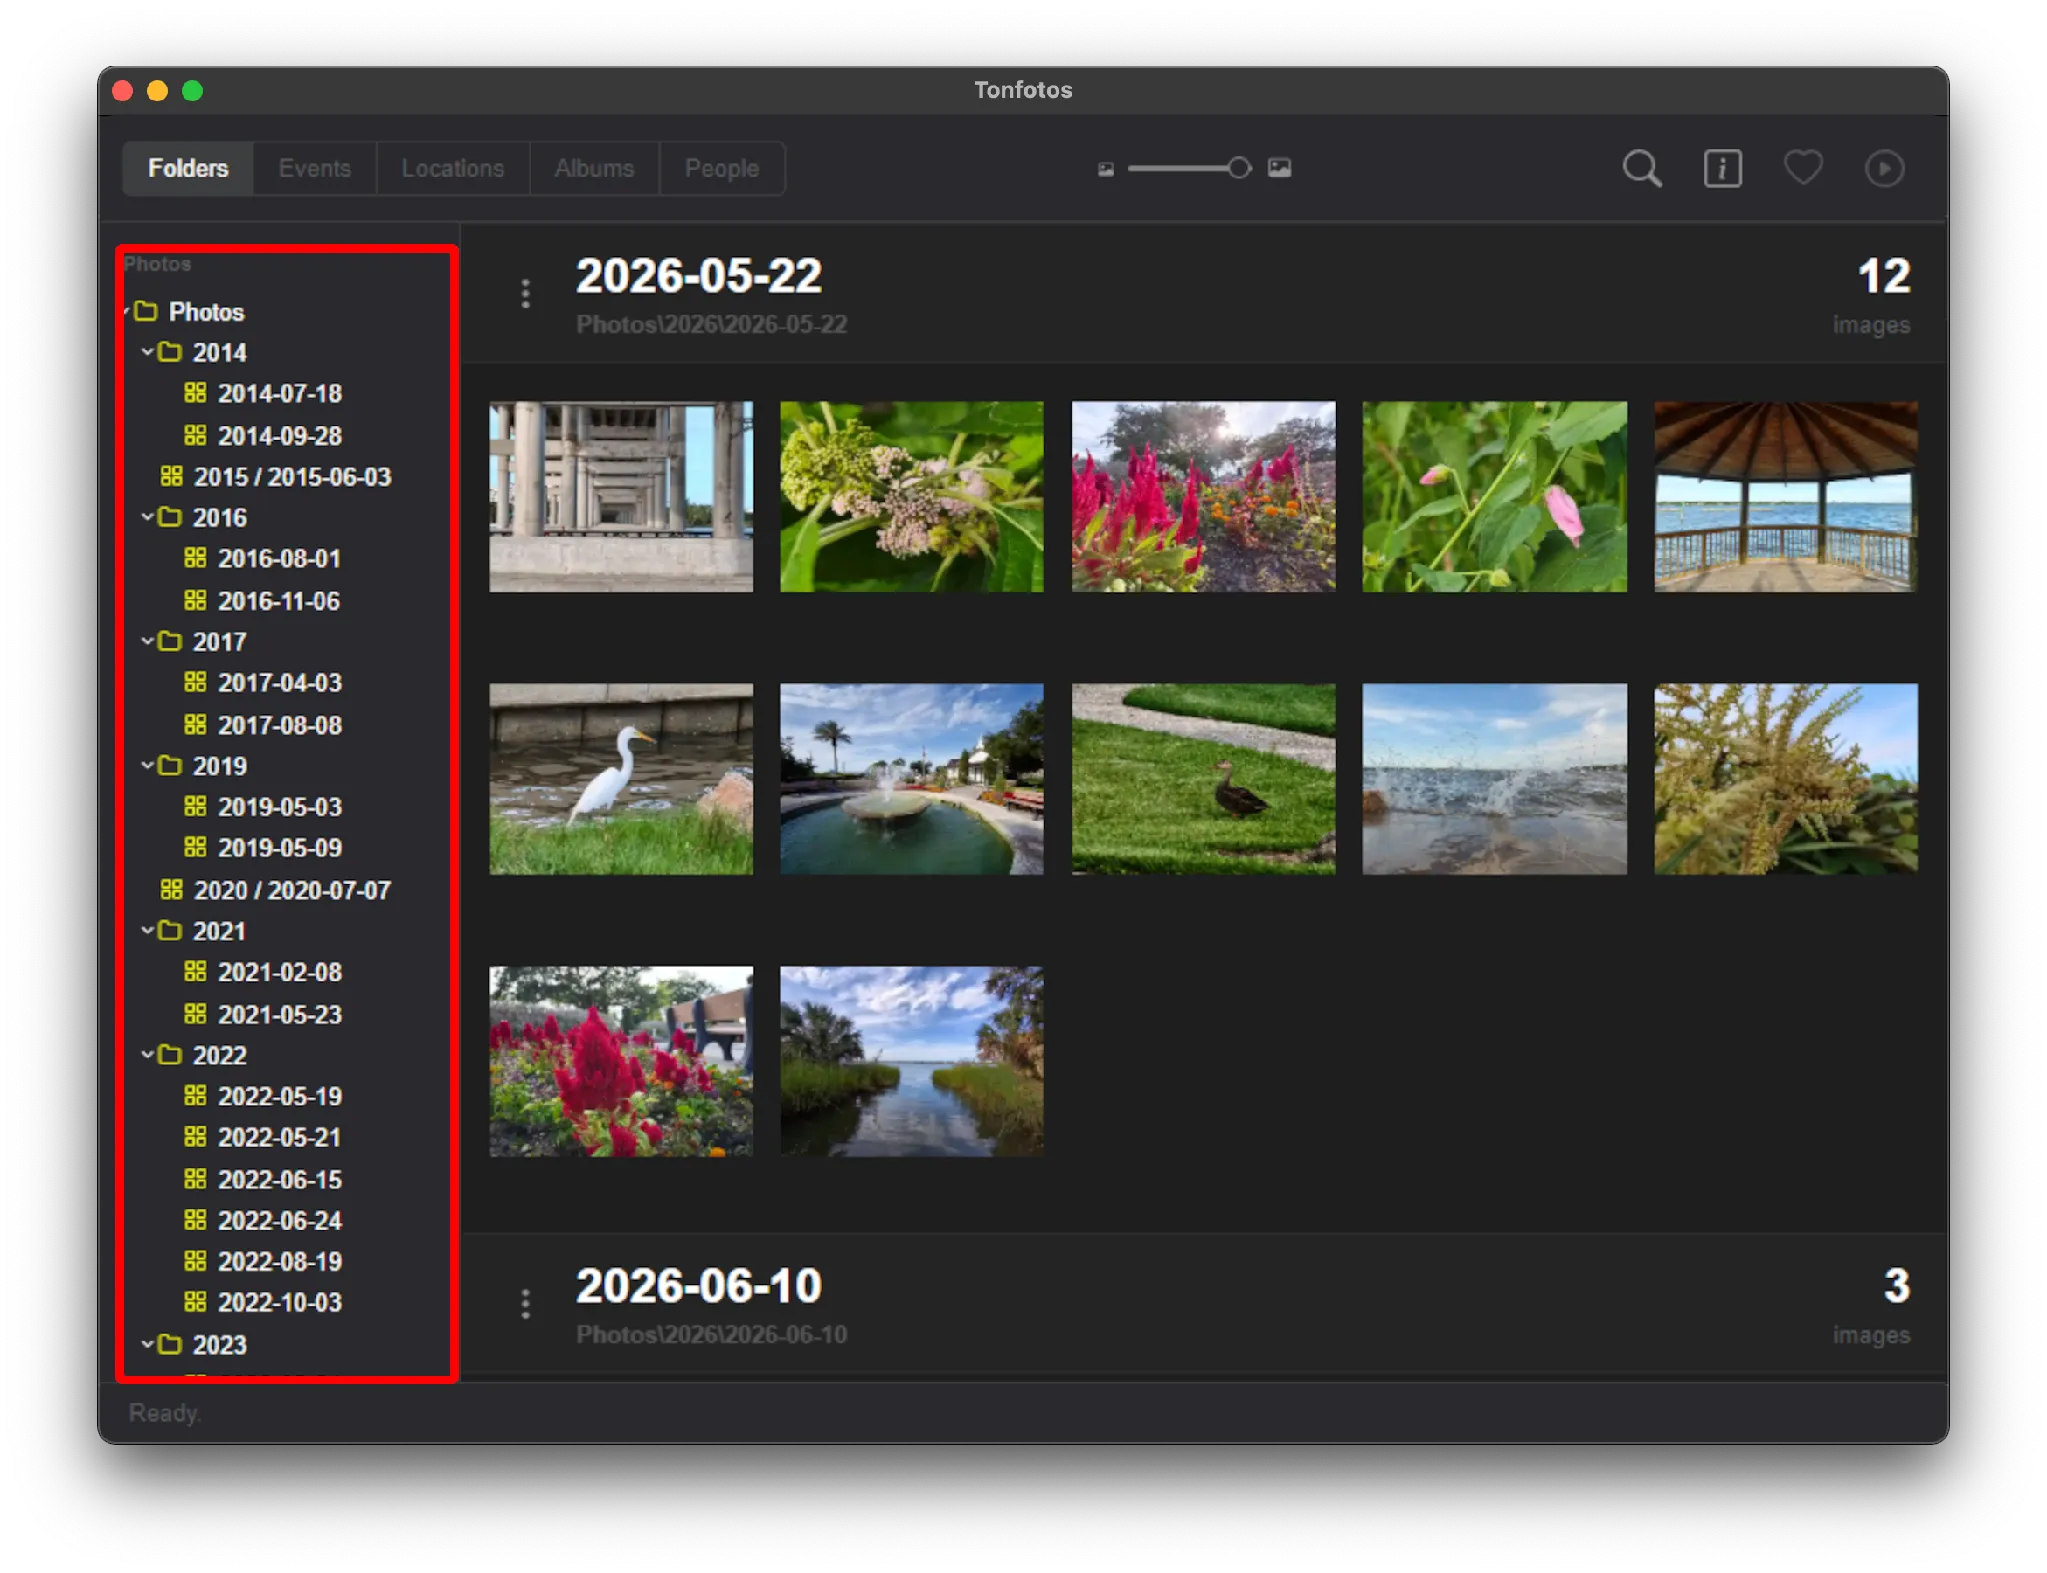
The first thing I liked about Tonfotos was its approach to importing photos. Unlike Apple Photos, the program immediately creates a clear folder structure by shooting date: year / year-month-day. For me, this turned out to be a major advantage, because even if I stop using Tonfotos one day, the entire structure will remain as ordinary folders in Finder, and the photo archive will not be tied to a specific program.
However, before importing, I had to prepare the library a little. I cleared the list of folders in the library manager and left only one main directory where I planned to store photos from all sources.
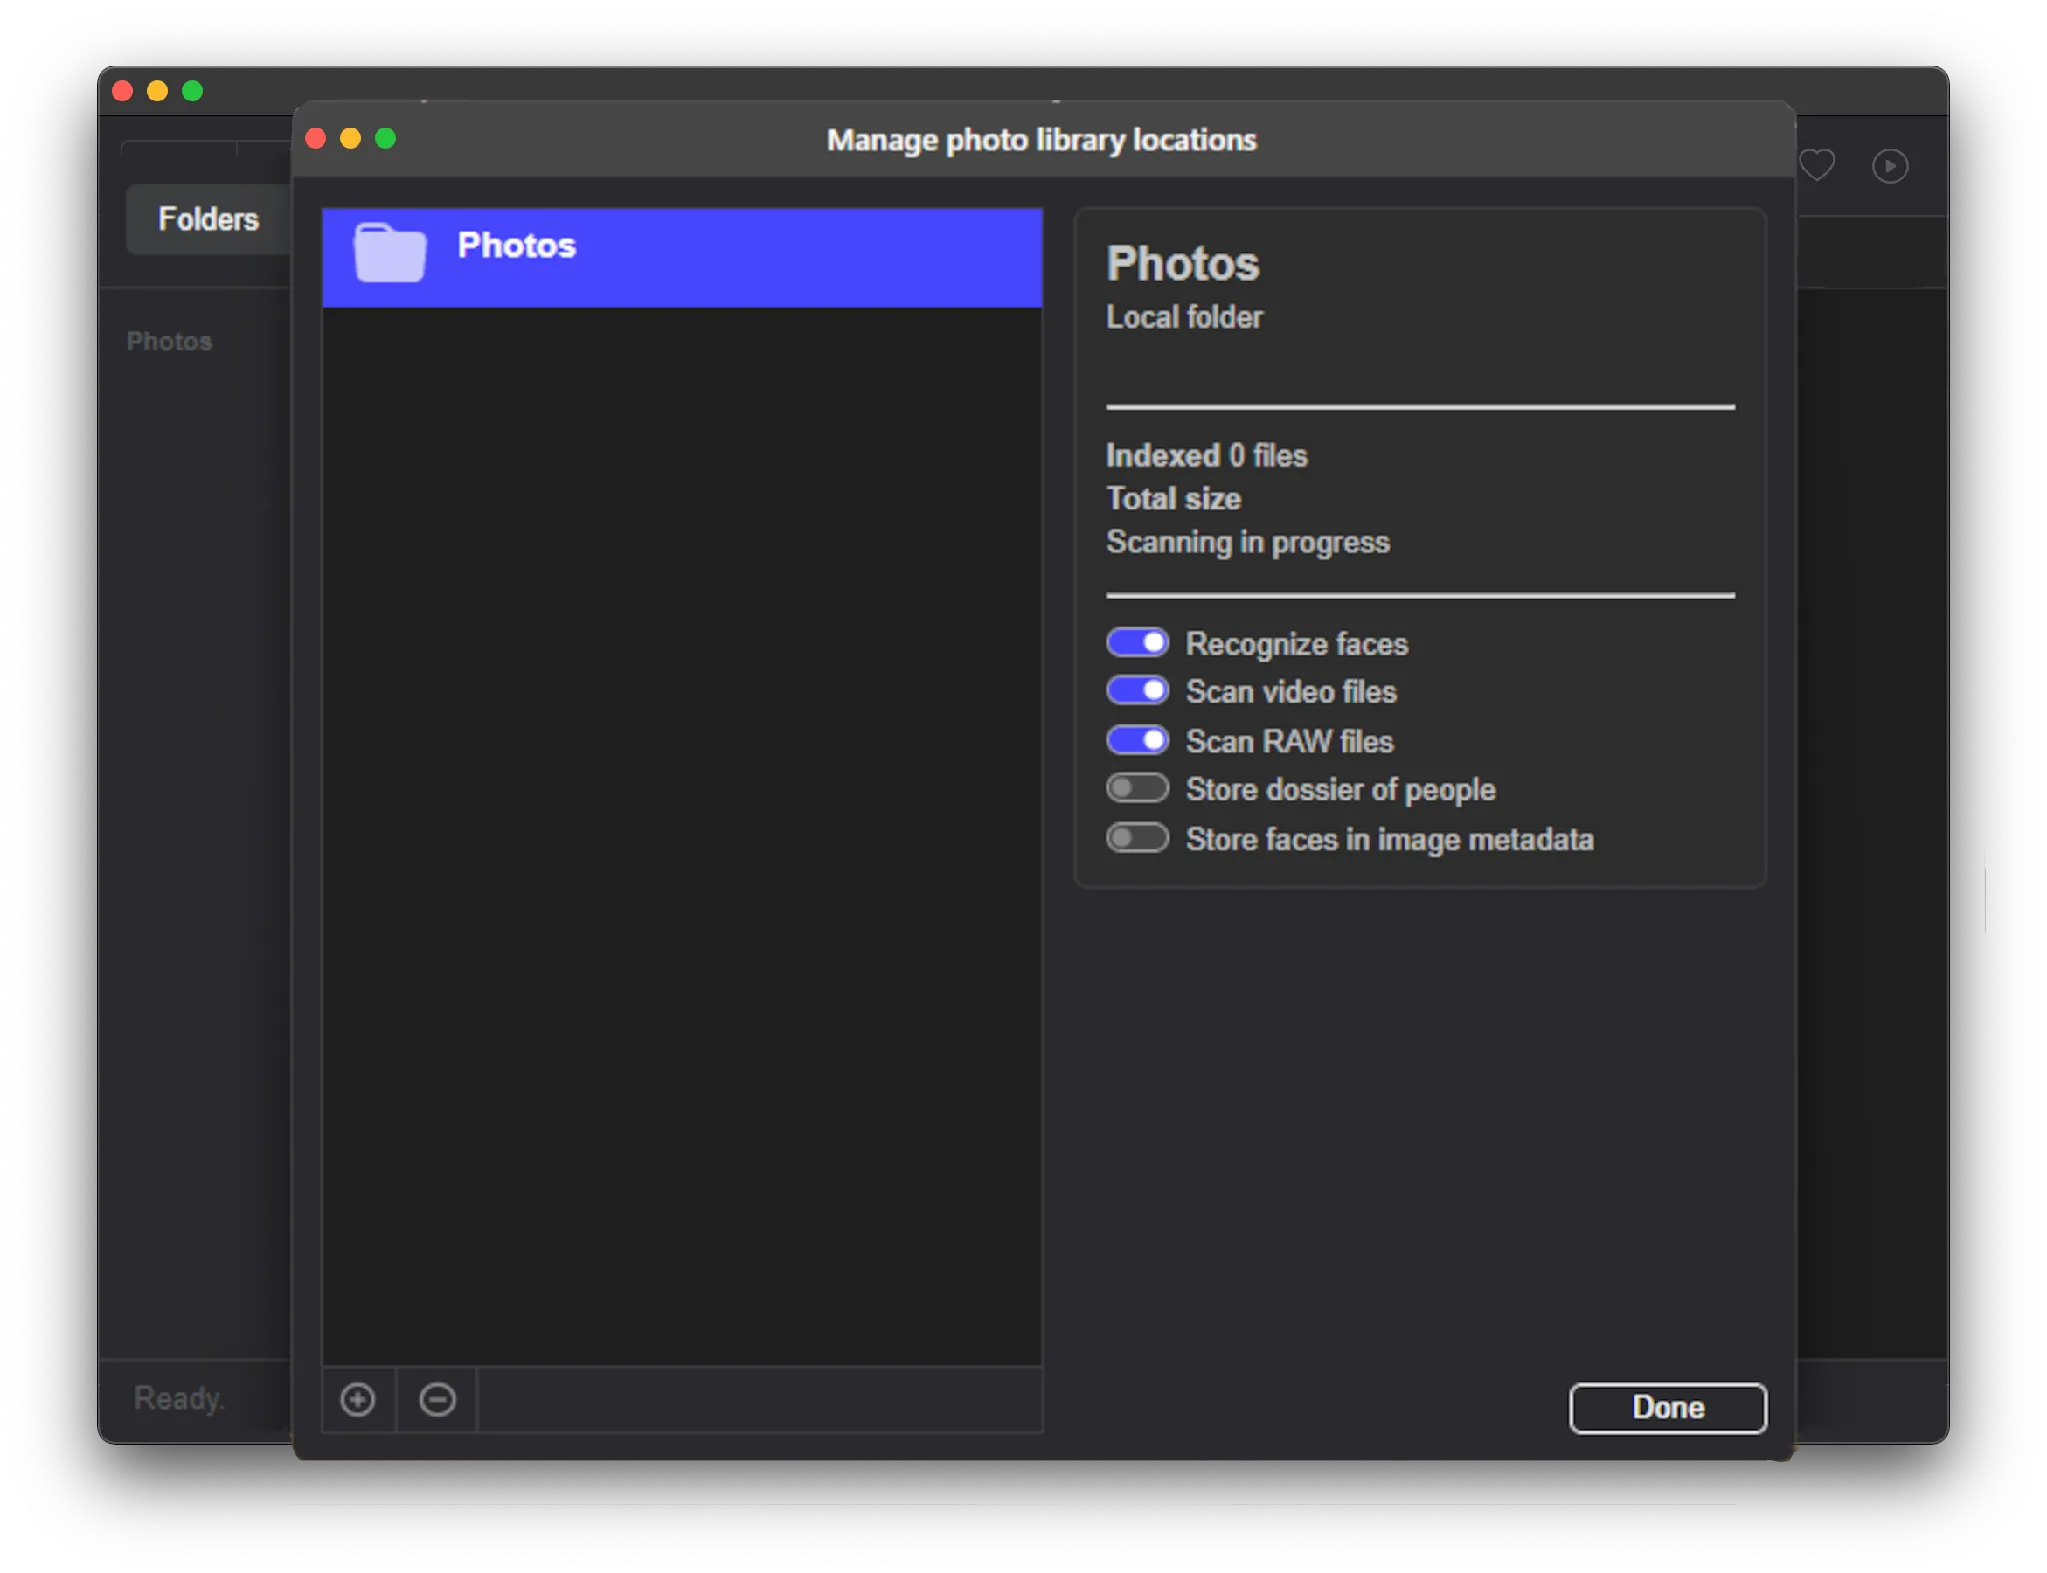
To start the import process with automatic folder sorting, I opened the “File” – “Import” menu.

In the window that appeared, I selected the folder with photos. If necessary, you can limit the import to a specific date range or enable ignoring existing duplicates.

Processing time directly depends on the number of photos. During this process, the program not only arranges images into folders, but also indexes them for later search. As a result, I received a ready-made, neatly structured photo archive with a clear folder hierarchy.
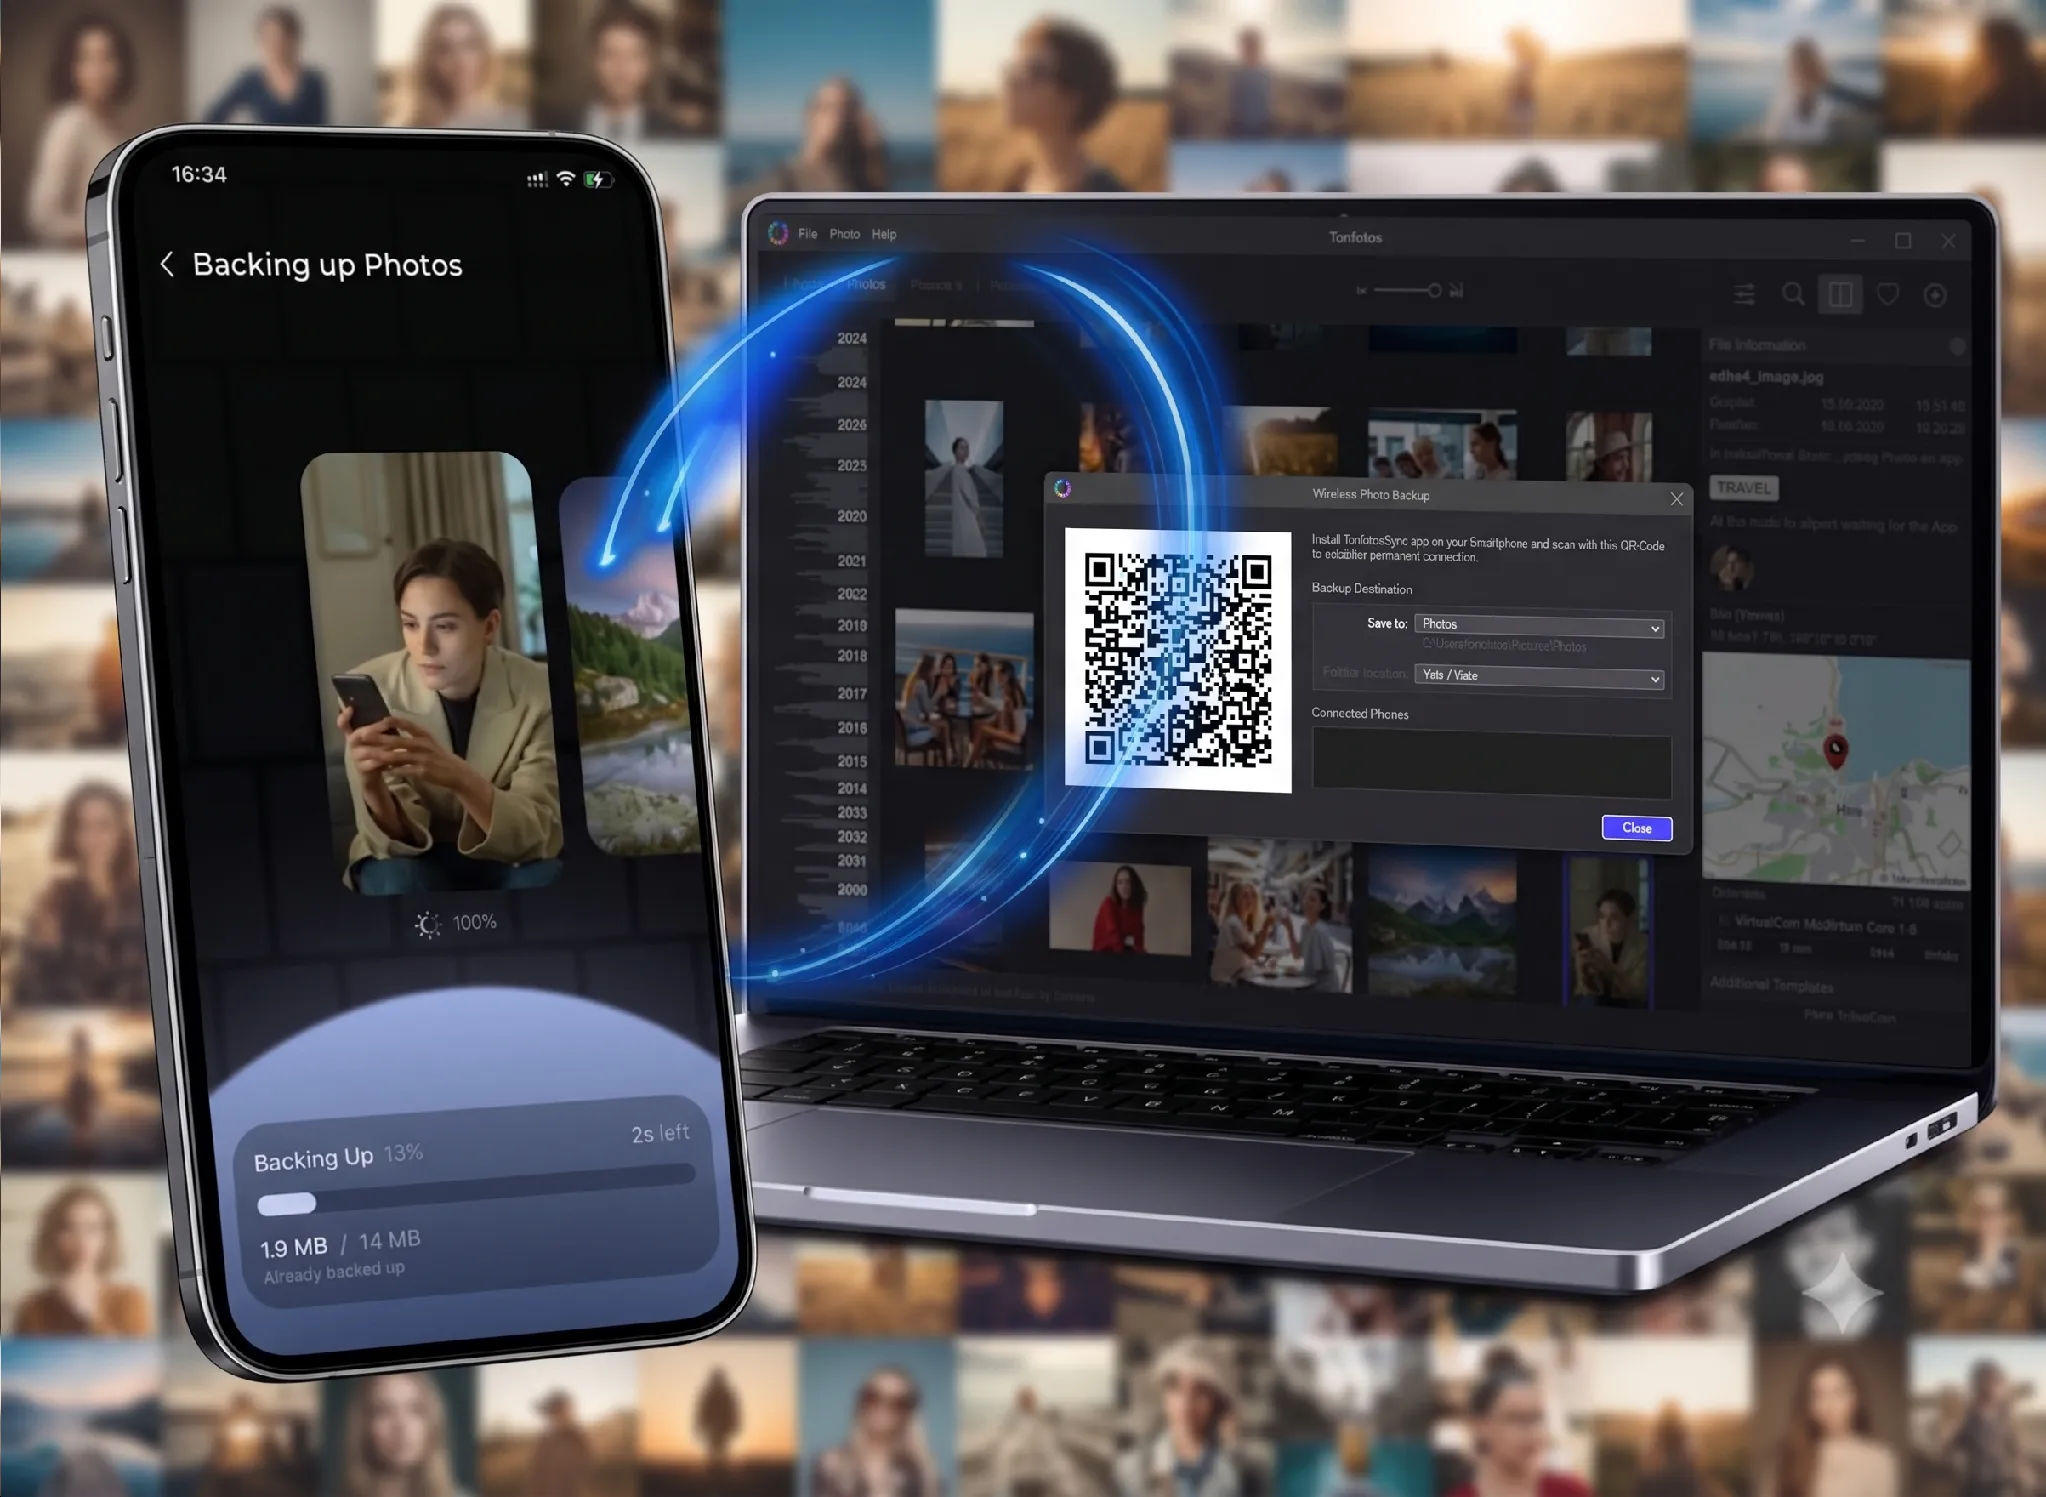
Another pleasant feature for me was the ability to automatically add photos from a smartphone, removing the need to connect the phone with a cable every time. It is enough to install the free TonfotosSync app.
After installation, I connected my smartphone to the desktop version of Tonfotos once by simply scanning a QR code in the wireless backup wizard. After that, the app independently tracks the appearance of new photos on the phone and automatically transfers them to the shared photo archive on the Mac over a local wireless network.
Finding Duplicates in Tonfotos
The next step was to deal with duplicates. To do this, I opened the “File” – “Duplicate Removal” menu.
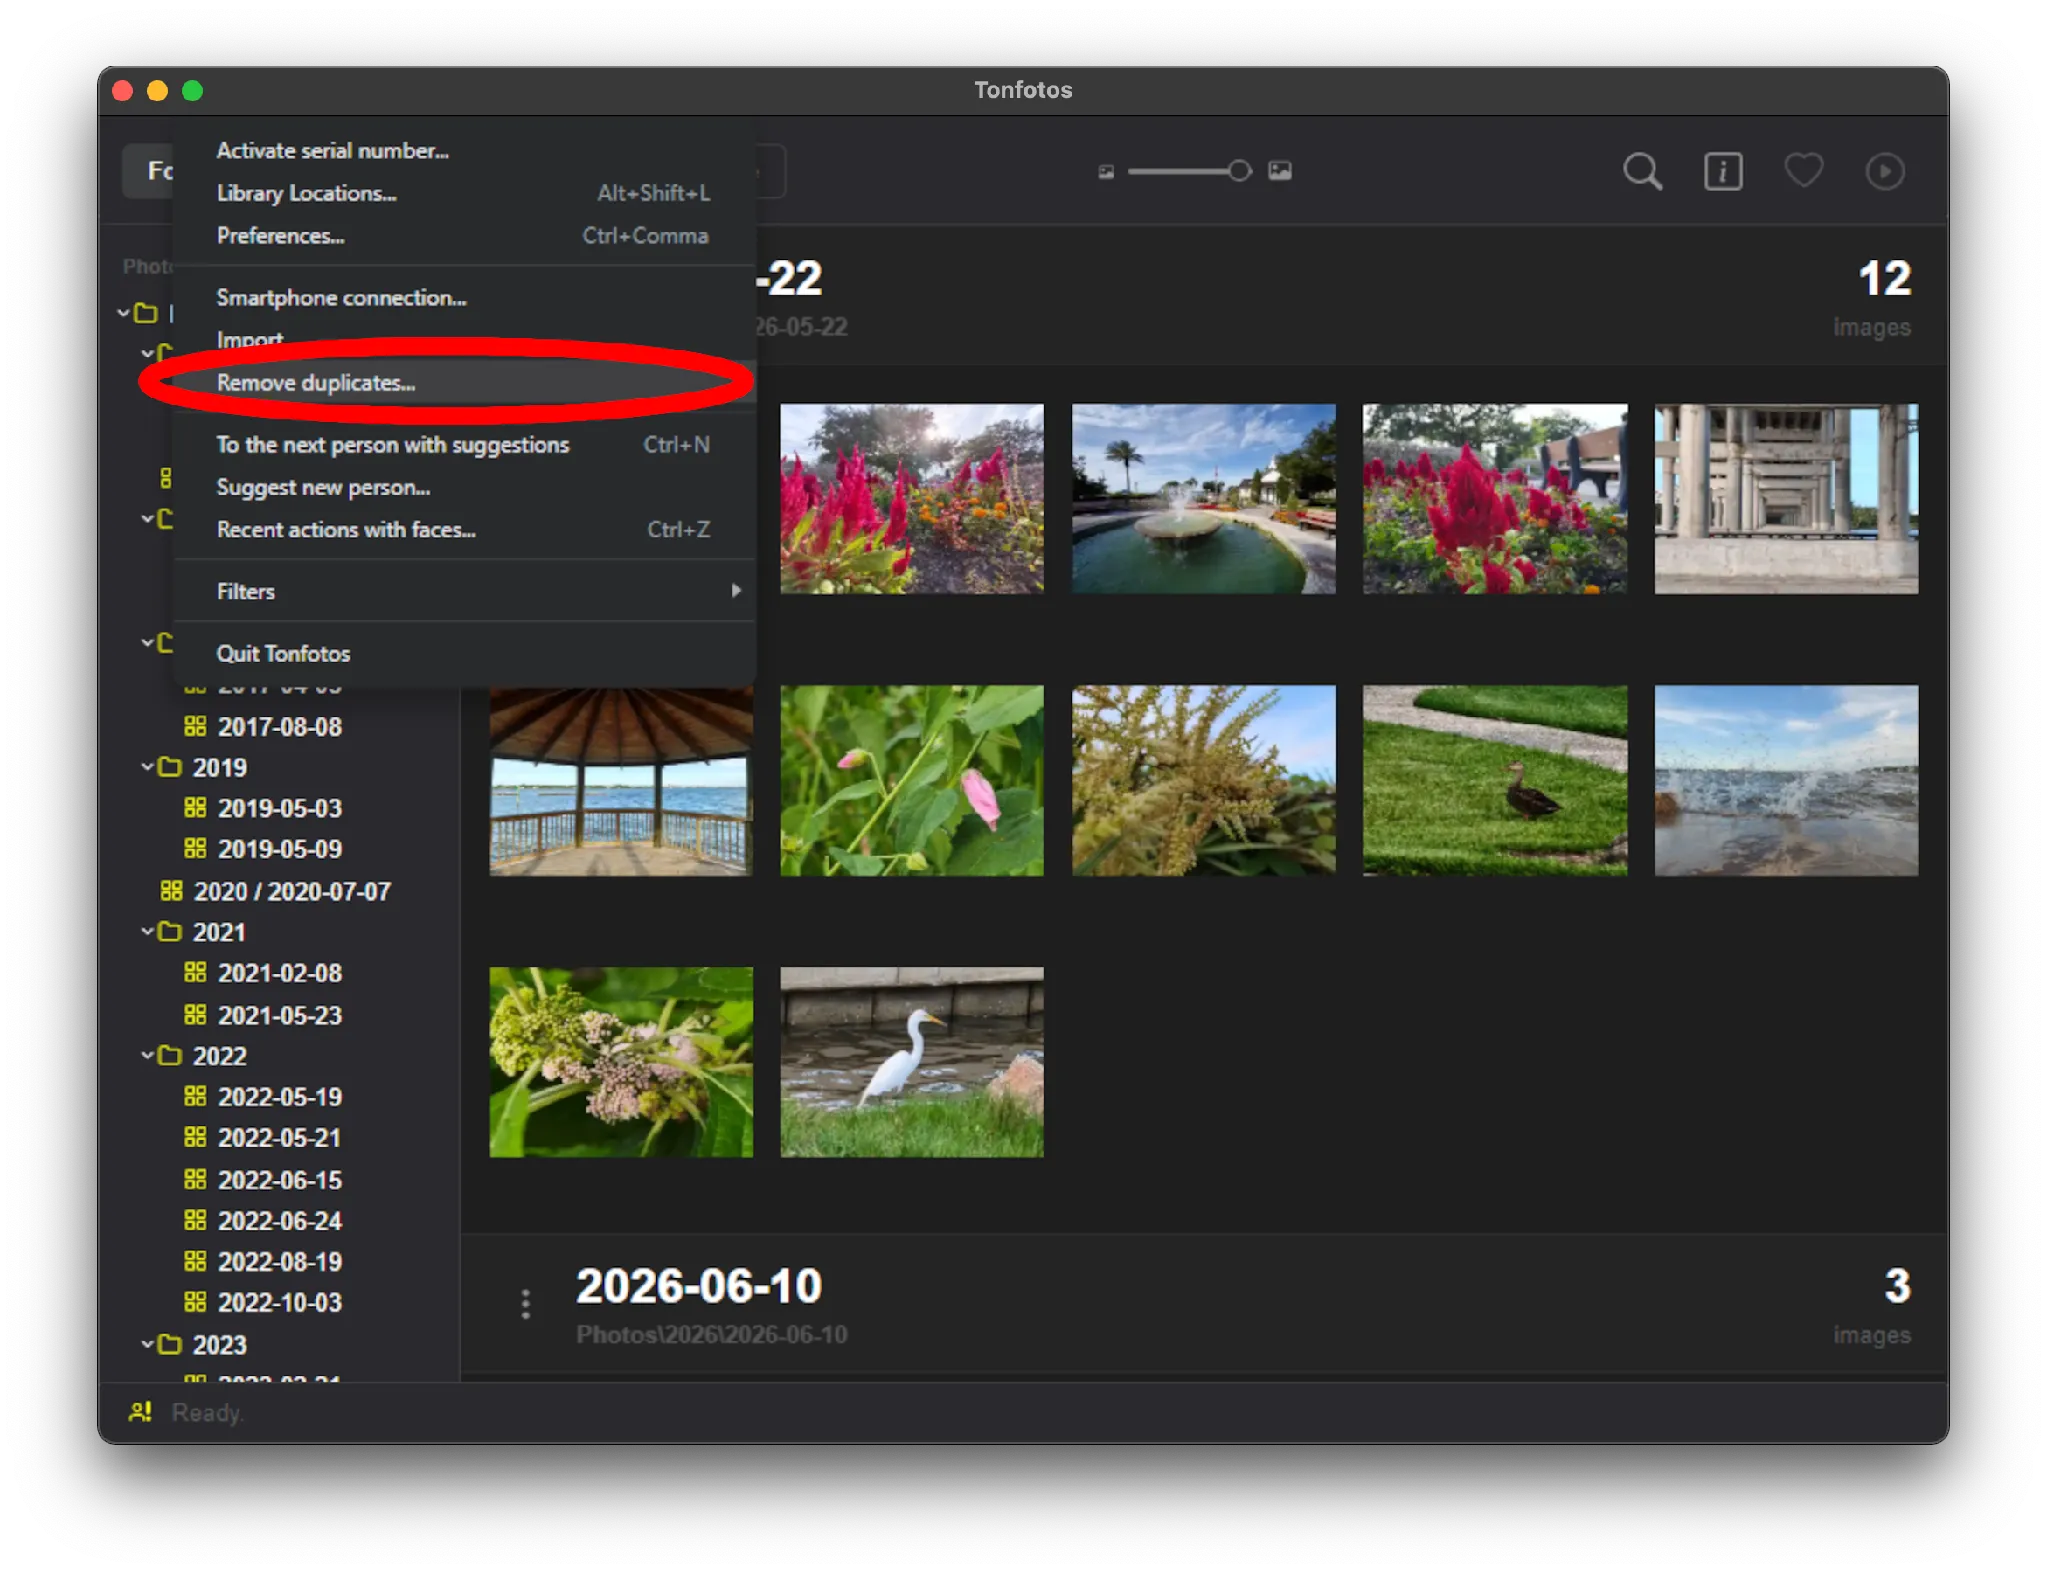
During the scan, the program analyzes all photos in the library and calculates a unique digital fingerprint for each file. If the fingerprints match, Tonfotos considers the photos duplicates, even if they are located in different folders or have different names.
After the analysis was complete, the program collected the found copies into separate groups. You can calmly compare the images and decide for yourself which ones to keep and which ones to delete. I liked that Tonfotos does not delete photos automatically and does not make decisions for the user.
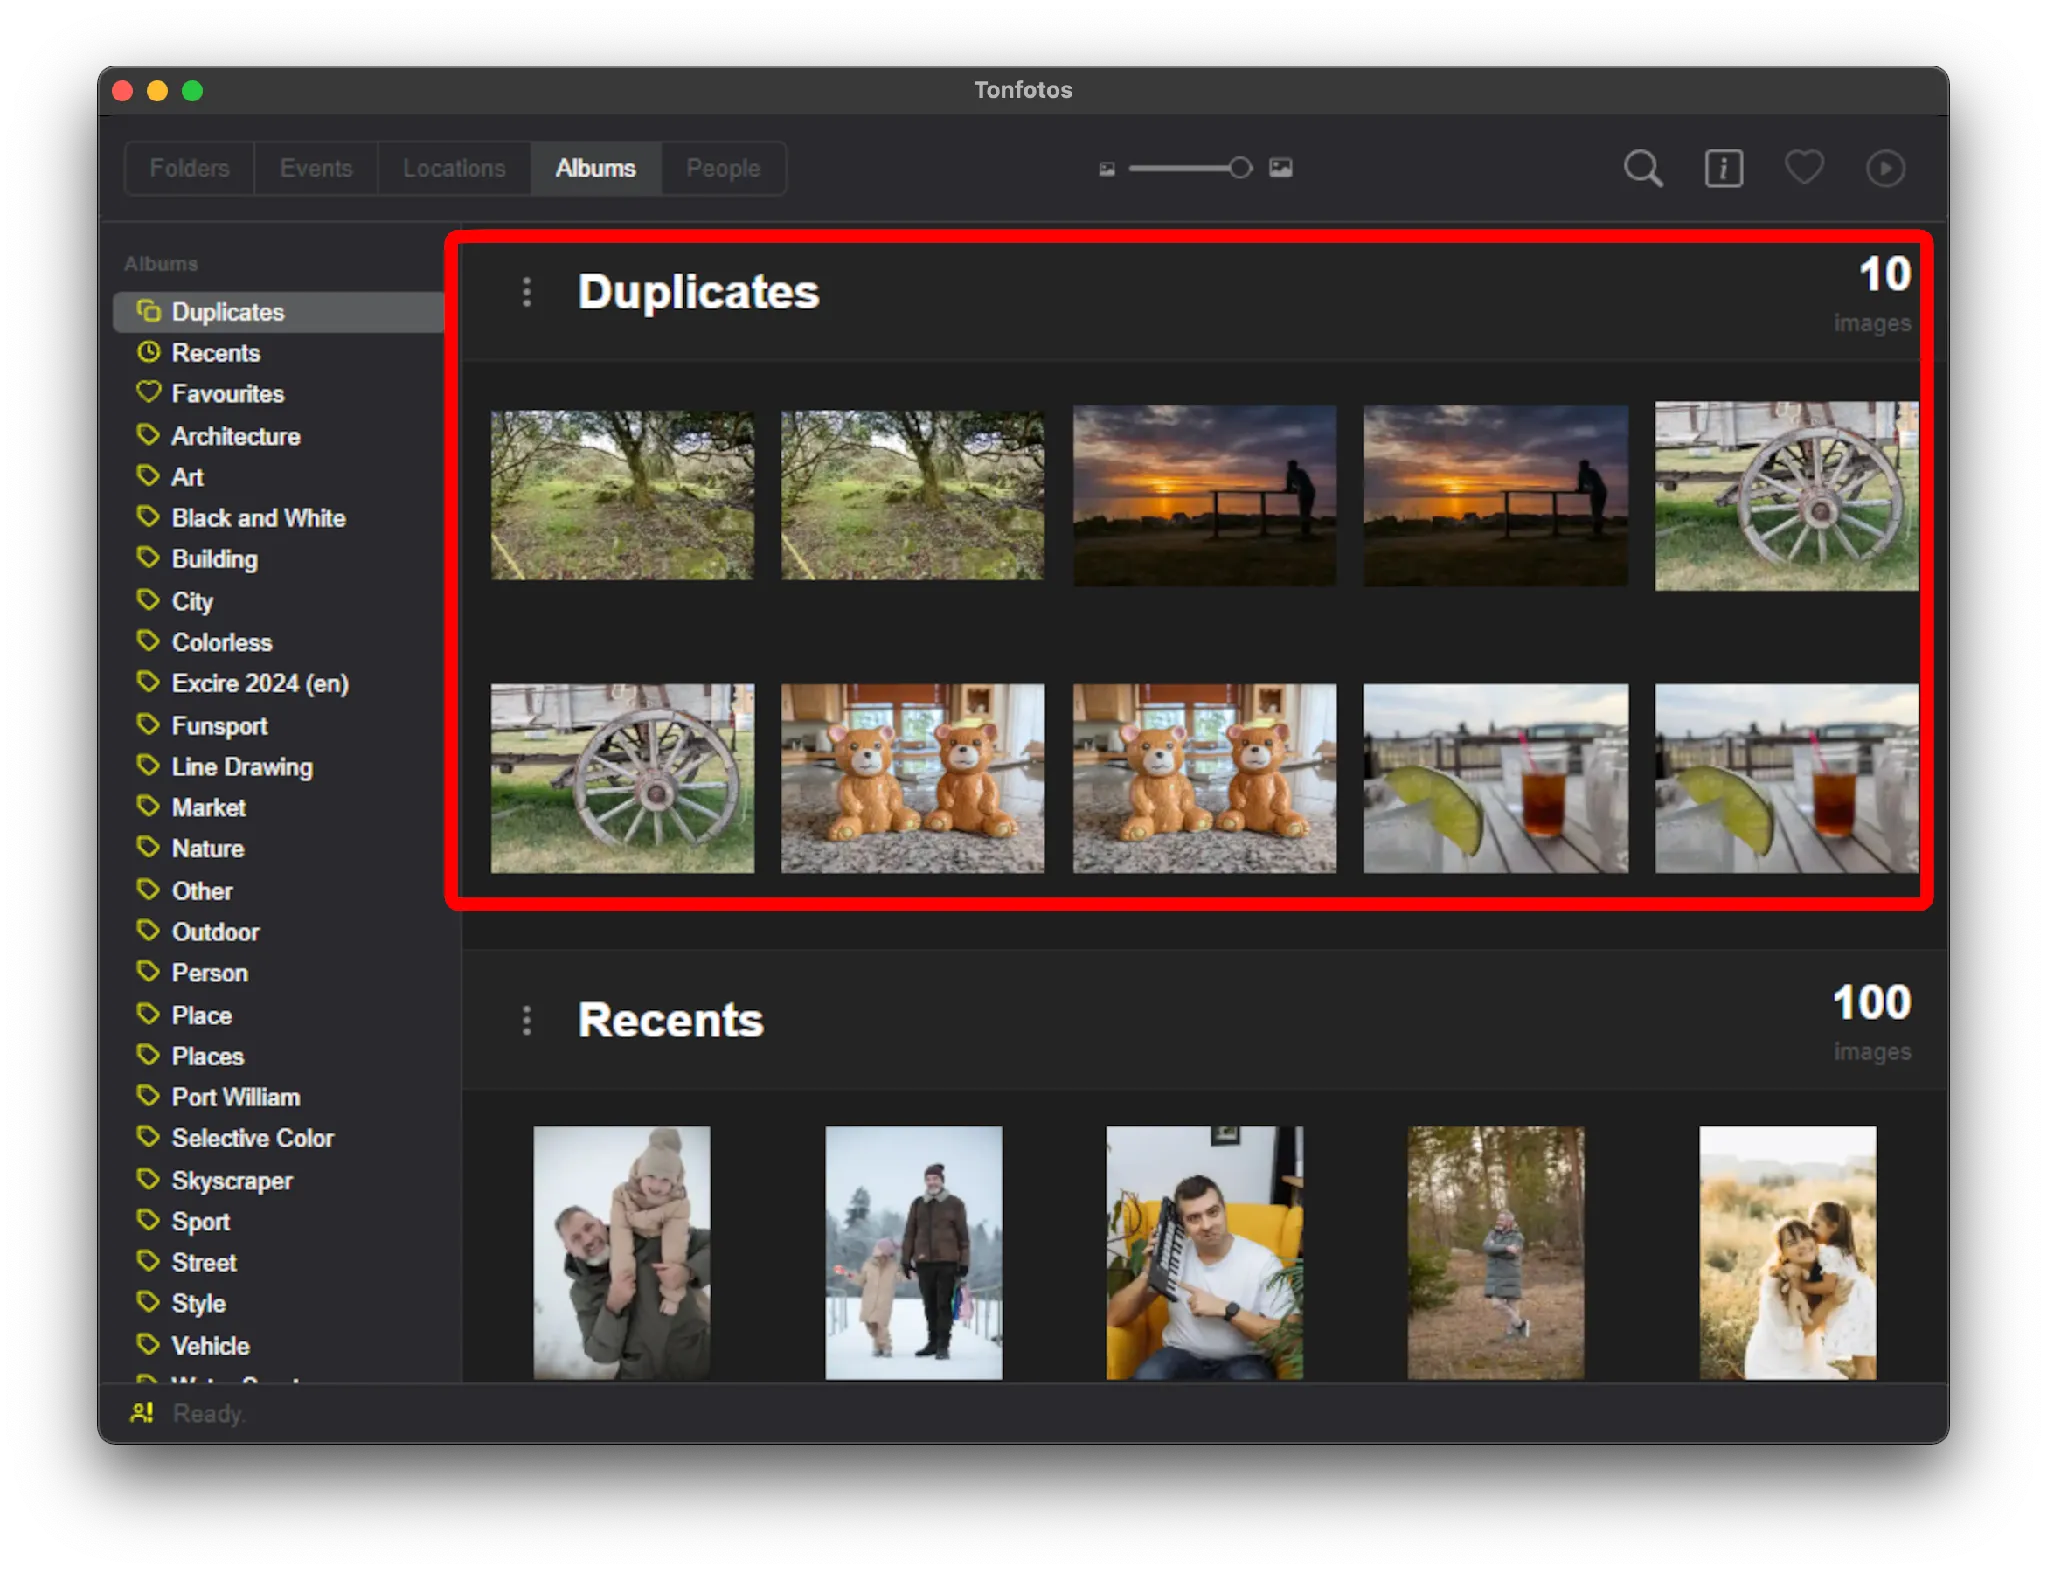
It is important to note that the program looks for completely identical files. If a photo has been changed even slightly, for example, cropped, compressed, or resaved at a different quality, Tonfotos no longer considers it a duplicate.
Culling and Tagging Photos in Tonfotos
Unfortunately, the developers have not yet implemented a photo rating system, but I worked around this limitation by creating albums. I created several albums in advance corresponding to conditional ratings, and while browsing photos, I simply sent images to the appropriate album. In this way, they started serving as a temporary rating system.
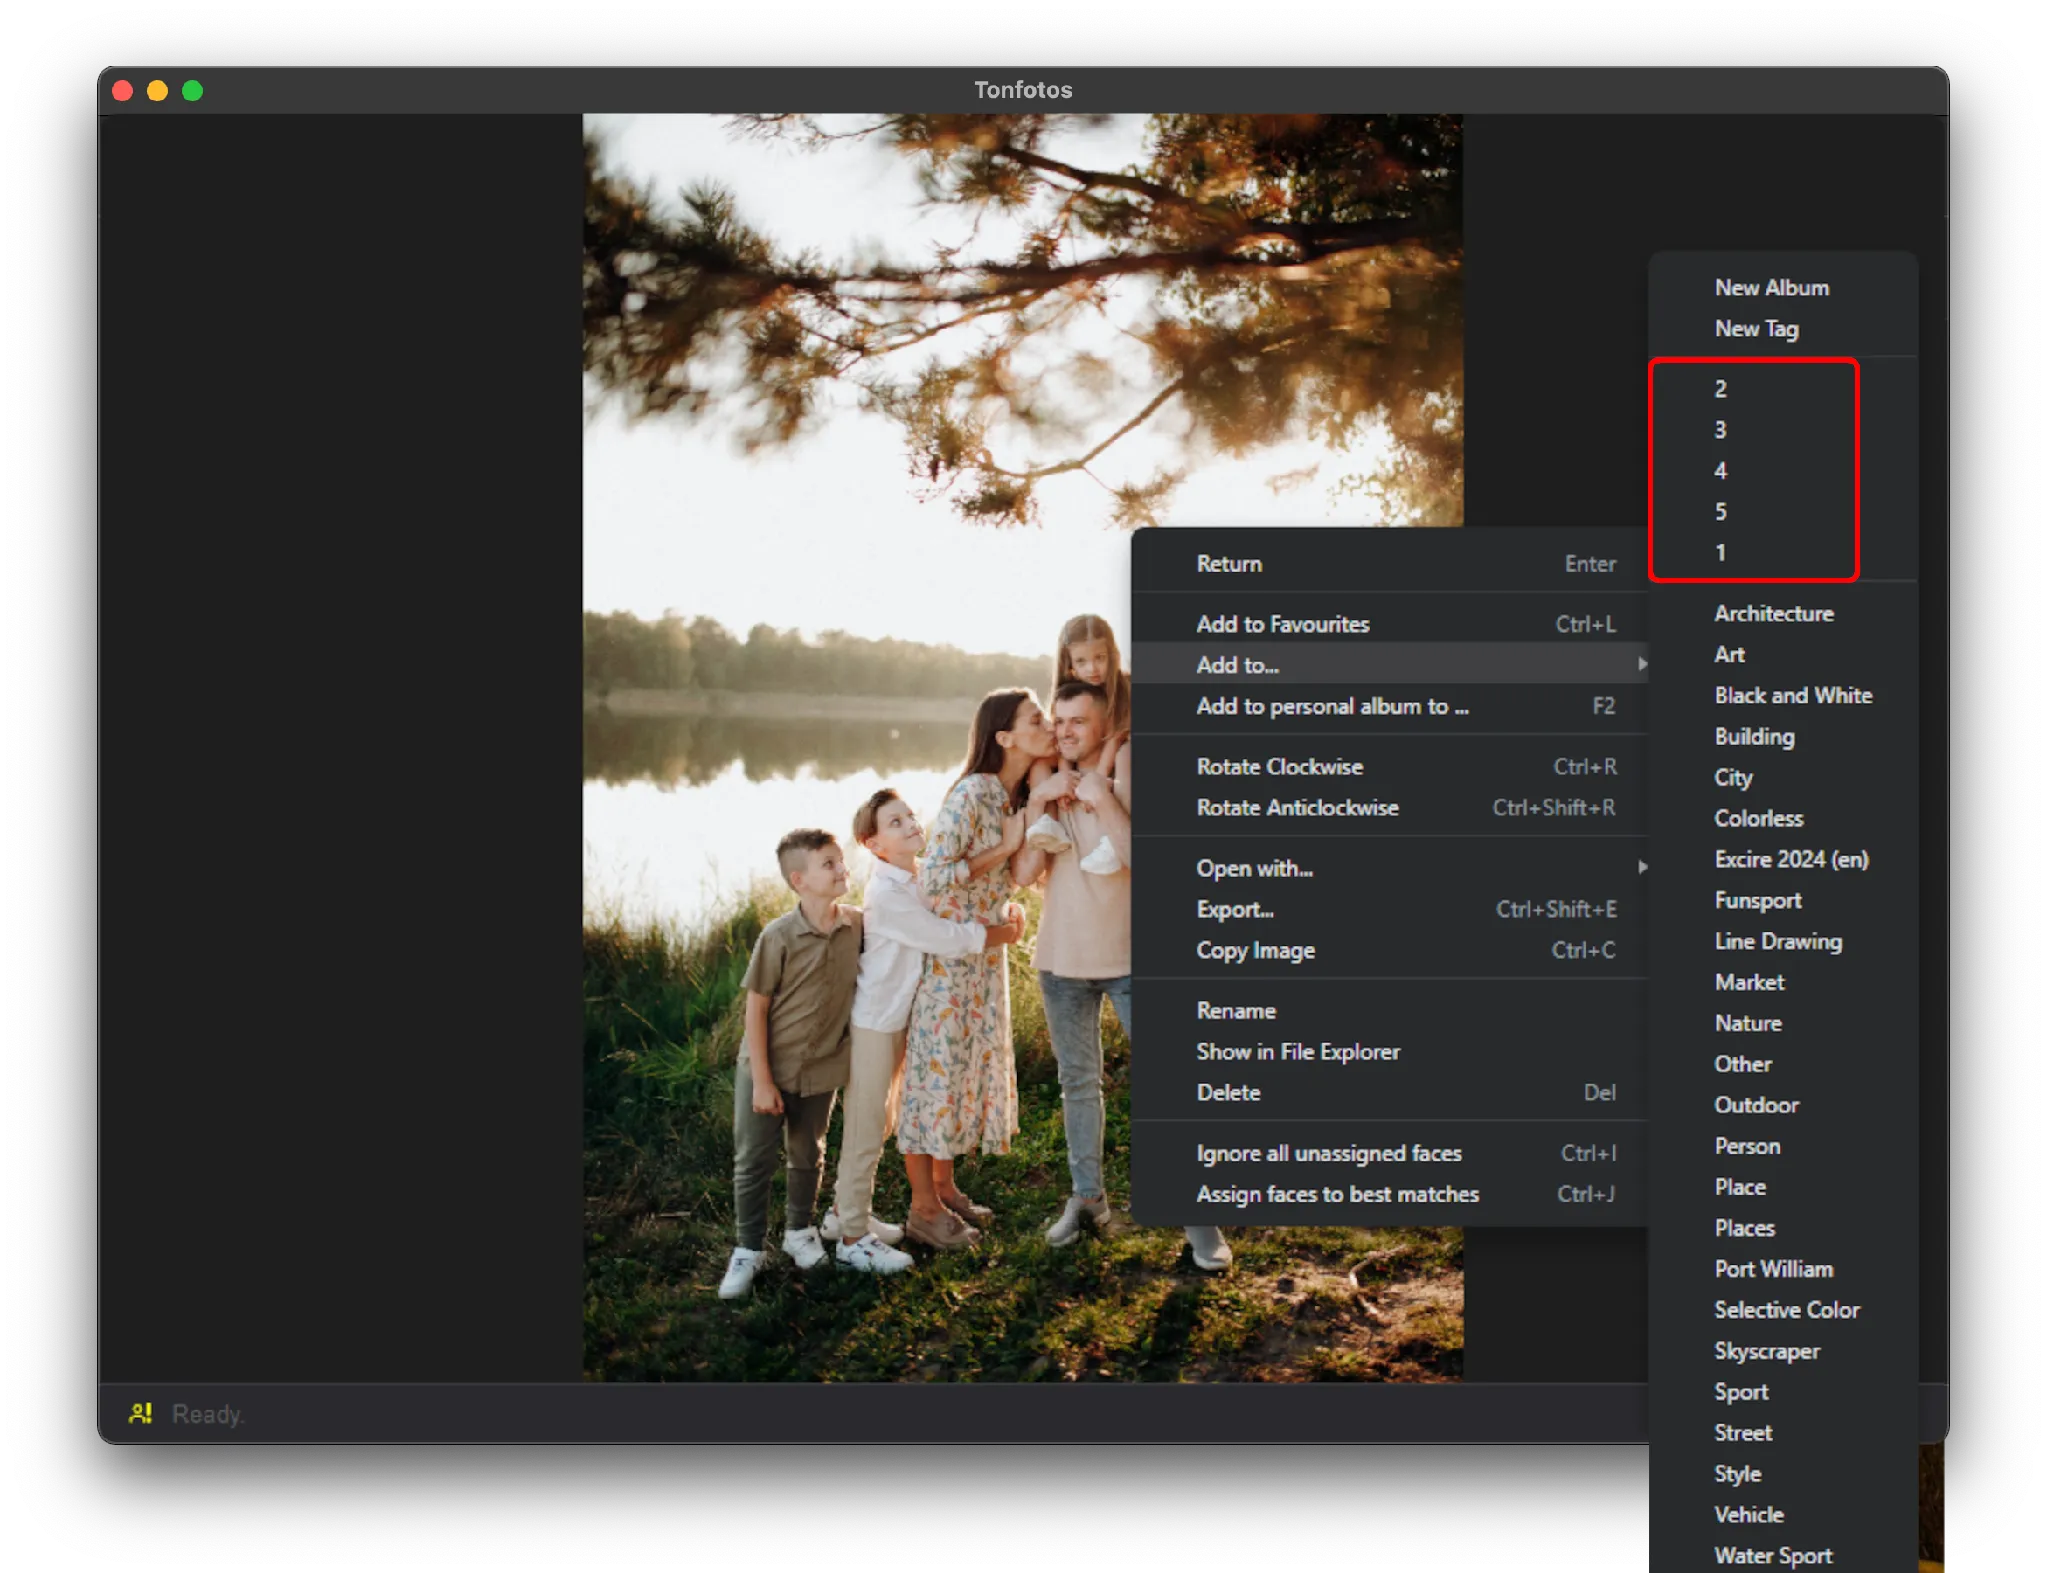
This approach also turned out to be convenient because albums here are completely virtual. They do not affect the location of the files themselves. Photos continue to remain in their folders, while albums are used only for convenient sorting. After that, all I had to do was open each album one by one and finally decide what to do with the photos: keep them, move them to the main archive, or delete them.
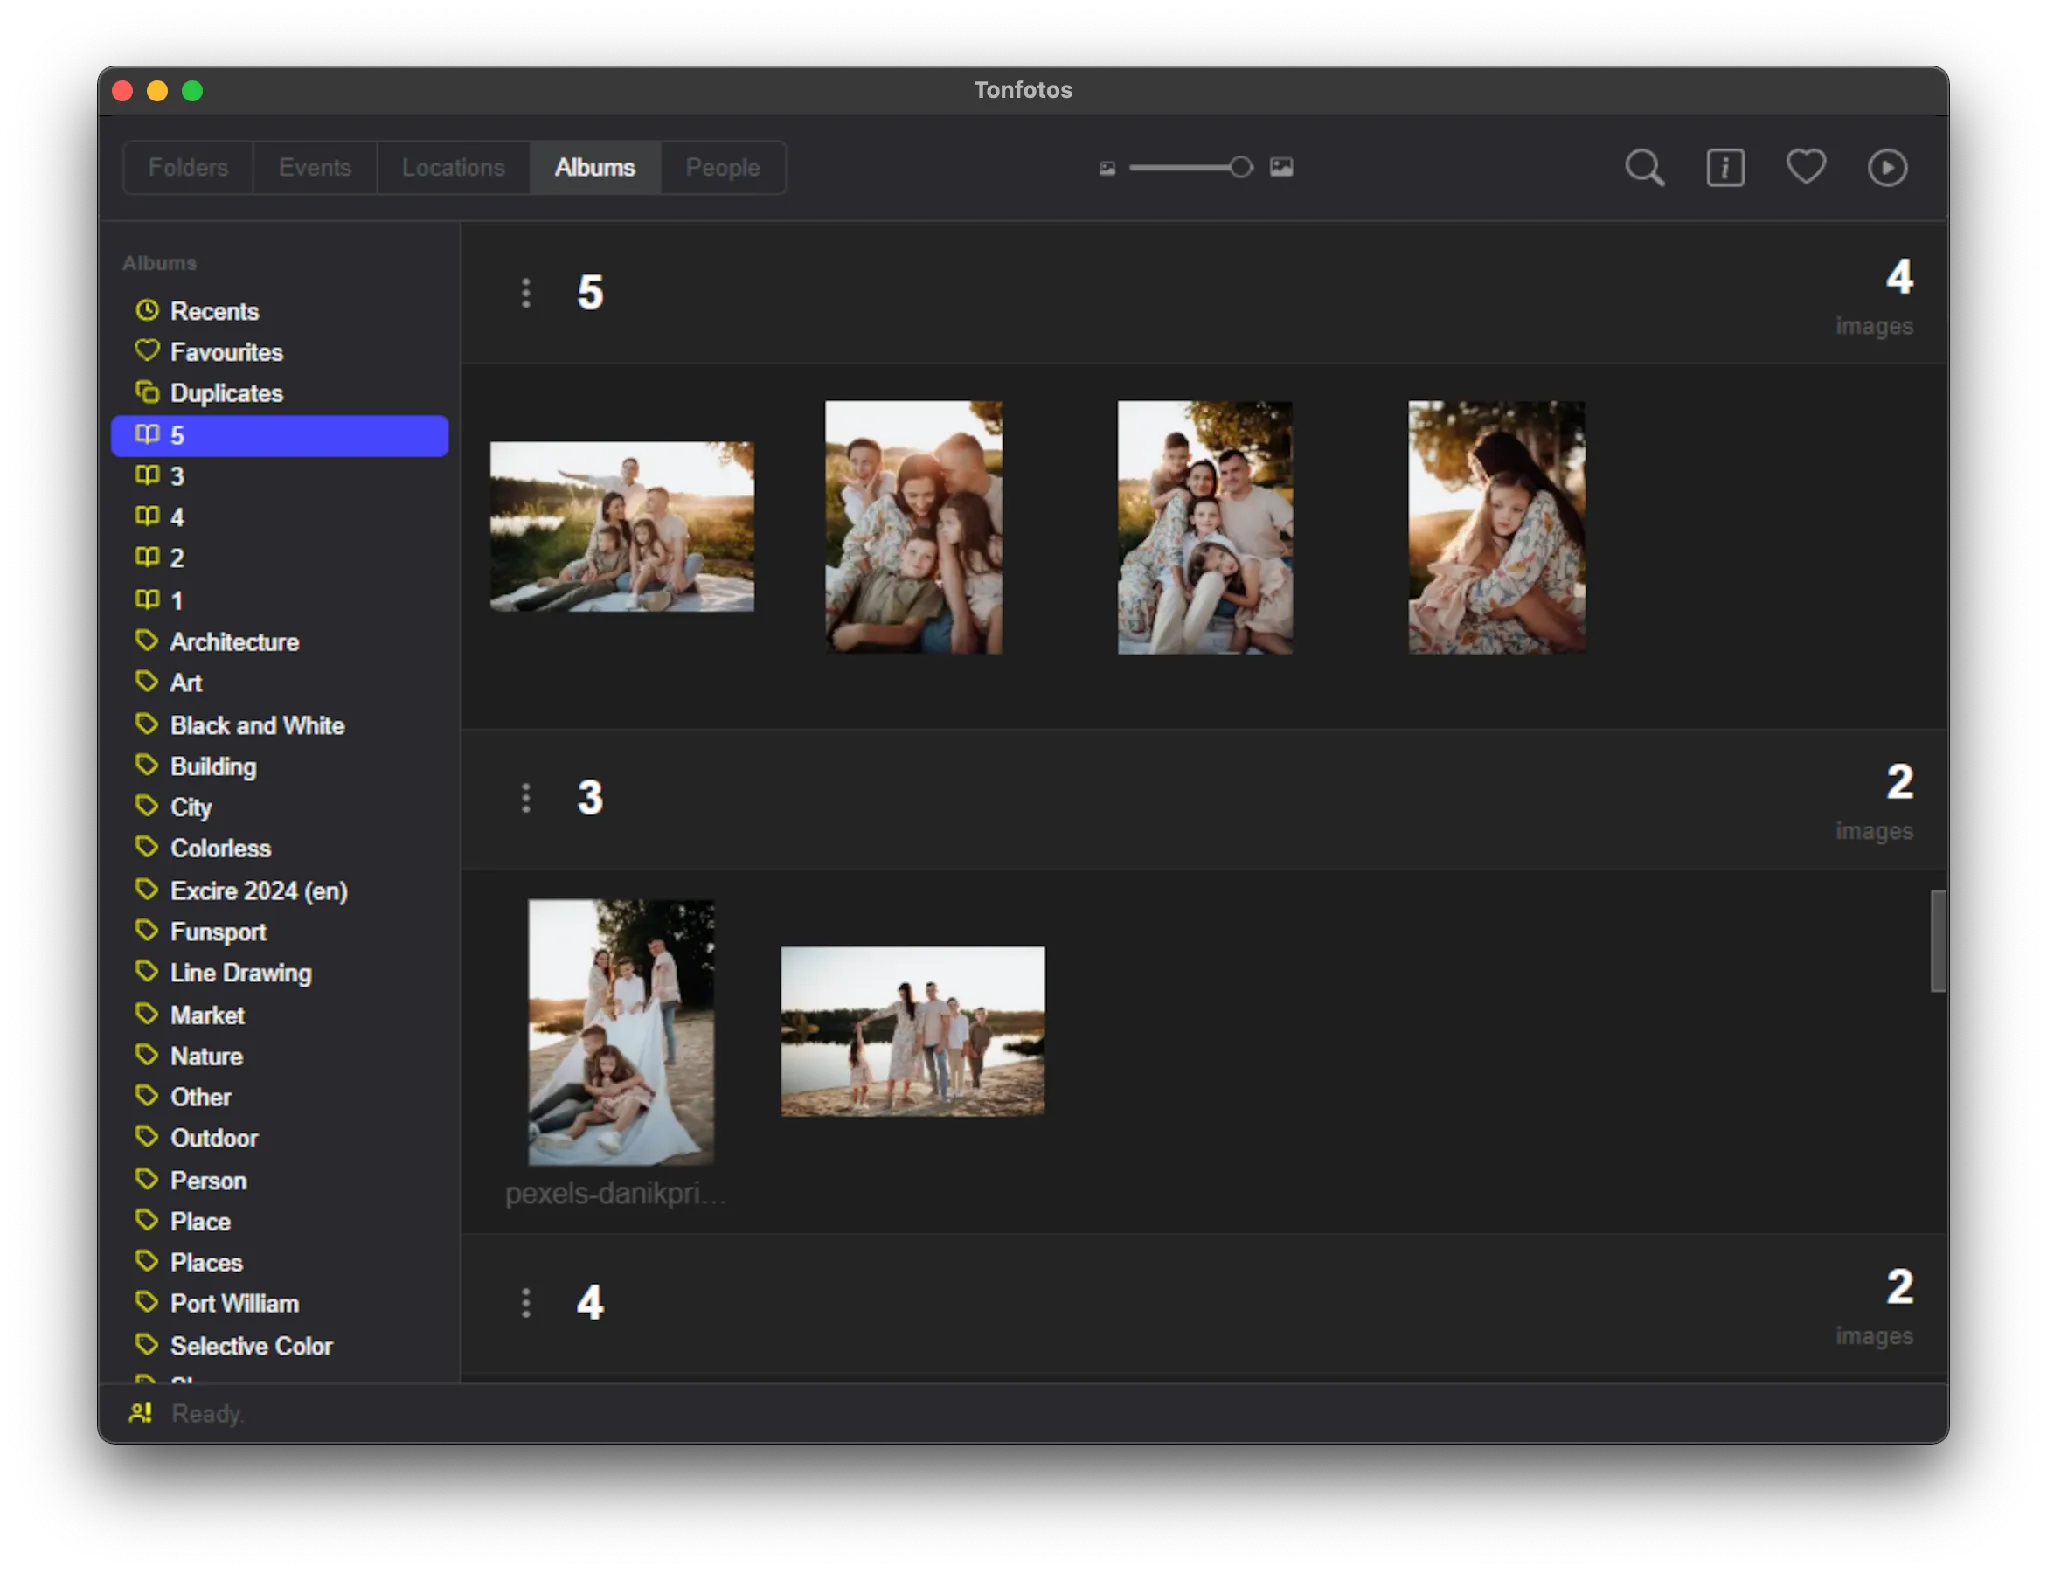
Although tags are closely related to albums in the Tonfotos interface, they serve a slightly different role. I use them to describe photo content in detail, indicating places, events, objects, seasons, shooting genres, and any other details that may be useful in the future.
Over time, I realized how convenient this is. Even if I need to find a specific photo in ten or fifteen years, it will be enough to remember a few details and enter the corresponding tags. Instead of spending a long time browsing thousands of images, the necessary shot is found almost instantly.
Face Recognition in Tonfotos
Tonfotos pays special attention to face recognition. Like all of the program's functions, it works completely locally. Photos are not uploaded to the cloud and are not sent to the developers' servers. All analysis is performed directly on the Mac. This helps preserve the privacy of a family photo archive and prevents concerns about personal images being transferred to third parties.

After adding photos, Tonfotos automatically scans the library, finds faces in images, and groups pictures of the same person together. The user only needs to assign a name to the person once and mark incorrect matches. After that, Tonfotos recalculates the results and starts recognizing the person more accurately even in new photos, automatically adding them to that person's collection.
However, the program's capabilities are not limited to simple face-based photo search. A separate profile is created for each person, which can become a kind of digital encyclopedia of a family archive. In addition to the name, you can add date of birth and death, contact details, education, address, and other information.

The ability to create family relationships between people is especially interesting. After the profiles are filled in, Tonfotos can build a visual family tree, allowing you to see relationships between relatives and preserve family history together with photos.

Conclusion
Organizing photos on Mac differs in many ways from working with regular folders. Apple focuses not on manual file management, but on an intelligent media library that handles most routine tasks. This approach takes some getting used to, but later it allows you to spend less time searching for and sorting photos.
At the same time, there is no single correct way to maintain a photo archive. Some users are satisfied with Apple Photos and iCloud, while others care more about fully controlling the folder structure, using a NAS, third-party cloud services, or specialized programs. The main thing is to choose a system that is understandable to you and will not require a complete overhaul as the collection grows.
If you define a single storage order from the beginning and follow it with each new import, organization stops being a difficult task. Instead of endless manual sorting, it becomes a simple and predictable process that takes only a few minutes. This is exactly the kind of approach that keeps a photo archive convenient, tidy, and ready to use even many years later.