The idea of finding a tool to fix pixelation came to me after going through my family's photo archive and discovering dozens of shots that used to look perfectly fine. On my old laptop and phone I'd browse through them without giving much thought to quality. But the moment I opened the same photos on a modern monitor, the flaws became obvious: faces looked blurry, object outlines were lost, and zooming in revealed a genuine pixel mosaic.
I have a particularly large number of photos like this from my old iPhone 4. It's hard to imagine now that shots from a phone which once felt like a piece of futuristic tech could look this bad. If these had been random cat pictures downloaded from the internet, I'd have just deleted them, but these were photos tied to specific memories.
Among these shots, for instance, were photos from family trips, old portraits, and simple everyday moments — valuable not for their artistic quality but because I have no other copy of some of them. So what I wanted wasn't just to upscale the image resolution, but to get a result that would once again be pleasant to look at on a big screen.
Why old digital photos look even worse today
At first glance it might seem the problem is purely about the low resolution of old shots. That's partly true, but there's another interesting factor at play — modern screens. They make us notice flaws that used to be practically invisible.
Many of the photos in my archive were originally meant to be viewed on devices with far lower resolution. If you open a shot like that today on a large 4K monitor and expand it to full screen, the viewer is forced to stretch the original pixels. As a result, instead of smooth outlines, a face or clothing ends up showing clearly visible square pixels.
In a sense, pixelation has become a kind of side effect of technological progress. The better our screens get, the more clearly they expose the flaws in old photos.
This is especially noticeable in shots where the main subject is some distance from the camera. For example, one of my photos shows a street musician sitting behind a small synthesizer against a wall. The person takes up a relatively small part of the frame, so zooming in makes his face and the small details of his clothing start to lose sharpness. At normal size, the shot looks fairly expressive and detailed.
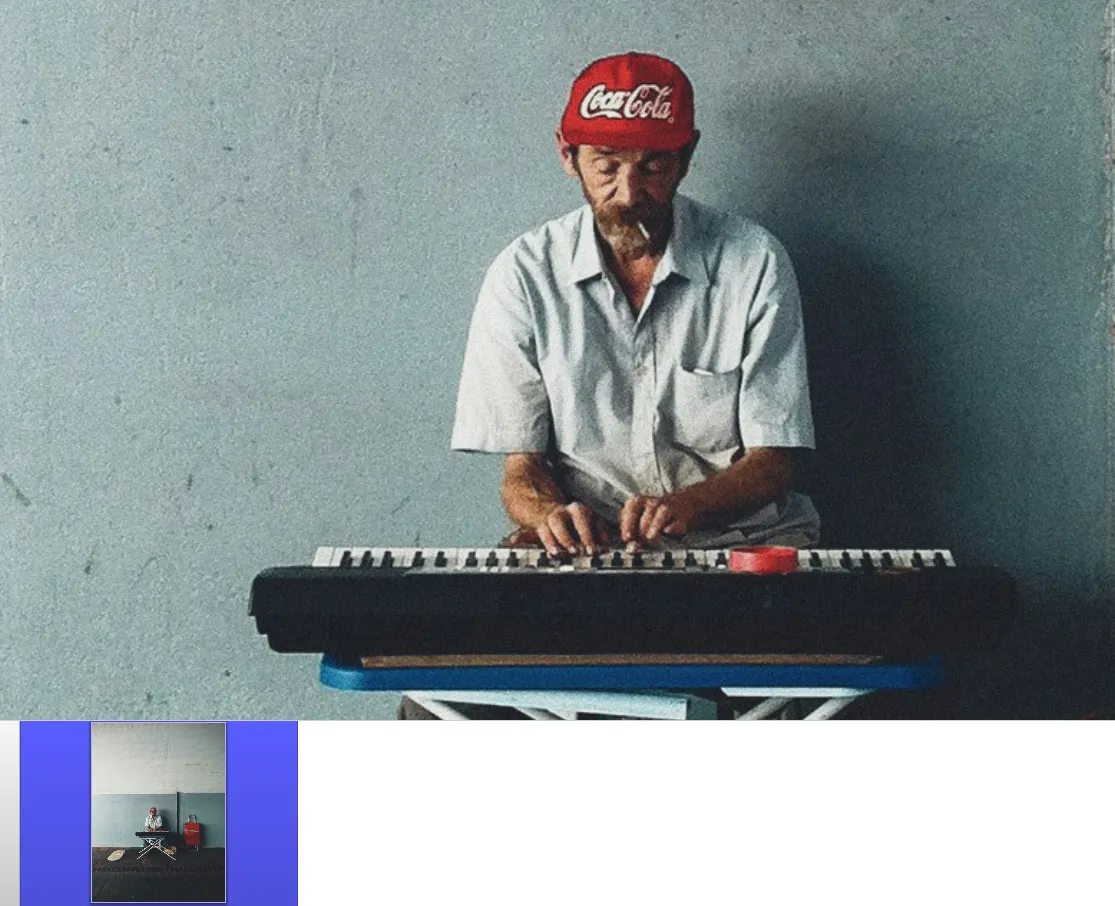
You could just shrink the photo and ignore the flaws — that's exactly what I used to do. But that only works if you're viewing the shot as a whole. If you want to make out a person's face, read text on a sign, or print the photo in a large format, the problem doesn't go away.
So I decided to try restoring a few of these shots and see just how far today's tools can actually take you.
Why digital photos develop defects
Before testing specific tools, I decided to dig a little deeper into the problem itself. It turns out low resolution, while the main cause, is far from the only one.
Digital zoom while shooting. Unlike optical zoom (where the lens itself moves closer), digital zoom simply crops and stretches the central portion of the smartphone sensor's data.
JPEG compression artifacts. When saving to JPEG, the algorithm splits the image into 8×8 pixel blocks. Under heavy compression, the edges of these blocks become clearly visible, forming a distinctive grid pattern.
Improper resizing. When a photo is enlarged using simple methods (like "nearest neighbor"), the software doesn't try to smooth the edges — it simply multiplies the size of the existing pixel squares.
In practice I ran into all of these at once, and quickly realized there's no universal "fix pixelation" button.
For one photo, it was enough to carefully increase the resolution and slightly boost sharpness. For another, that same approach just made the artifacts more visible. And for a third, there was so little original data left that a decent result was only achievable using AI tools capable of filling in missing details.
Local programs for fixing pixelated photos
When it comes to privacy — especially with family photos — I'm quite careful about the tools I choose for processing them. That's why in this review I deliberately skip online services. Every program I tested installs directly on the computer and lets you process photos locally, without uploading your personal photo archive to any third-party site.
This matters a lot to me personally, since personal photos aren't the kind of material I want to upload to some random service just to experiment. On top of that, local programs let me work comfortably with the originals, try several processing variants, and compare results without depending on a constant internet connection.
Topaz Photo AI
Topaz Photo AI is the app that comes up most often in YouTube reviews and articles about fixing pixelation and other digital photo defects. I decided to start my search with it.
The developers put a huge amount of effort into automating the restoration process. As a result, Topaz Photo's interface is minimalist and barely has any switches or settings. When you add a photo, the app automatically figures out the context of the composition and launches the appropriate AI tools. The neural network recognizes objects in the shot: faces, skin texture, fur, architecture, vegetation, and text.
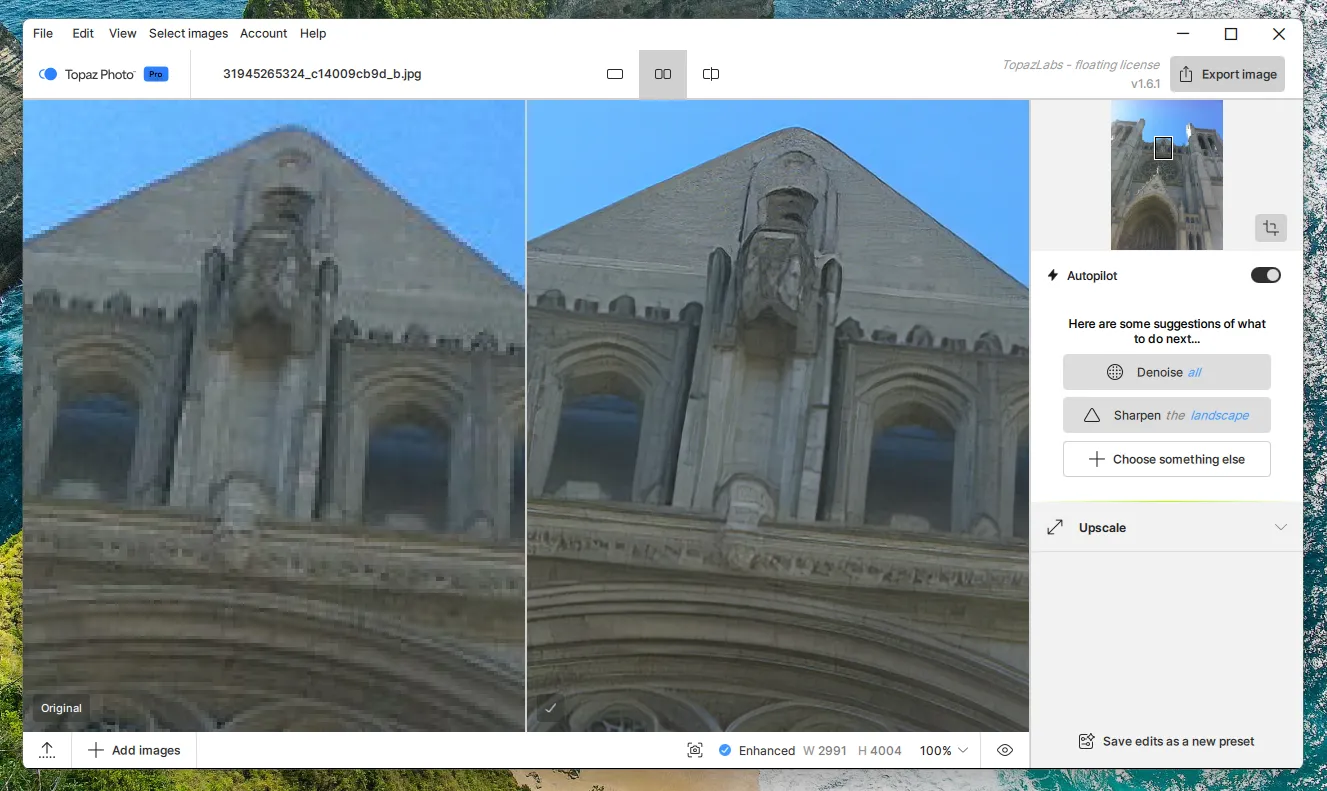
The algorithm doesn't just stretch pixels — it literally "fills in" lost details and edges, drawing on a dataset of millions of processed high-resolution photos. If you're not happy with the result, you can fine-tune the main parameters or choose a different model.
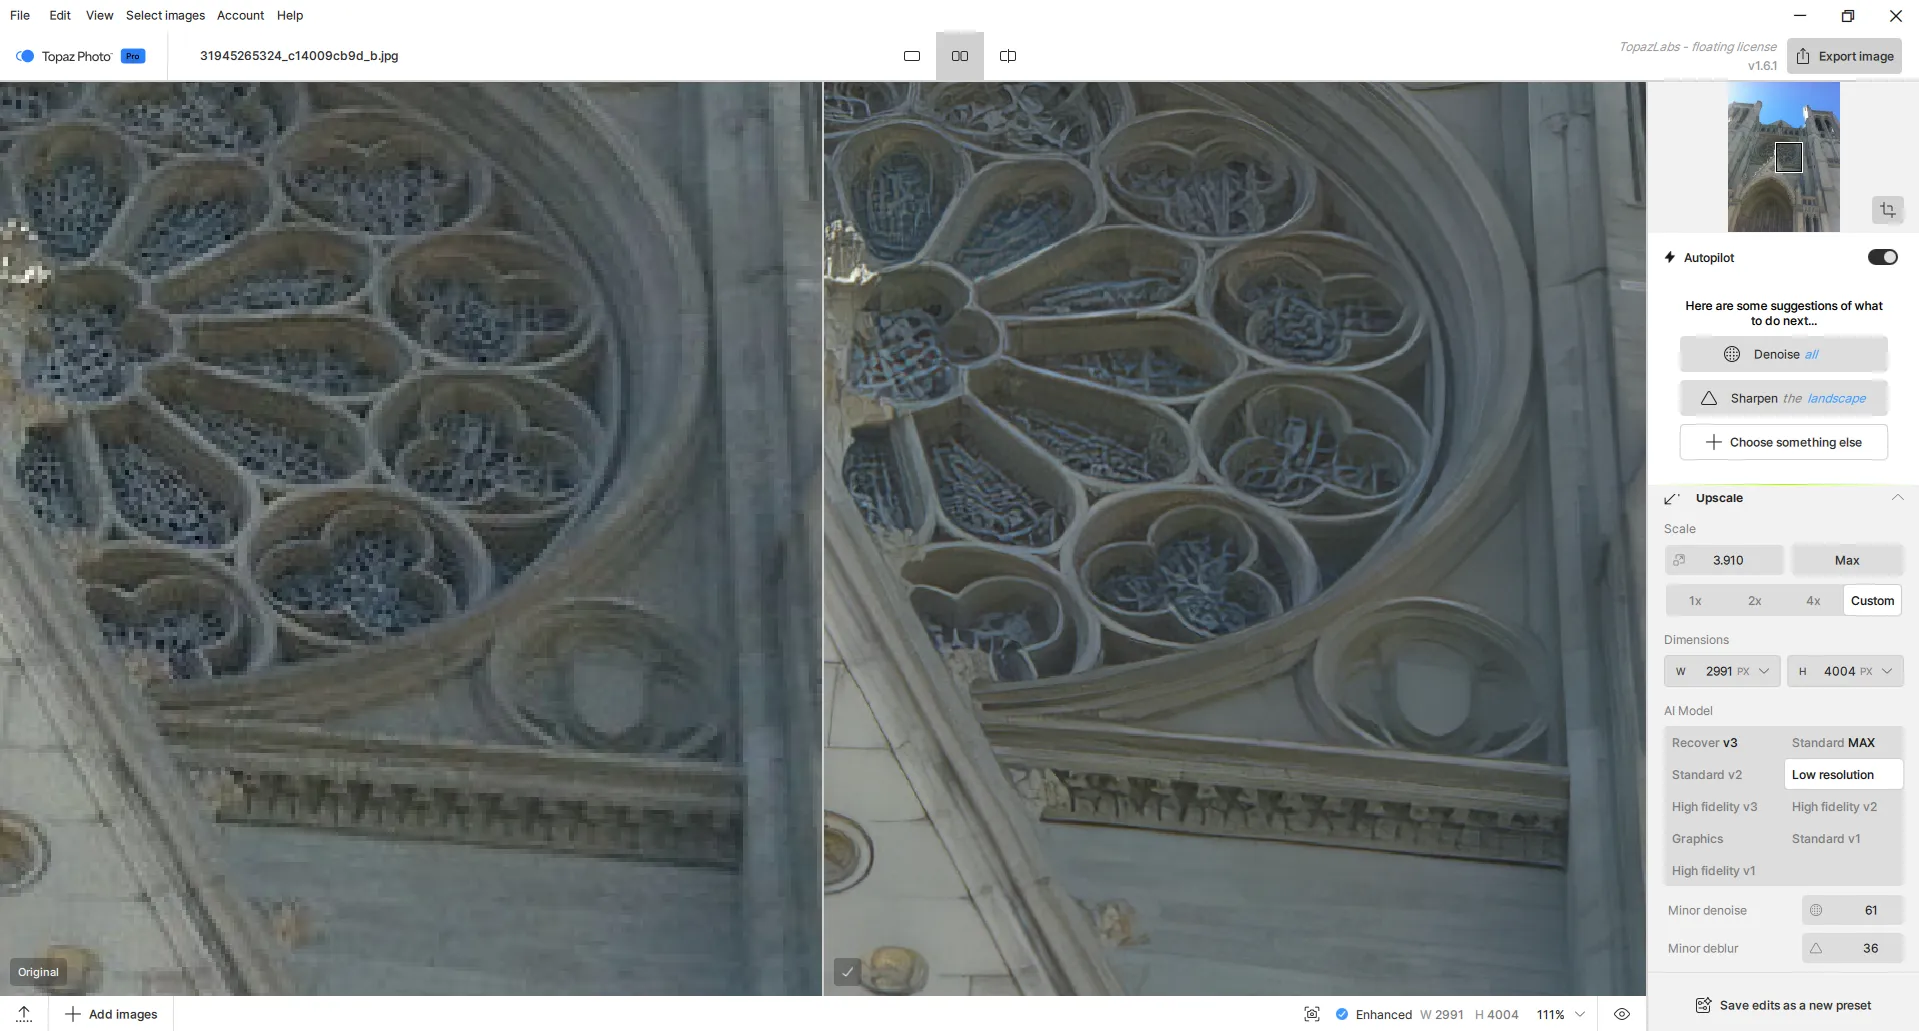
That said, when you pick a model, it first has to be fully downloaded to your computer before it can be applied. During my tests, for example, Topaz Photo AI used up about 50 GB of free disk space.
It's also important that all the pixelation fixing runs on a discrete graphics card — otherwise, processing time can stretch into tens of minutes. Even so, Topaz Photo AI delivers high-quality results.
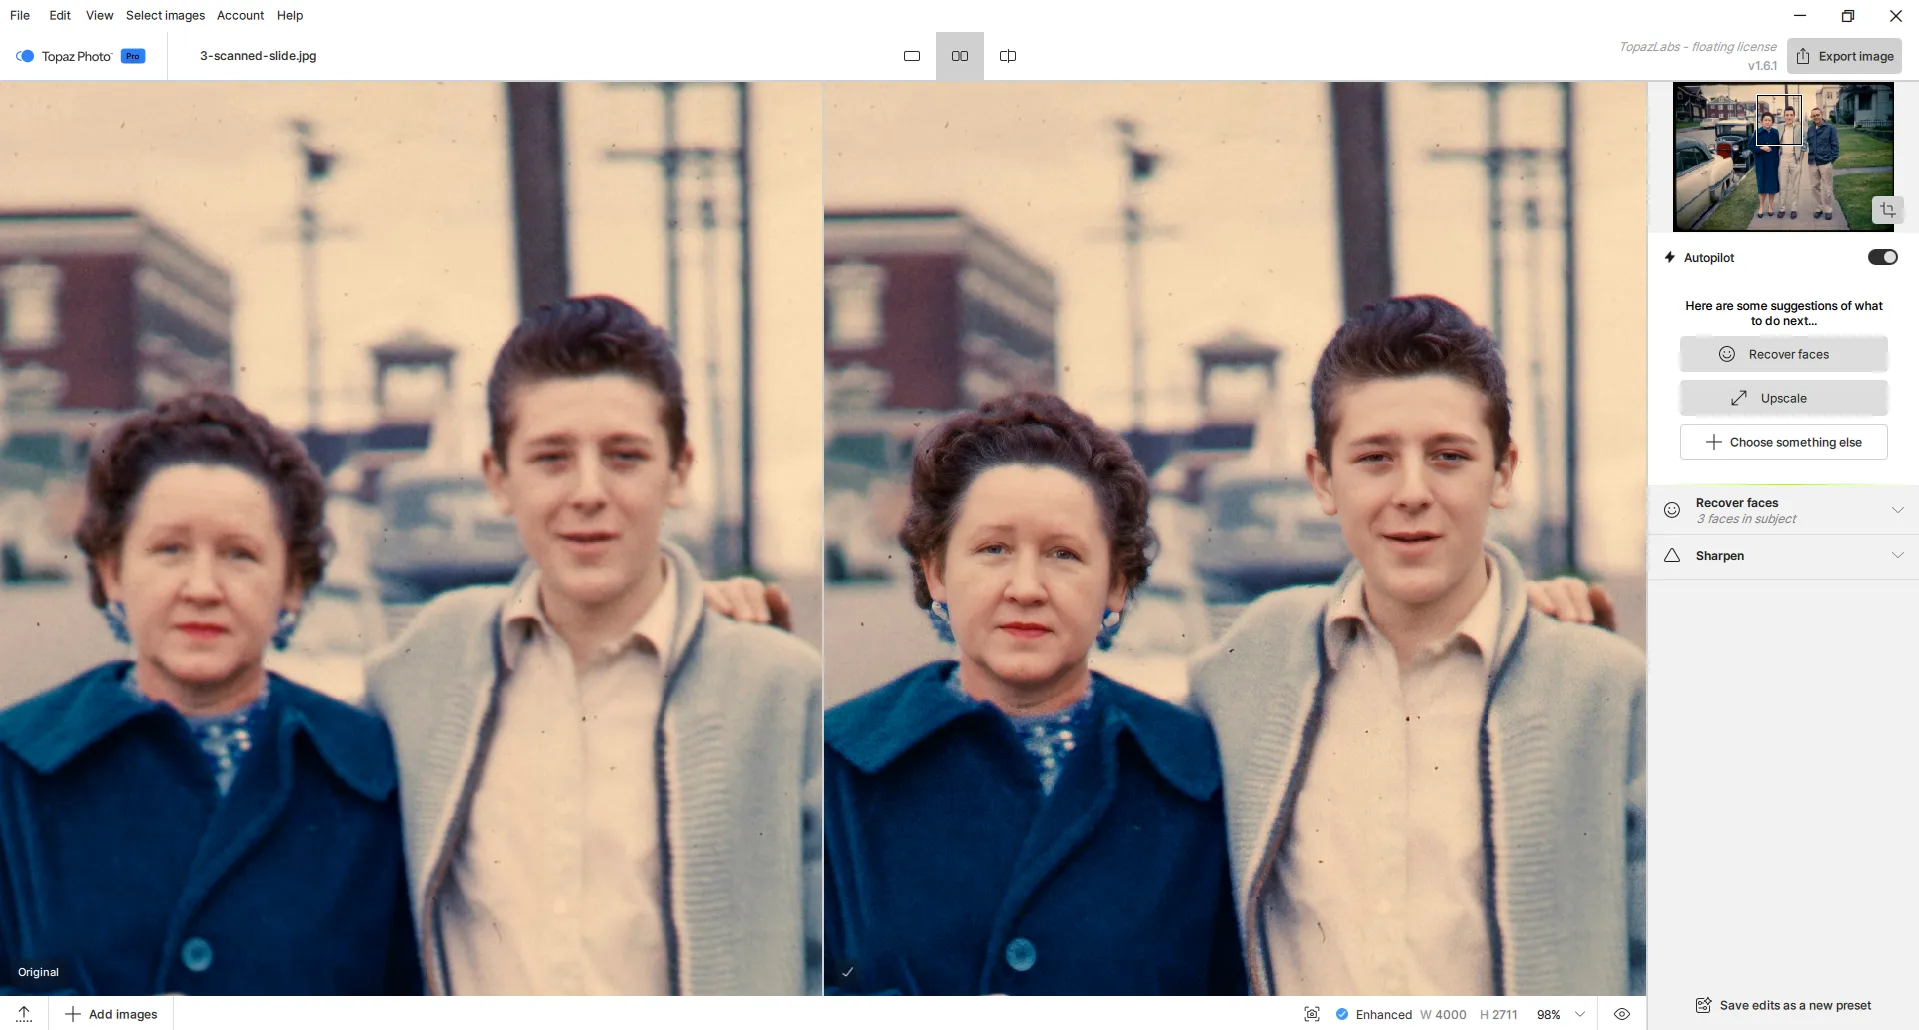
It's worth specifically calling out how it handles people's faces. The face detection and restoration feature works effectively, carefully bringing back sharpness to facial features and skin texture without creating that "plastic mask" effect.
Pros of Topaz Photo AI for fixing pixelated photos
Automation and smart analysis.
High-quality face restoration.
Deep detail reconstruction.
Cons of Topaz Photo AI for fixing pixelated photos
High demands on free disk space.
Dependent on GPU power.
Sold on a monthly subscription basis (from $17/month).
Upscayl
Since Topaz Photo AI is demanding on computer resources, and processing itself takes around 5 minutes per photo (and I had several dozen), I had to look for a lighter alternative. So I decided to try Upscayl.
It's a free, open-source app built on the basic, publicly available GFPGAN/Real-ESRGAN models.
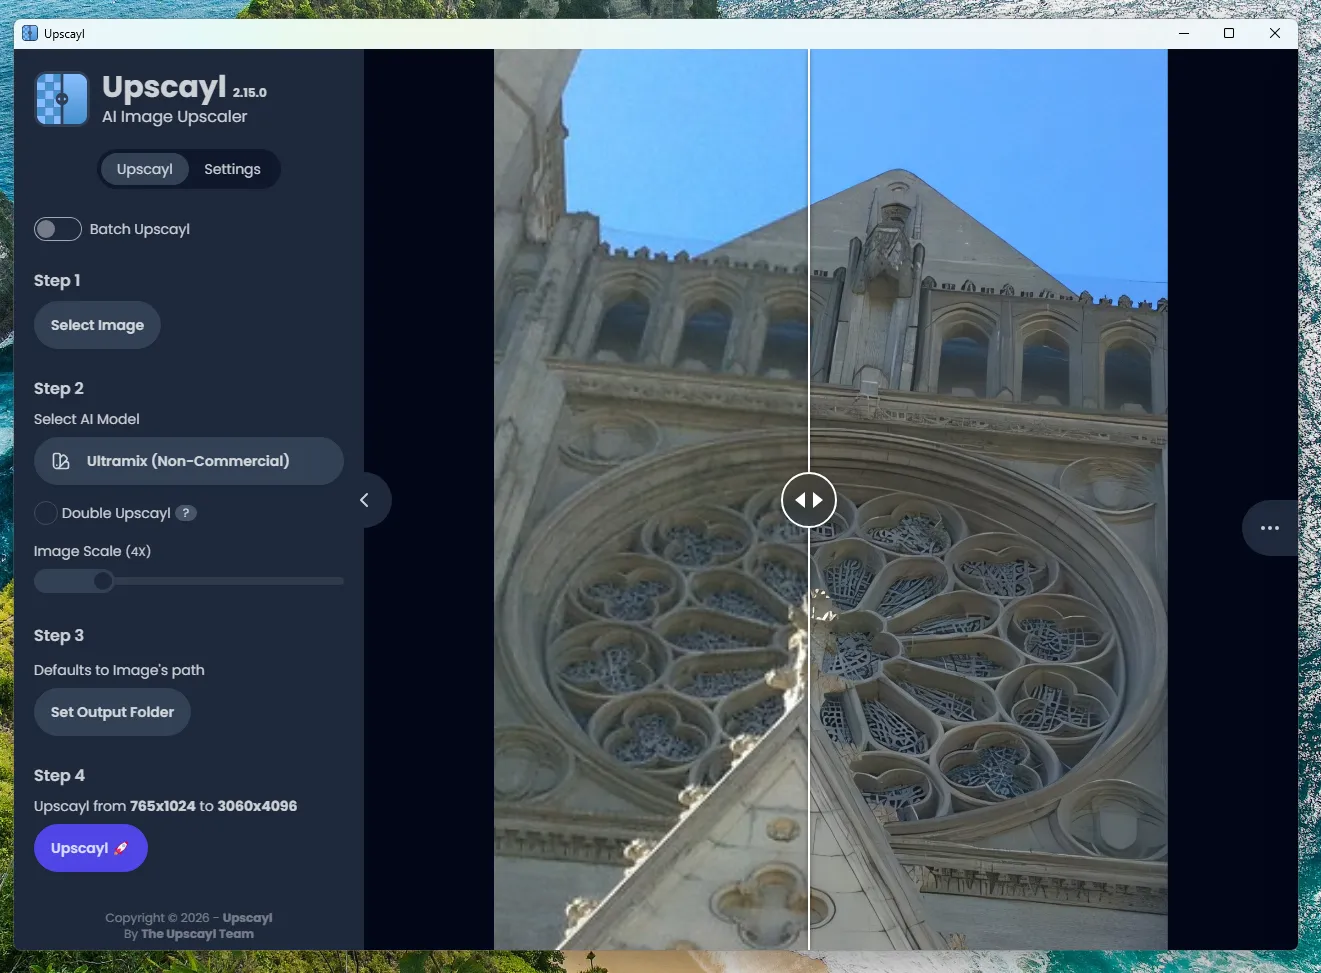
The app handles JPEG compression artifacts and visual pixelation well, making edges smooth and crisp. However, Upscayl doesn't fix out-of-focus or blurry shots. If the original frame isn't in focus, you end up with a larger but still blurry image.
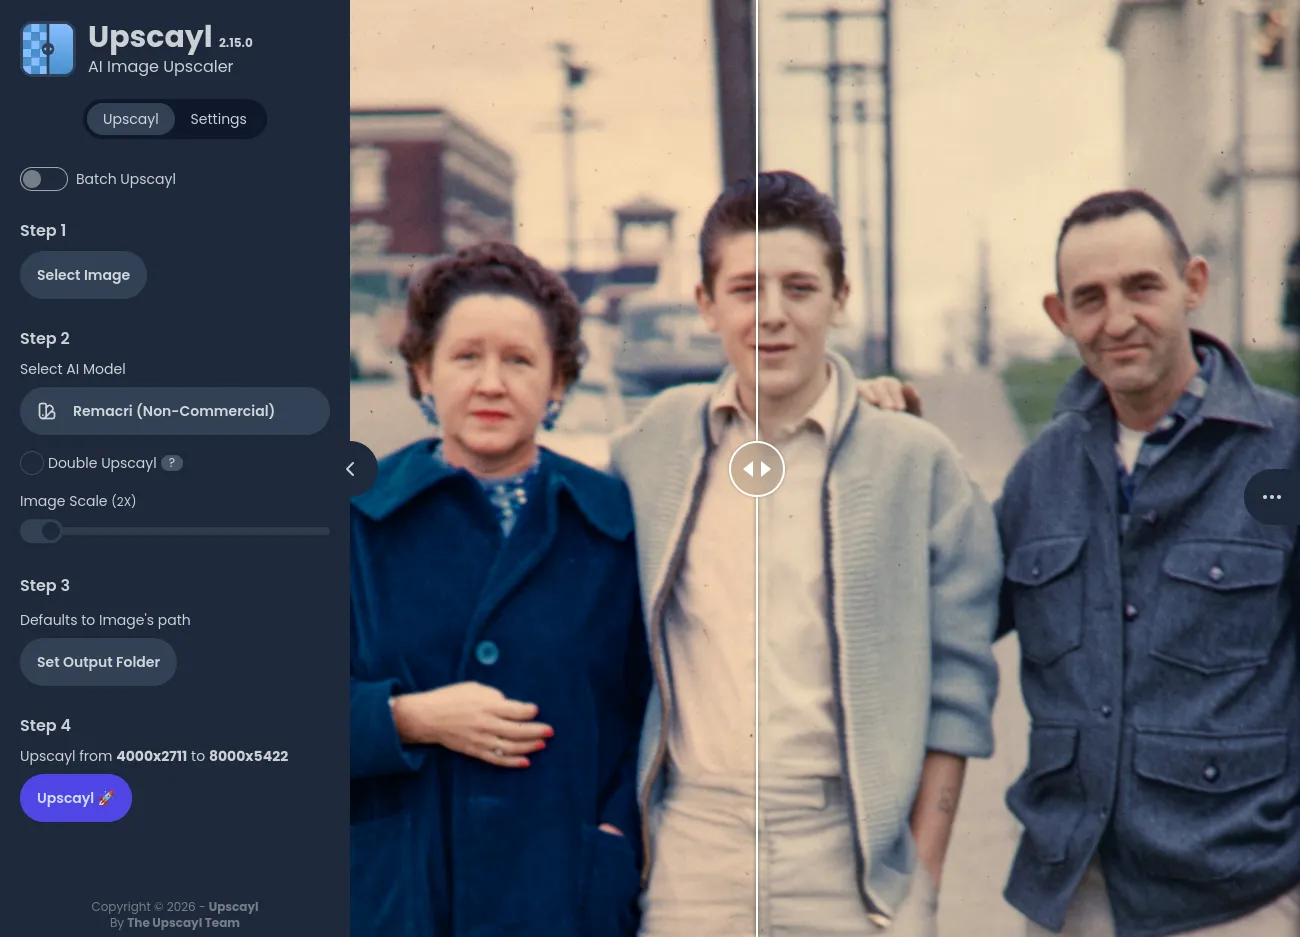
Overall, Upscayl works well if you need to fix pixelation on landscape shots or photos of building architecture. For shots featuring people, you're better off with Topaz Photo AI or looking for another alternative.
Pros of Upscayl for fixing pixelated photos
100% free with no ads.
Photos are processed on your own PC and never sent to remote servers.
Cross-platform.
Simple interface.
Cons of Upscayl for fixing pixelated photos
Demanding on hardware.
Very few manual settings.
Low effectiveness of the free models.
Slow development — no updates in two years.
ON1 Resize AI
ON1 Resize AI caught my interest because it uses the Genuine Fractals system, whose roots go back to the late 1990s. It combines classic fractal algorithms with modern deep-learning neural networks and diffusion-based super-resolution models. I don't know much about the inner workings of AI models, but even the names alone inspire confidence.
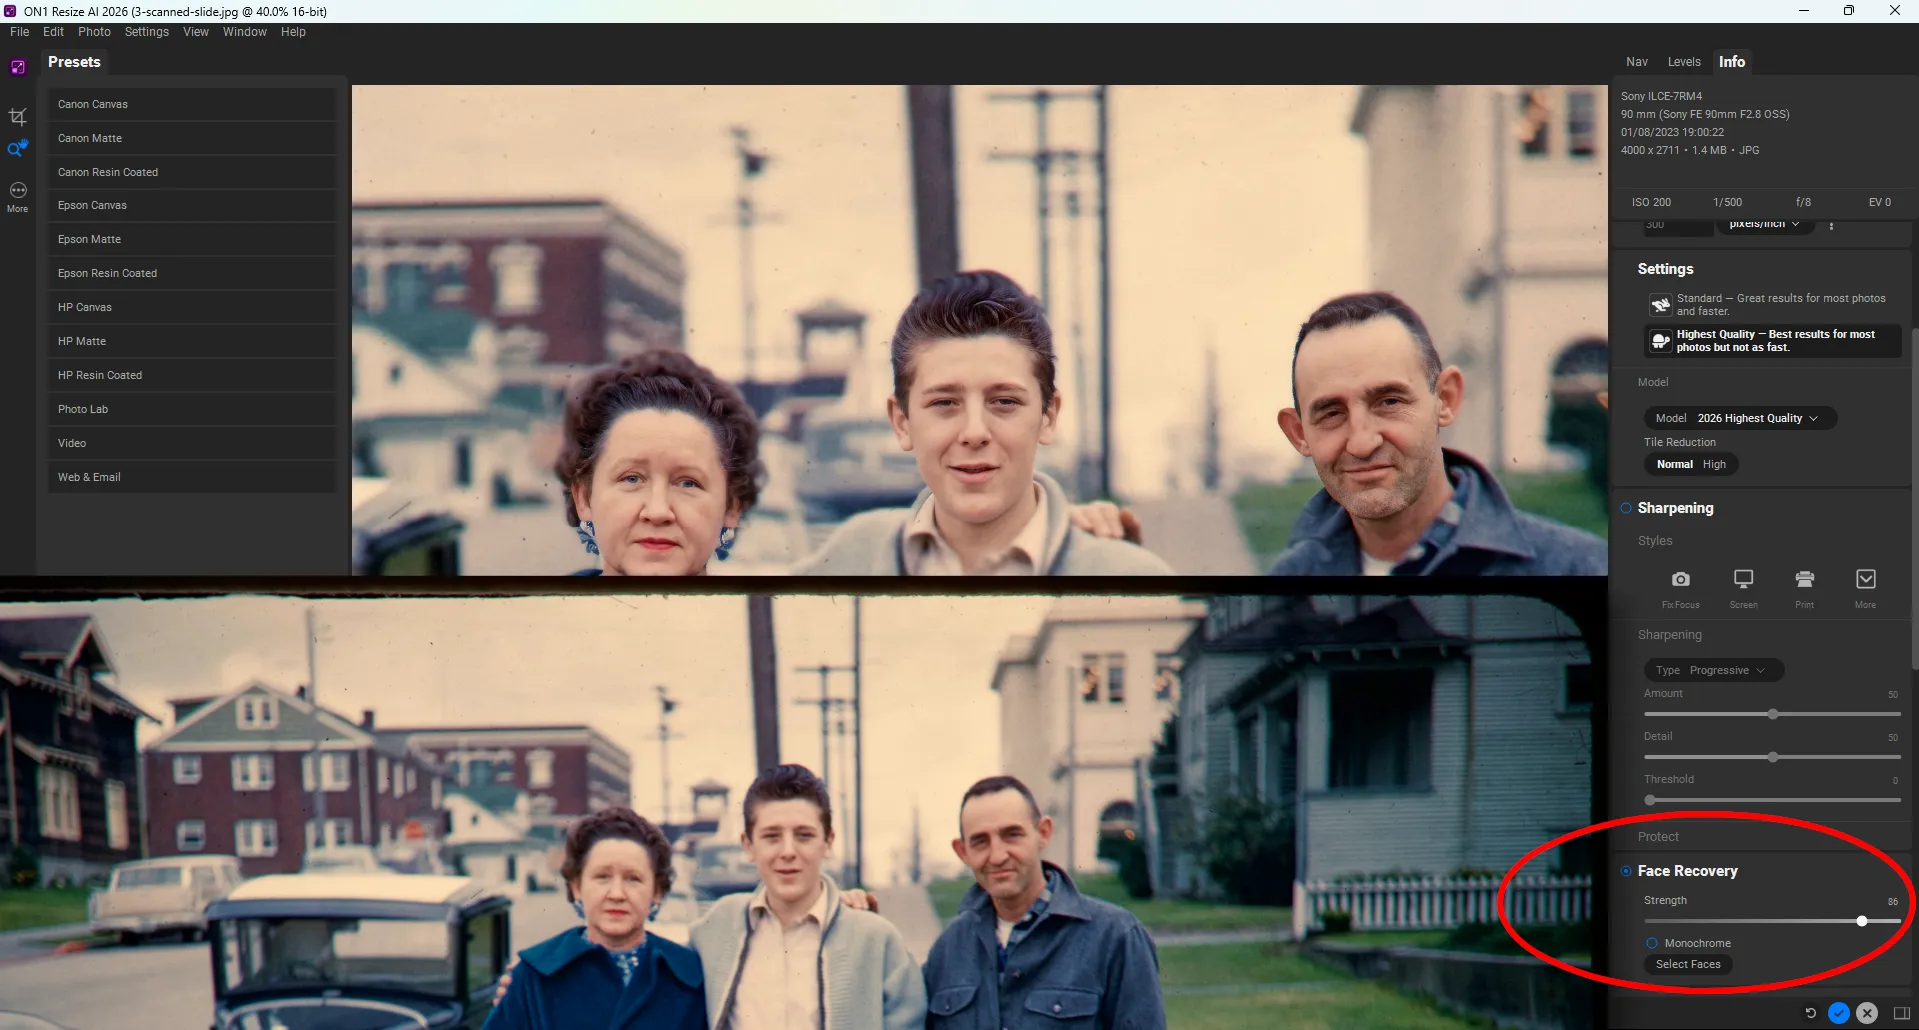
ON1 Resize AI's interface resembles Topaz Photo's but feels more advanced, mainly because of its deeper manual controls. Here you can fine-tune the pixelation-fixing process and add filters or adjust effects.
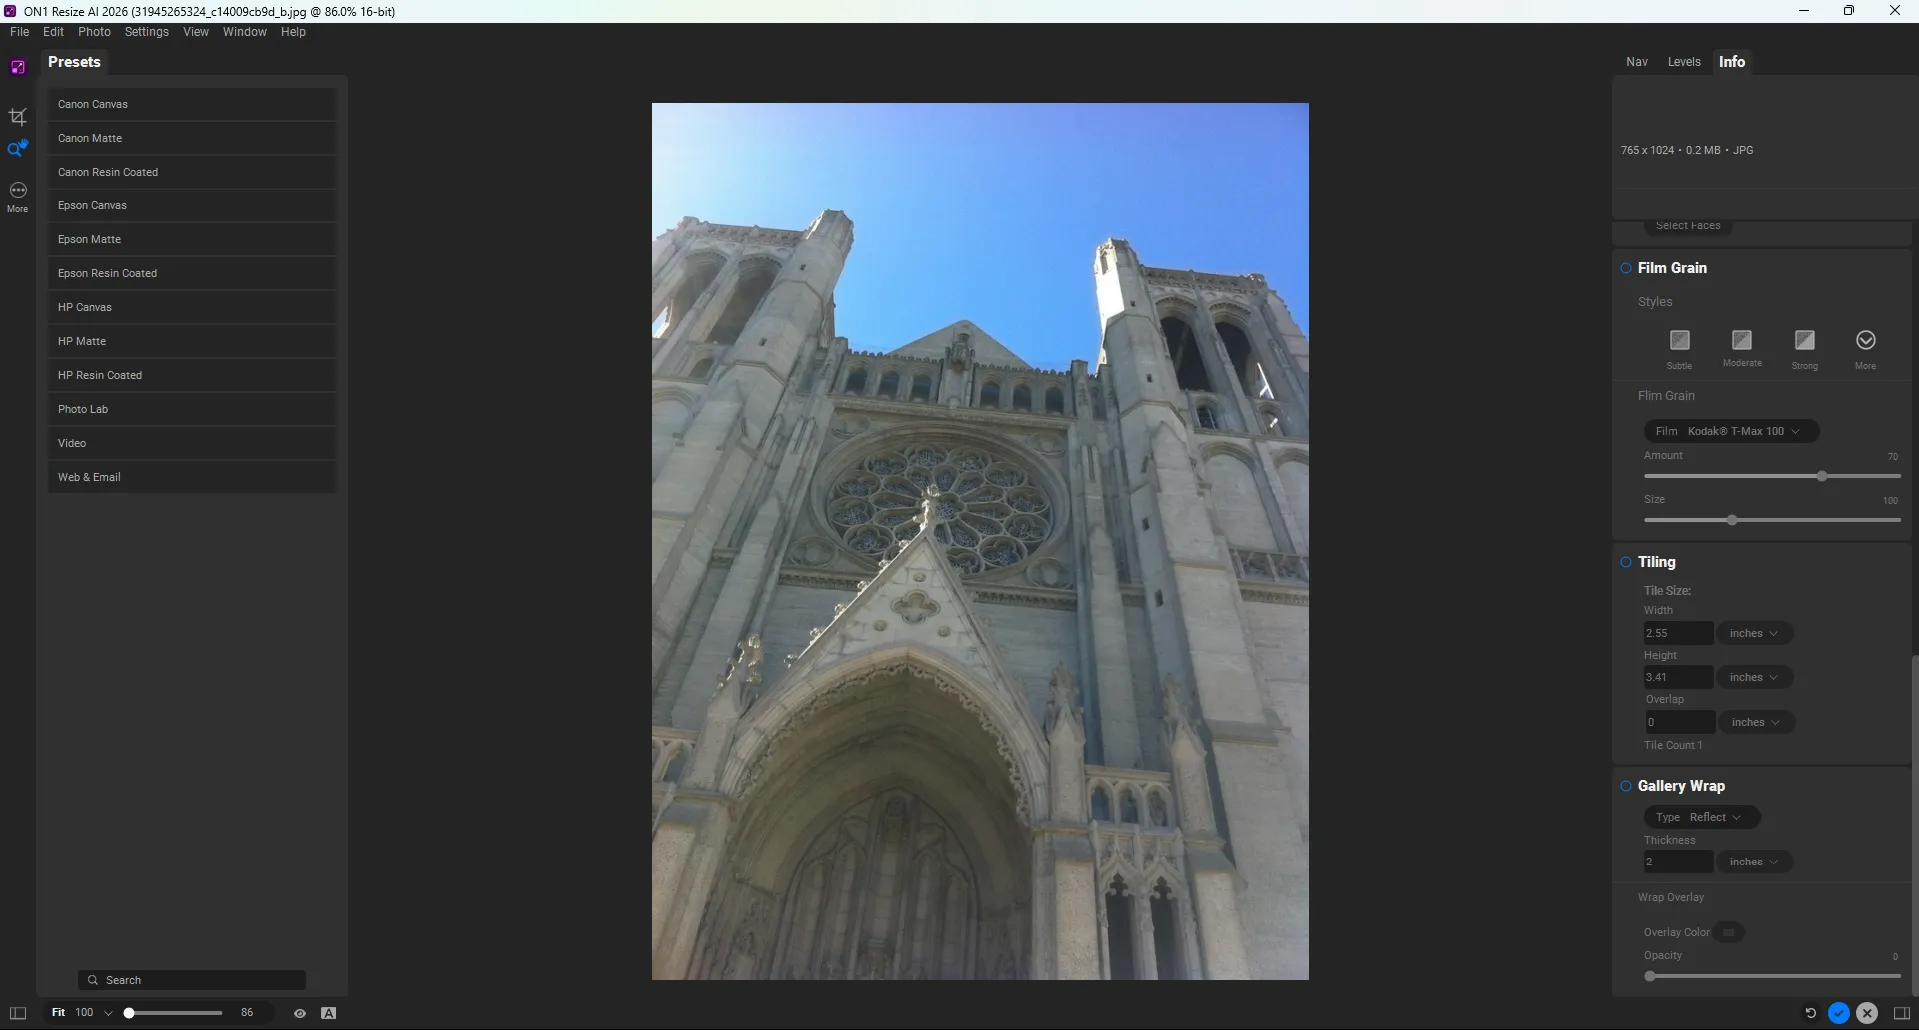
Even without precise adjustments, though, the app produces a fairly solid result.
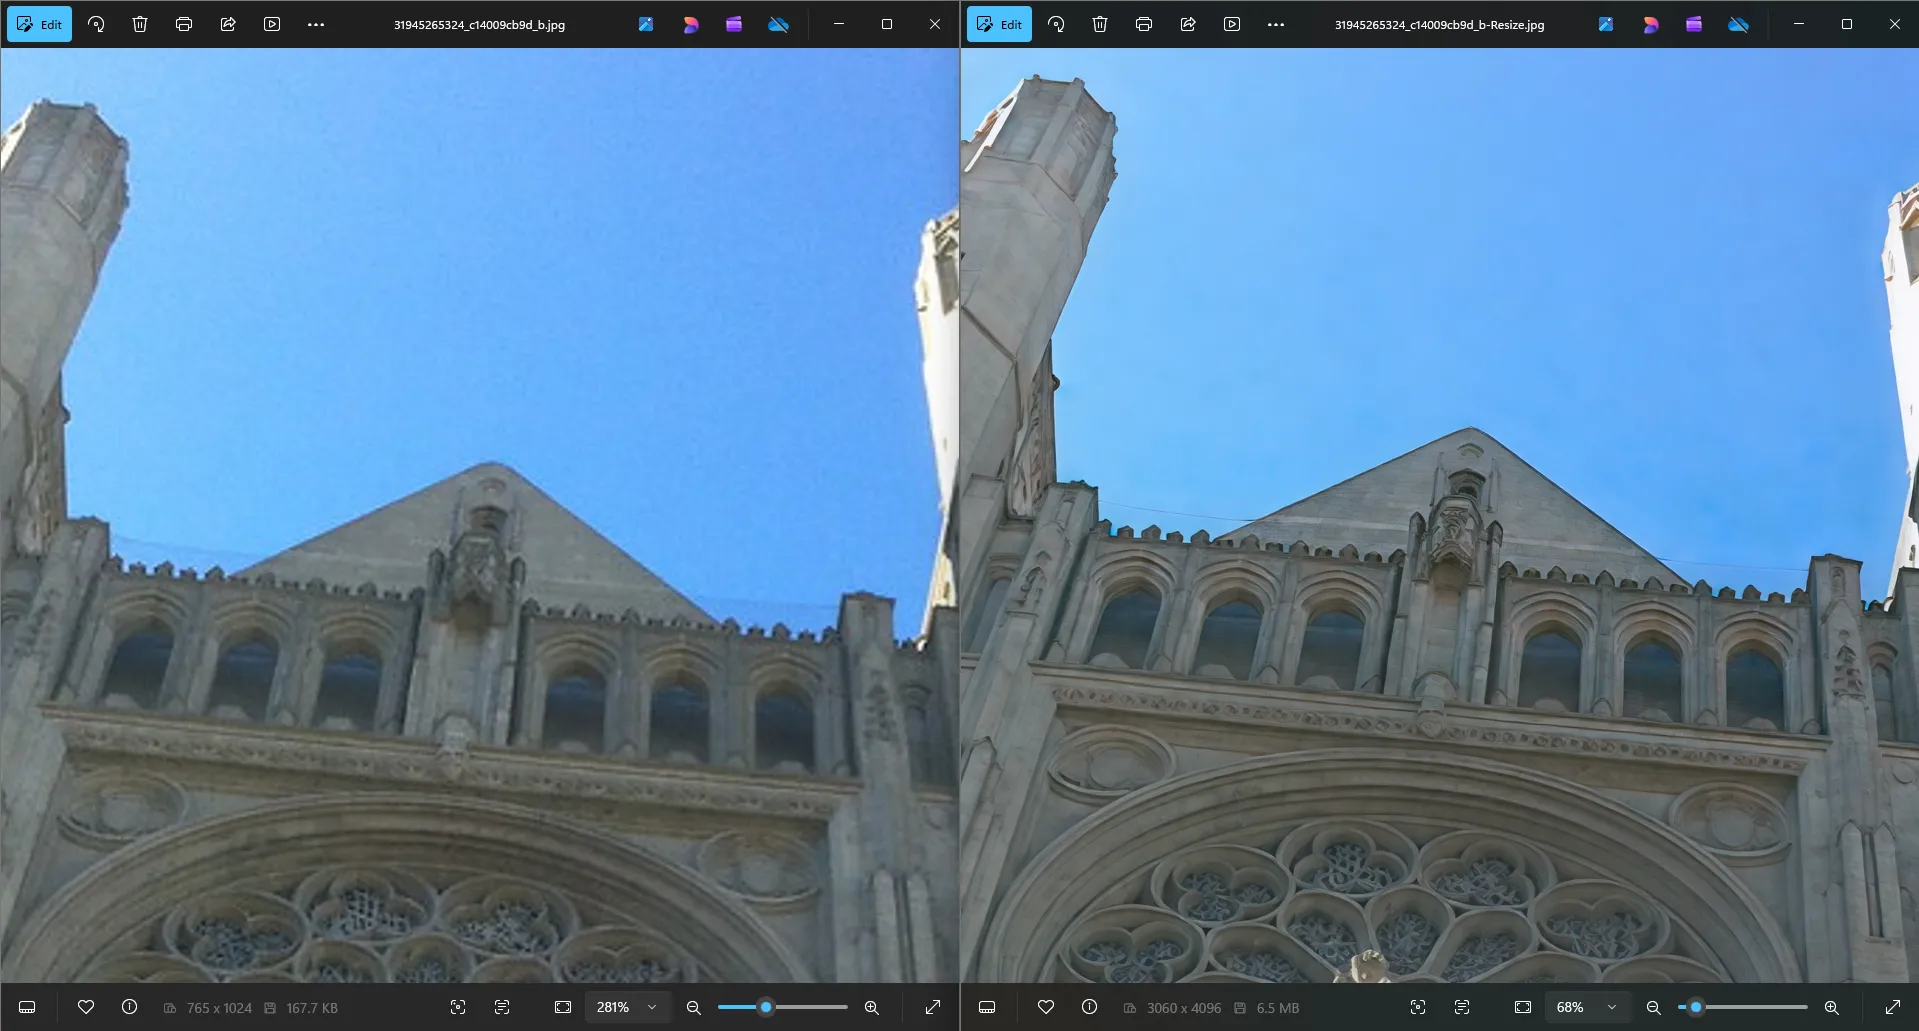
I liked how the face restoration model works here. It finds portraits in low-detail or pixelated shots and restores natural facial features, eyes, and skin structure using an adjustable strength slider. There's a slider that lets you control the intensity of the algorithm's effect in real time.
Pros of ON1 Resize AI for fixing pixelated photos
High quality of edge preservation after processing.
Professional print-preparation tools included.
Works with both RAW and JPEG.
Flexible control over how strongly the models affect the final result.
Cons of ON1 Resize AI for fixing pixelated photos
Neural network processing and diffusion models require a powerful graphics card.
If the source is extremely compressed or pixelated, the AI can produce overly smooth, "painted" textures.
A lifetime license, but at a price too high ($119.99 before any discount) for what's essentially a single module.
Luminar Neo
Unlike the previous programs, Luminar Neo is a hybrid photo editor that combines classic photo editing with AI extensions. It's a full-fledged competitor to Lightroom when it comes to "developing digital negatives." The app offers a huge range of editing tools, but when it comes to fixing photo pixelation specifically, it performs only mediocrely.
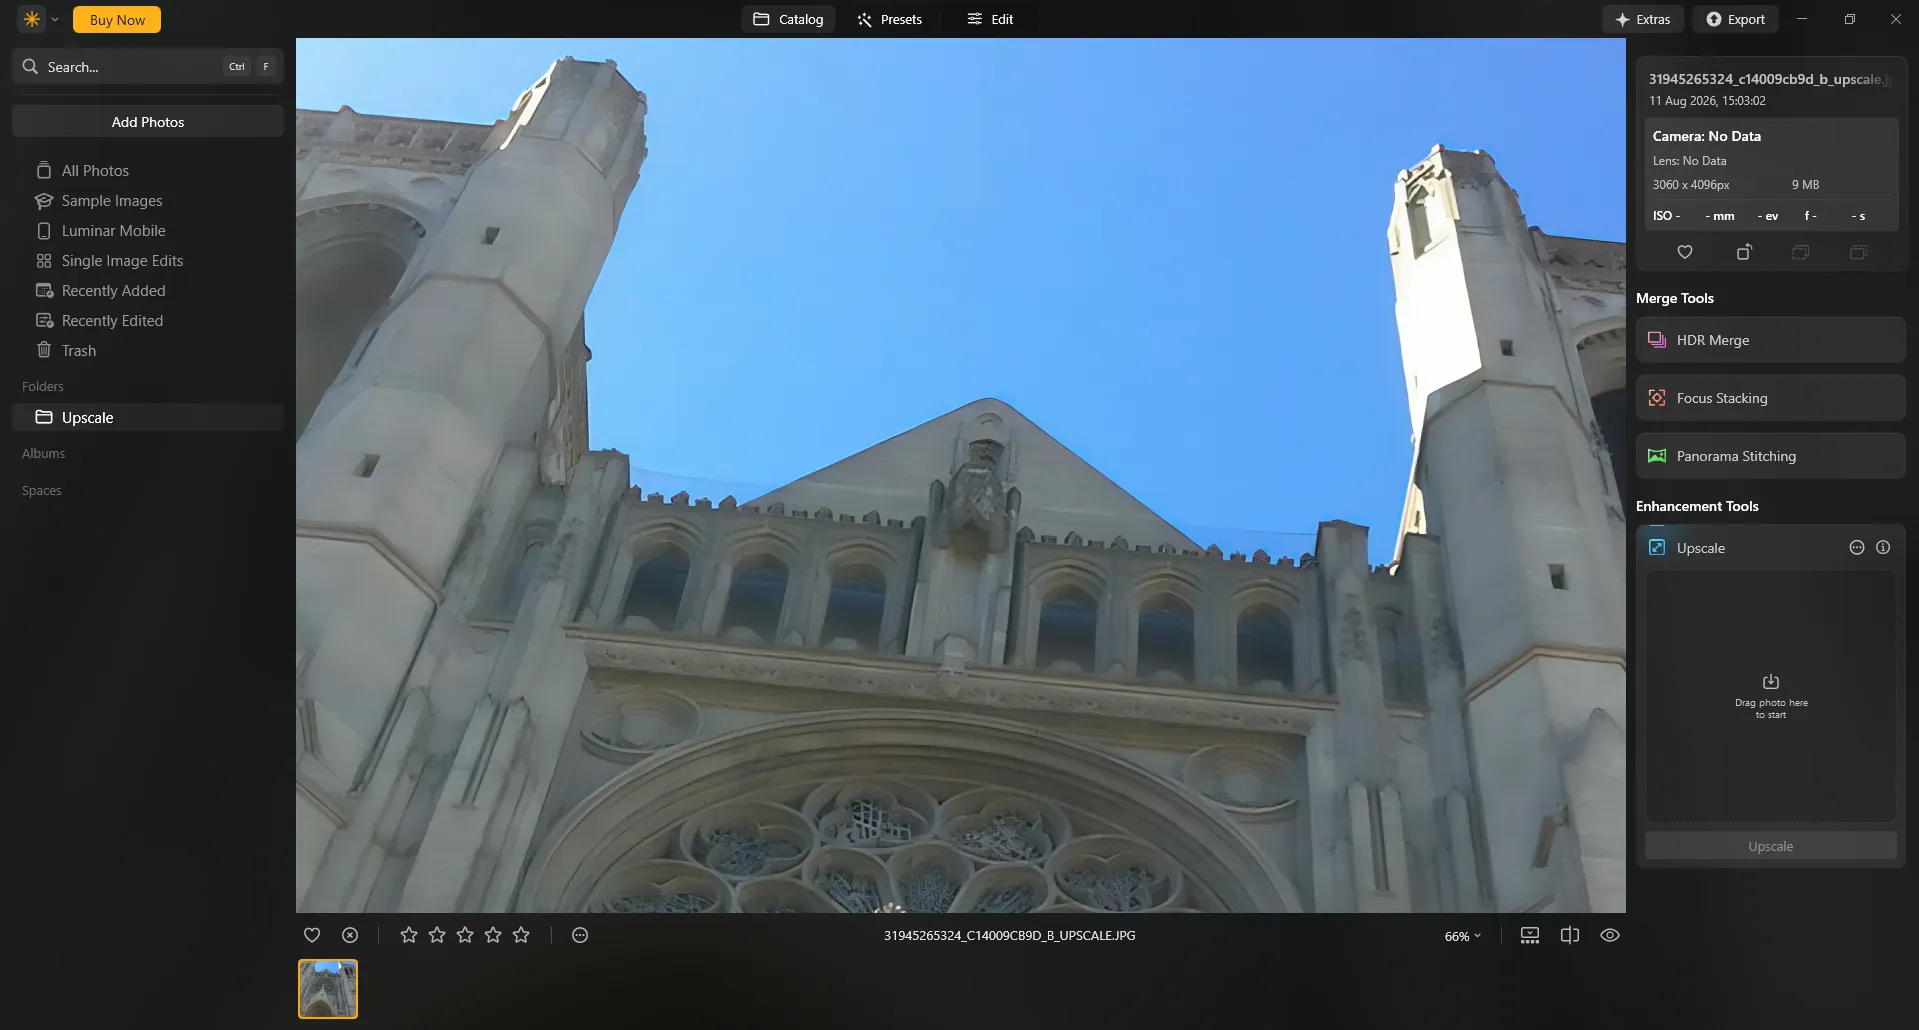
Even without comparing it to the original, you can see the built-in model tries too hard. The result comes out looking overly "plasticky," with none of the natural imperfections left.
Pros of Luminar Neo for fixing pixelated photos
Easy to use.
A comprehensive, all-in-one approach.
Batch processing.
Cons of Luminar Neo for fixing pixelated photos
A "watercolor/plastic" effect after processing.
No tools to reduce how strongly the AI model affects the image.
First and foremost an editor for professional photographers, not a tool for improving old photos.
HitPaw FotorPea
As it turns out, HitPaw FotorPea is one of the few programs originally built specifically for AI-based photo enhancement. And it's not just an upscaler — it's a multifunctional solution that bundles together several models at once. It includes tools for increasing resolution, removing noise, restoring faces, fixing blur, working with text, and restoring old photos.
Despite the extensive feature set, I didn't have to figure out dozens of technical parameters. You just add a photo, and then either use the automatic mode or pick a processing model yourself.
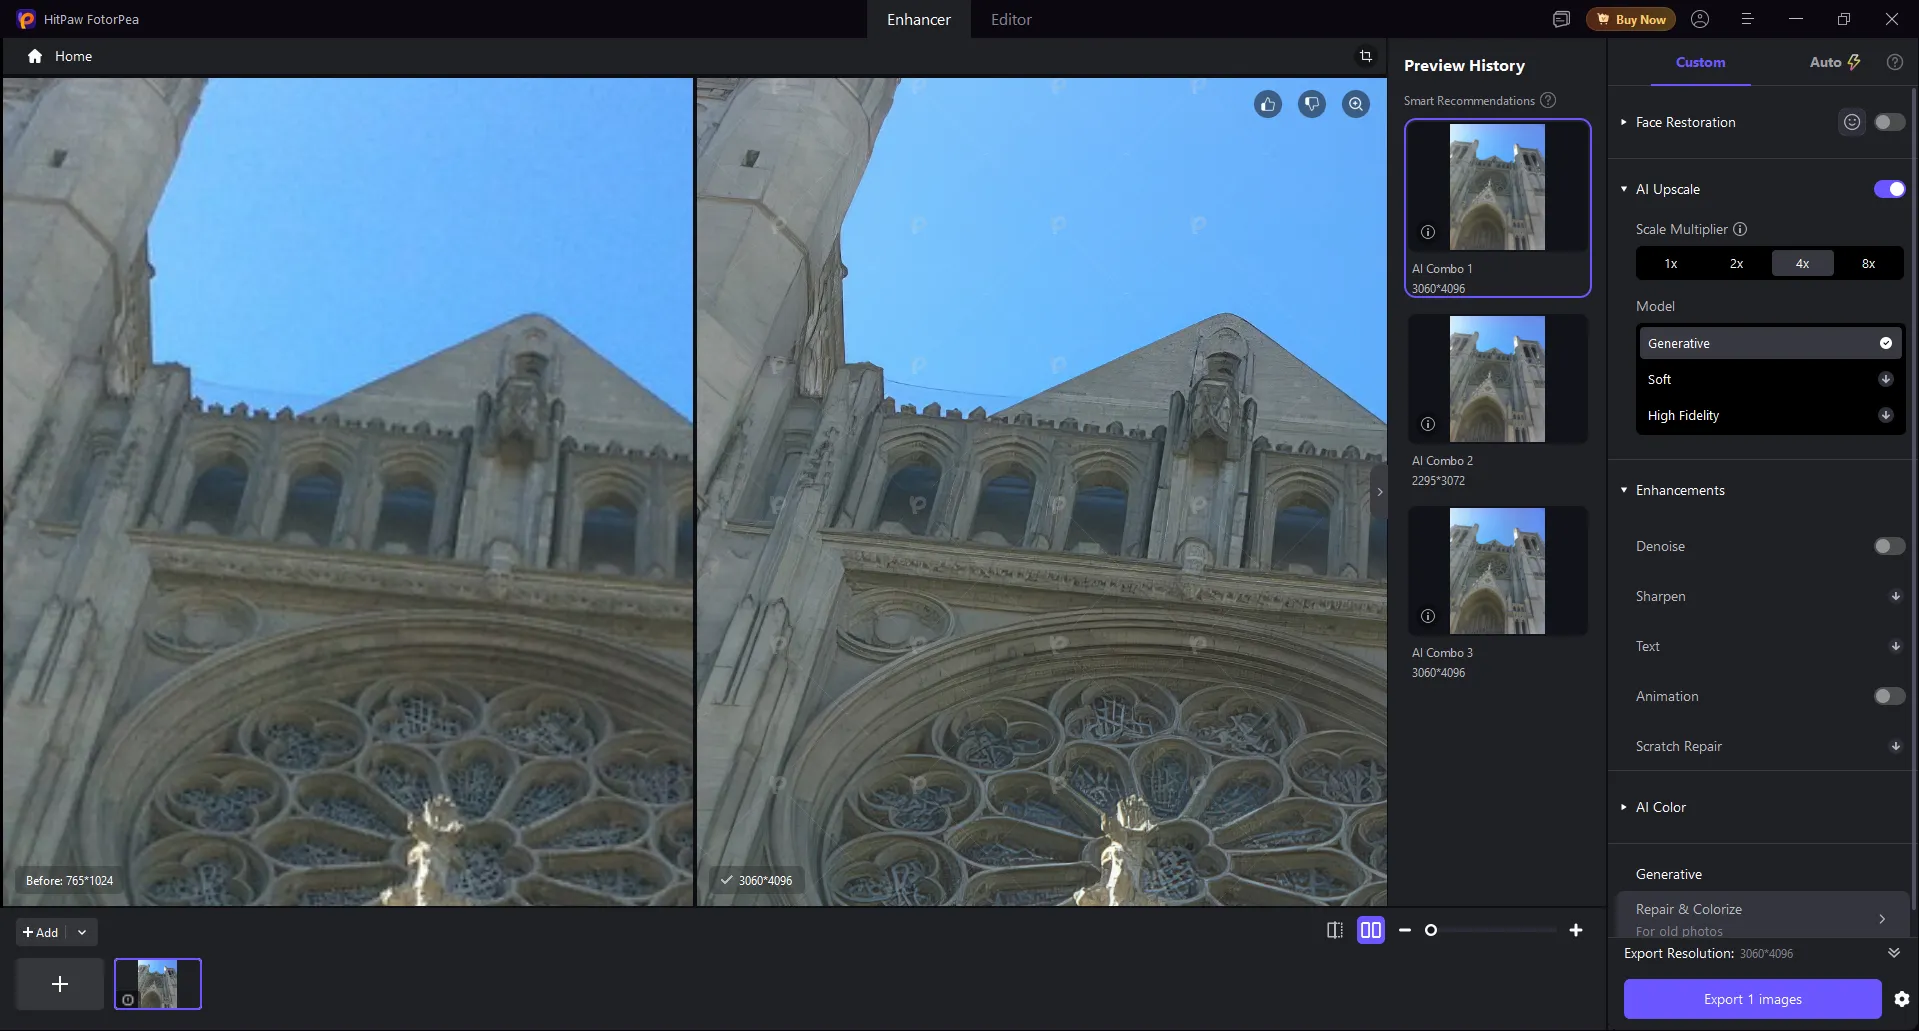
To fix pixelation, I used the AI Upscale model. It increases the image resolution while trying to restore small details lost during downscaling or compression. It also offers three processing variants at once, letting you pick the best one.
In my view, the ability to choose a specialized model is one of FotorPea's biggest strengths. For portraits, for example, there are several Face Restoration options: Soft V1, Soft V2, Realistic, and Sharp. Realistic is meant, among other things, for very low-quality or partially obscured faces, while Sharp emphasizes edges and facial contours. You can also adjust the strength for the Face Model.
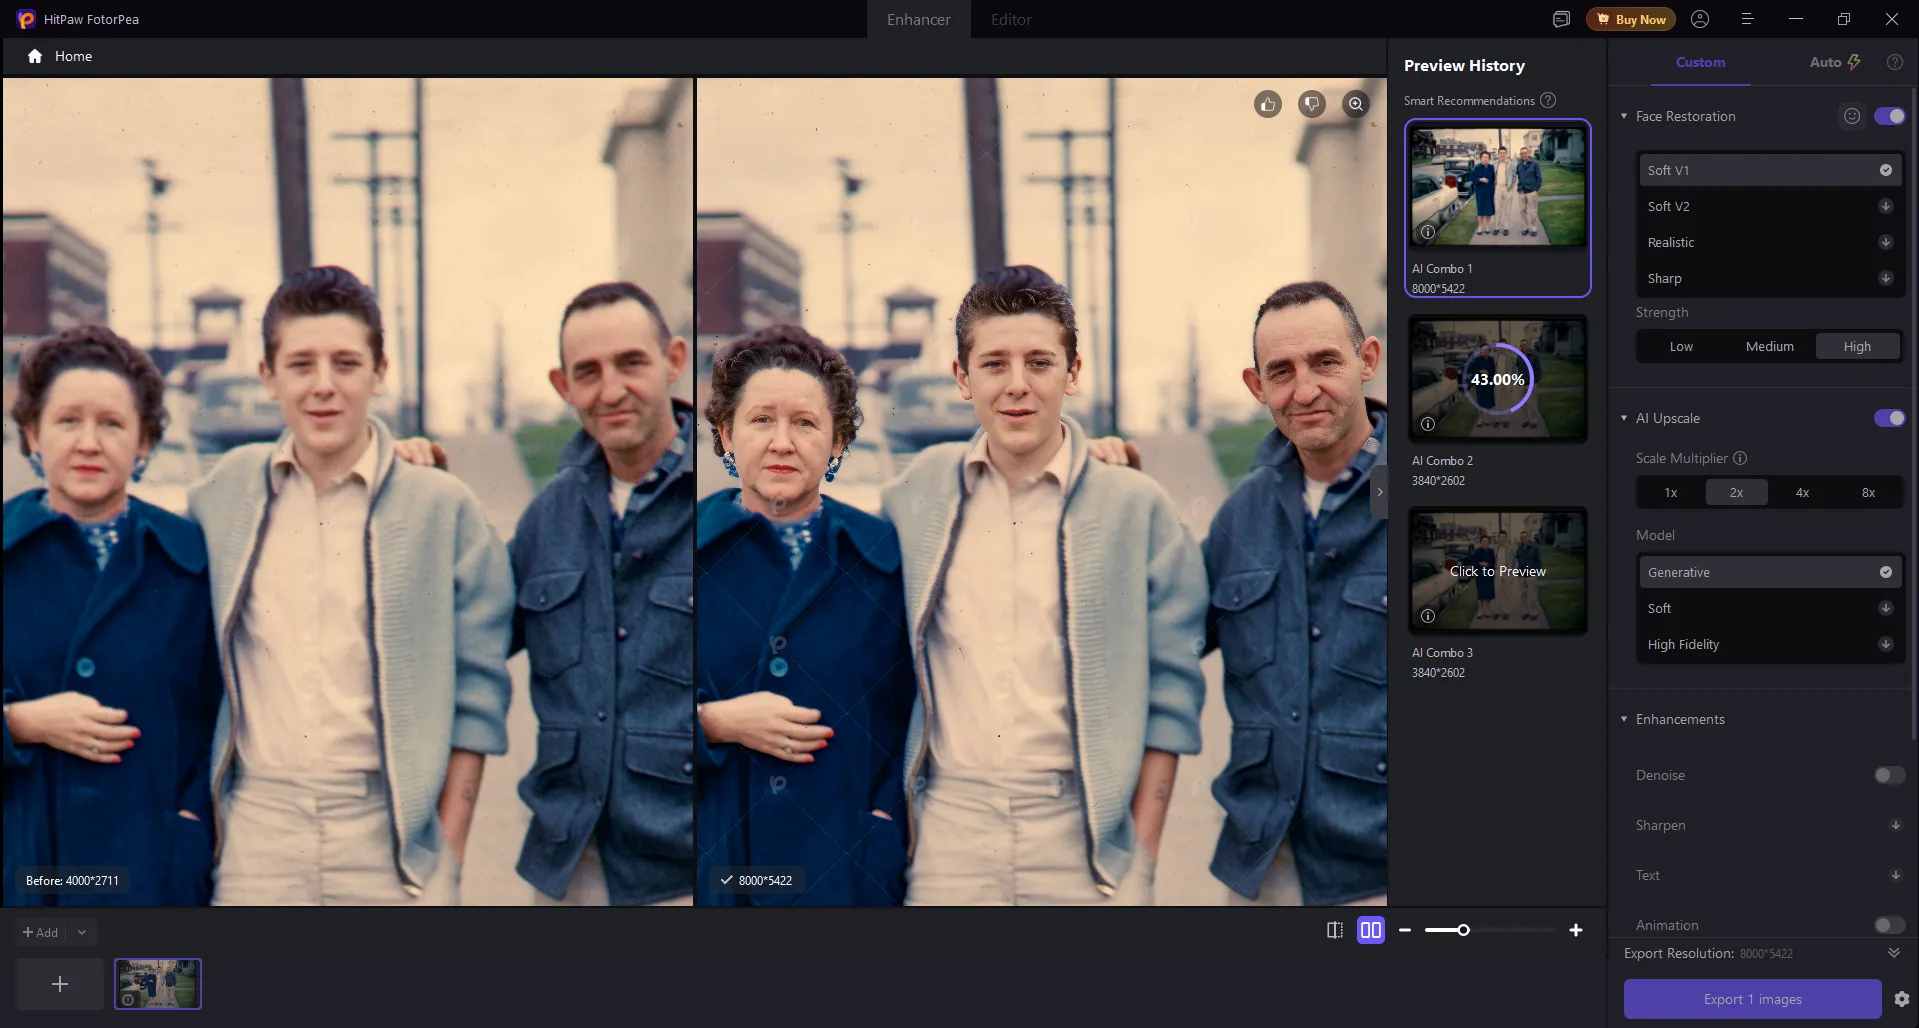
This helps you avoid situations where the neural network "over-improves" a face and turns skin into a smooth plastic surface. That said, it's impossible to fully rule out that effect. At maximum processing strength, the app can still start adding too many invented details.
Pros of HitPaw FotorPea for fixing pixelated photos
Several specialized AI models for different types of defects.
Good quality when increasing photo resolution.
Effective face restoration with adjustable strength.
Separate models available for noise, blur, and JPEG artifacts.
Specialized text processing.
Ability to upscale images 6× and 8×.
Tools for restoring old and damaged photos.
Scratch removal and colorization.
Automatic selection of the appropriate model.
Cons of HitPaw FotorPea for fixing pixelated photos
Under heavy pixelation, the AI starts inventing details that weren't in the original.
Faces sometimes come out too smoothed or different from the original.
Some models create artificial-looking textures when upscaling too aggressively.
Needs solid hardware for comfortable use.
Fixing Pixelation with the GIMP Image Editor
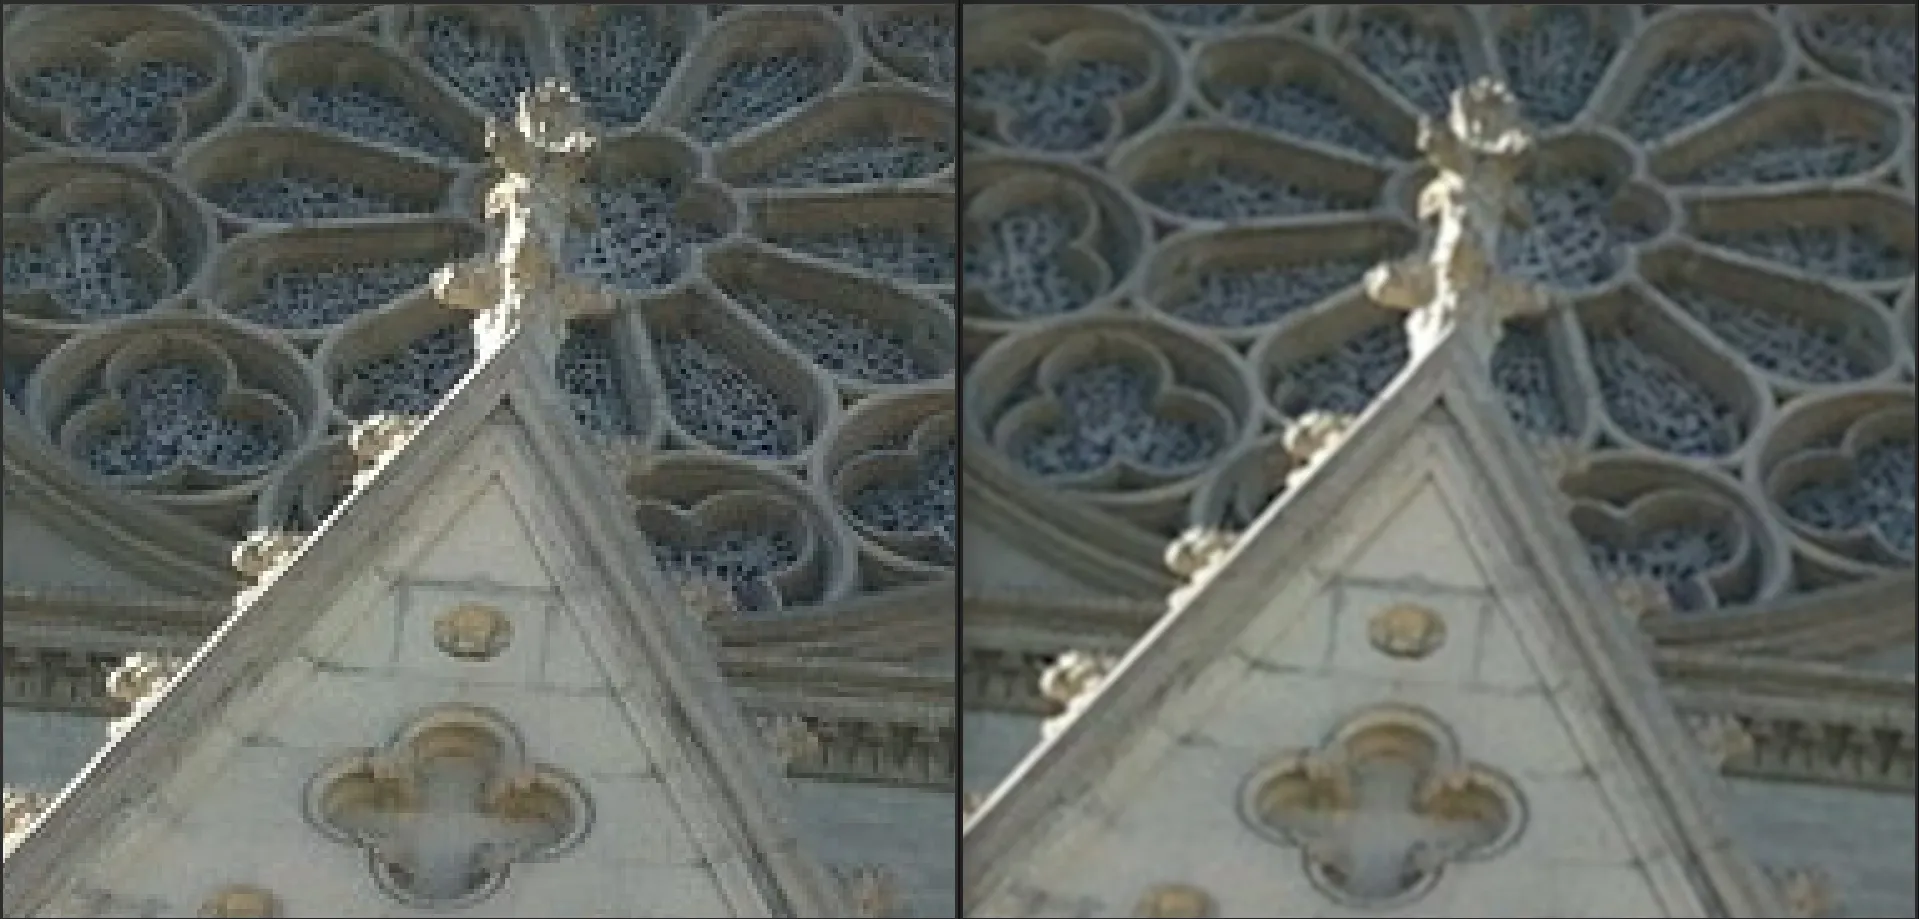
The downside of every AI-based tool is that it distorts accuracy. They can invent elements that don't actually exist or warp proportions. While that's not critical for landscape shots, it's unacceptable when dealing with historical buildings. For fixing pixelation on photos like that, I used the GIMP image editor.
First, I changed the image encoding from 8-bit to 16-bit floating point. This doesn't affect the encoding of the final result, but it does expand the available color range while you're editing.
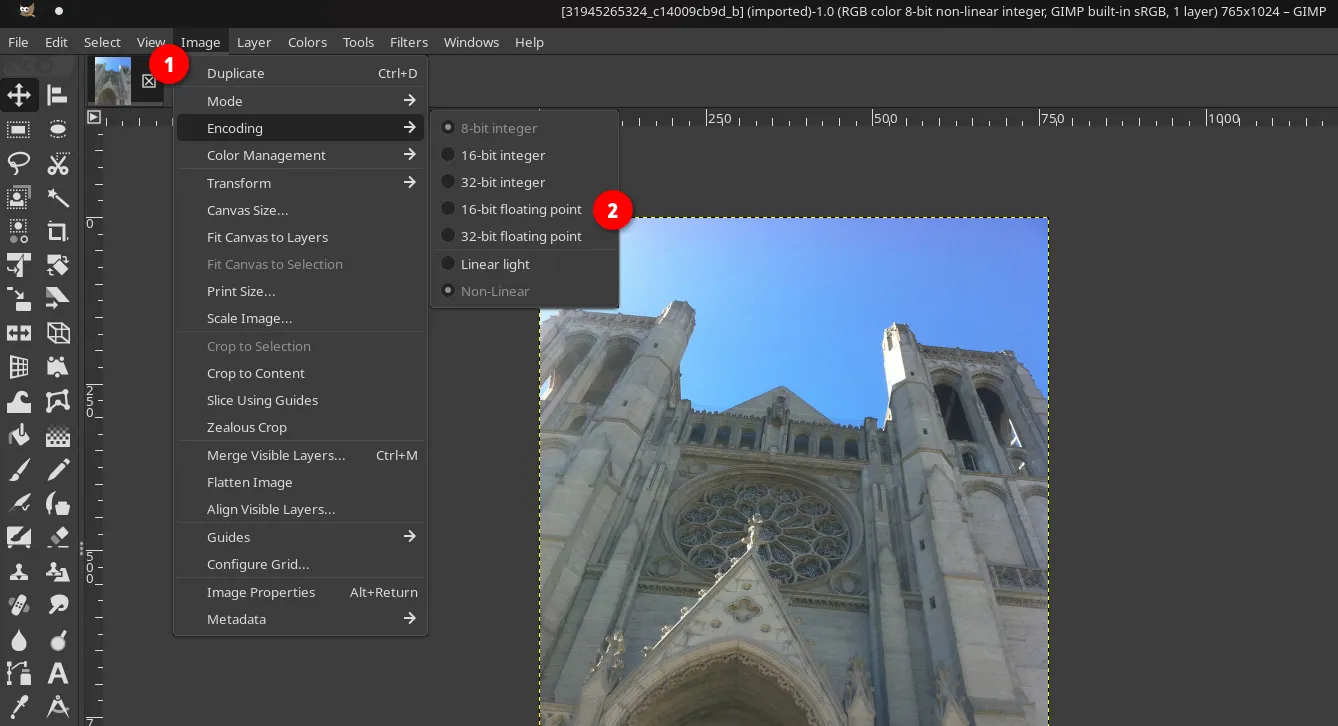
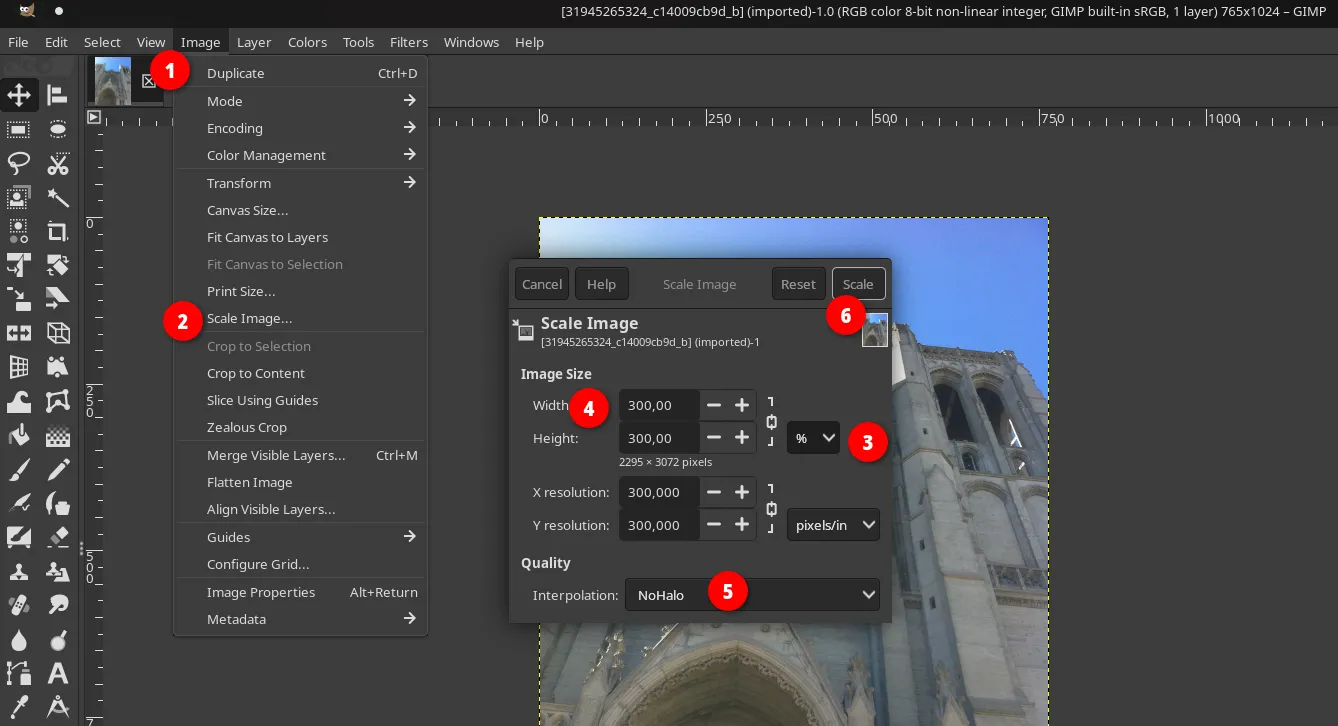
The next step is increasing the image's resolution. When you do this, it's important to choose NoHalo or LoHalo in the interpolation dropdown. These modern algorithms, part of GIMP's GEGL engine, are specifically designed to resize images without creating sharp, high-contrast color halos around pixels. For convenience, I set the size in percentages.
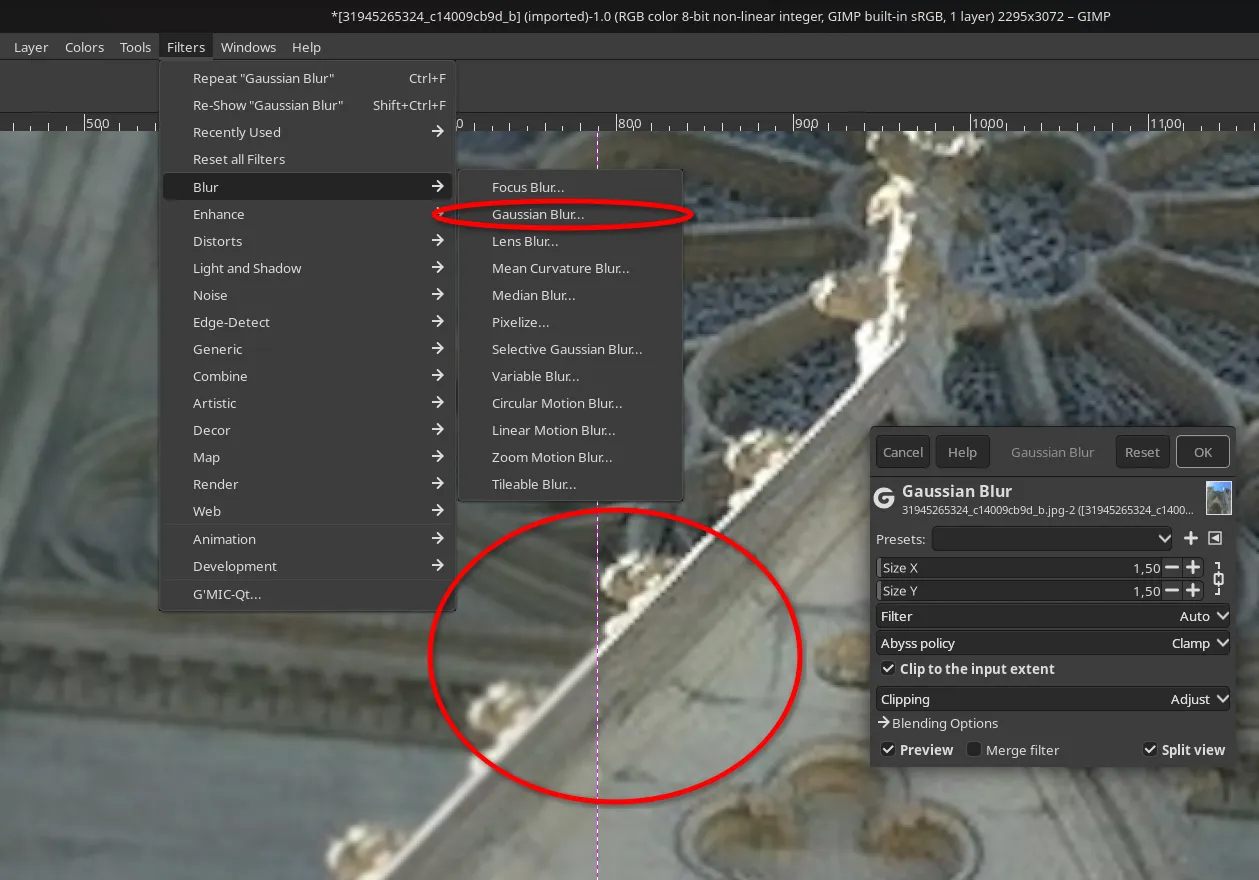
To get rid of the stair-stepped pixel squares that stand out especially on high-contrast edges, I use the "Gaussian Blur" filter.
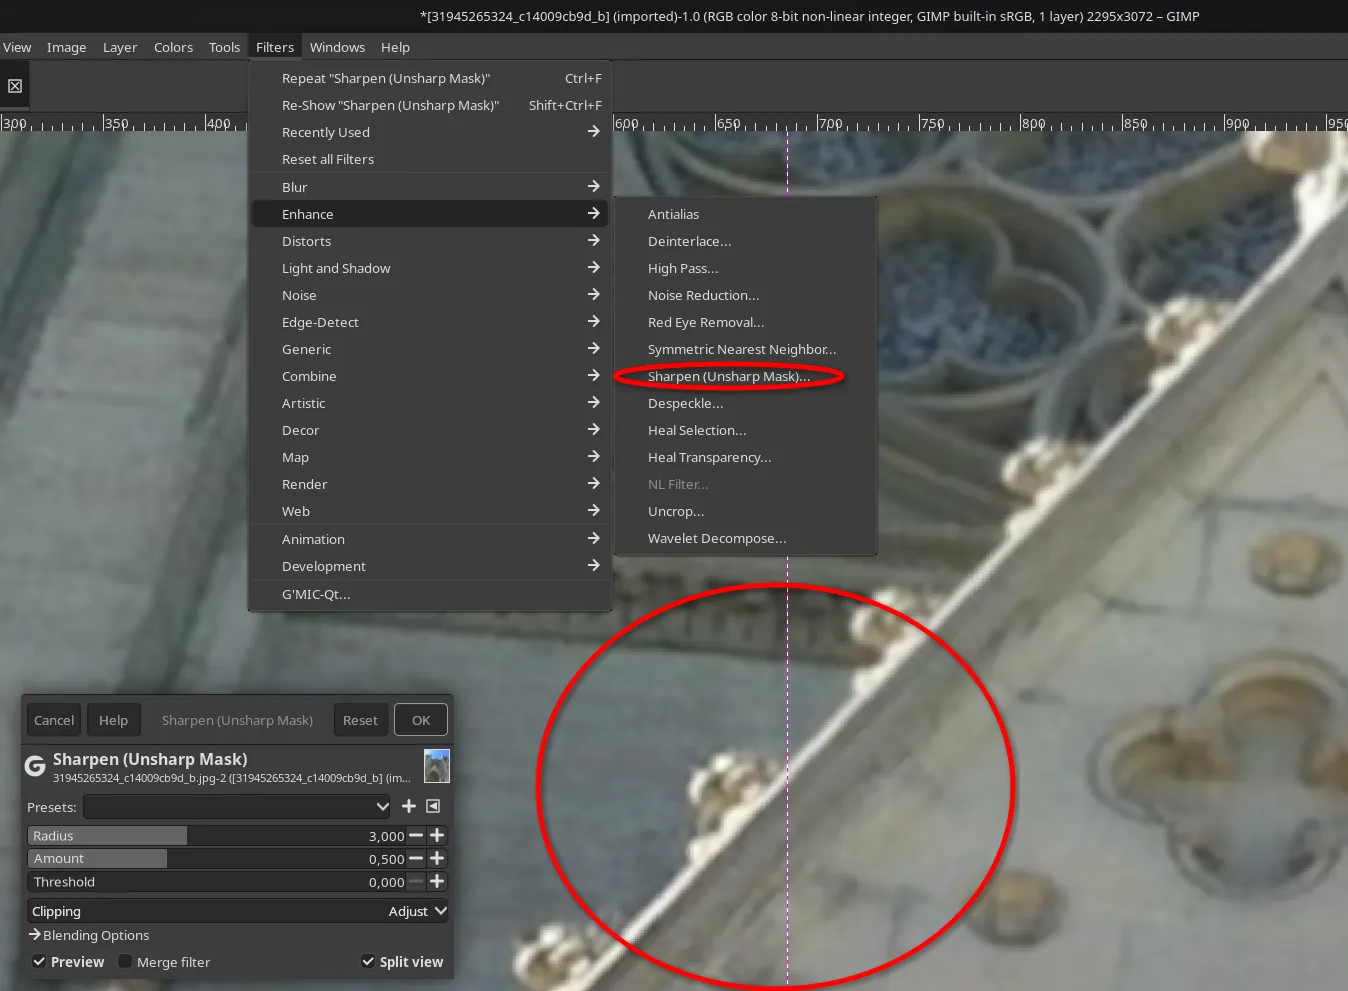
To bring back edge sharpness, I use the "Unsharp Mask" filter. This emphasizes silhouettes and details in the frame, restoring crispness after the smoothing step.
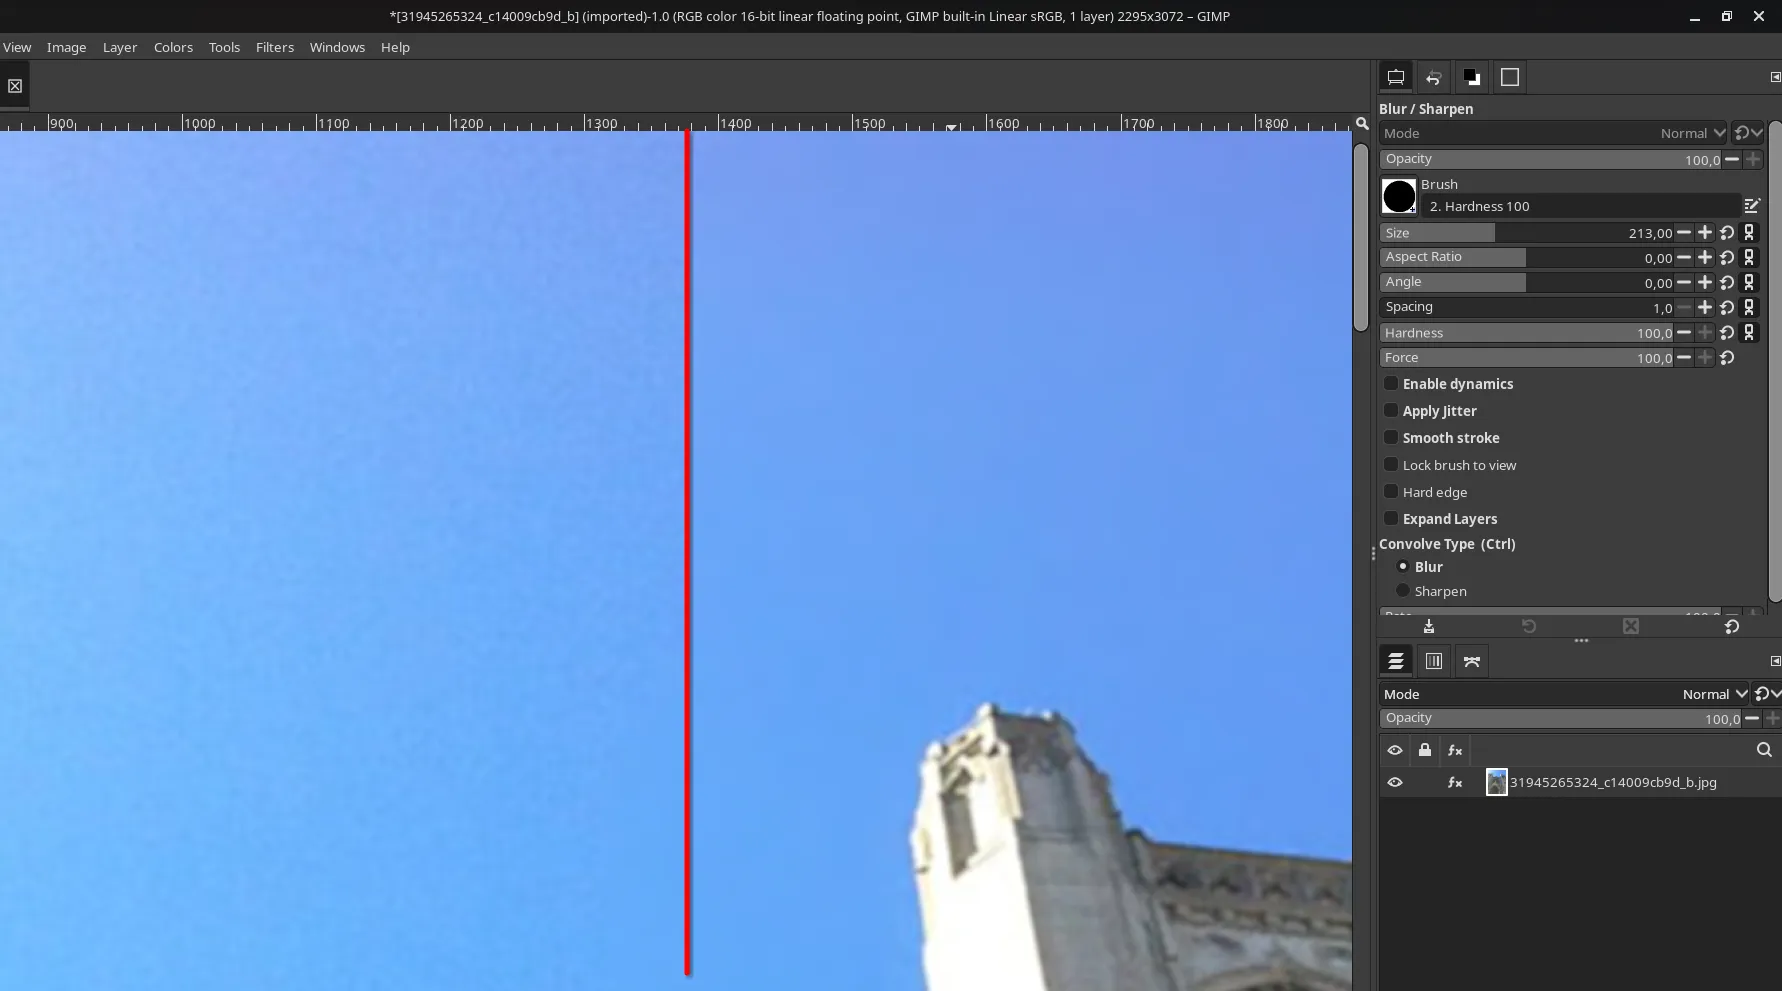
The Blur/Sharpen tool is great for fixing pixelation over large areas of a photo. In this particular example, I used it to restore the sky.
The result of fixing pixelation using this simple technique in GIMP.
Comparing Programs for Fixing Pixelation
To sum up my experiments, I put together the key characteristics of every local program I tested into a single table.
| Program | Specialization | Face/Detail Processing Quality | License Type & Price | Main Advantage | Main Drawback |
|---|---|---|---|---|---|
| Topaz Photo AI | Comprehensive AI restoration and upscaling | Excellent: natural textures and detailed facial work | Subscription ($39/month) | Full automation and the highest level of detail realism | High price and a huge amount of disk space used (~50 GB) |
| Upscayl | Basic open-source AI upscaler | Average: good for landscapes/architecture, weak on blurry faces | Free (Open Source) | Free, private, simple interface | No advanced manual settings and infrequent updates |
| ON1 Resize AI | Professional upscaling for printing | Very good: flexible face processing via sliders | Perpetual license ($119) | Flexible control over AI model strength and print preparation | High cost for a narrowly-specialized tool |
| Luminar Neo | Hybrid photo editor with AI extensions | Fair: tends toward heavy smoothing | Perpetual (~$99) | A huge range of tools for full photo editing | "Watercolor/plastic" effect, no fine control over upscaling |
| HitPaw FotorPea | Specialized AI photo restoration tool | Good: a wide selection of profiles for different types of defects | Subscription (~$59.99/month) | Many specialized models (faces, text, old photos) | At maximum settings, invents unrealistic details |
| GIMP | Classic raster image editor | Basic (no AI) | 100% Free (Open Source) | 100% accuracy — doesn't "invent" anything extra | Requires manual work |
Sorting Pixelated Photos in a Home Photo Archive
While looking for a tool to fix pixelation, I discovered that finding all the old photos scattered across thousands of files in different folders on my computer was actually the hardest part. Manually opening every shot, checking its quality, and moving it to a separate folder for further processing seemed like a completely unrealistic task. So I started looking for a solution, with simplicity, versatility, and price as my main criteria.
As it turned out, far from every available program meets these simple criteria — probably because developers try hard to grab customers' attention and end up building in features that aren't always relevant to a given product.
Among the whole range of photo managers, Tonfotos caught my attention. At first the app seemed too simple, but after a closer look and some testing, it turned out to cover everything I needed for finding pixelated photos.
Organizing a single photo archive
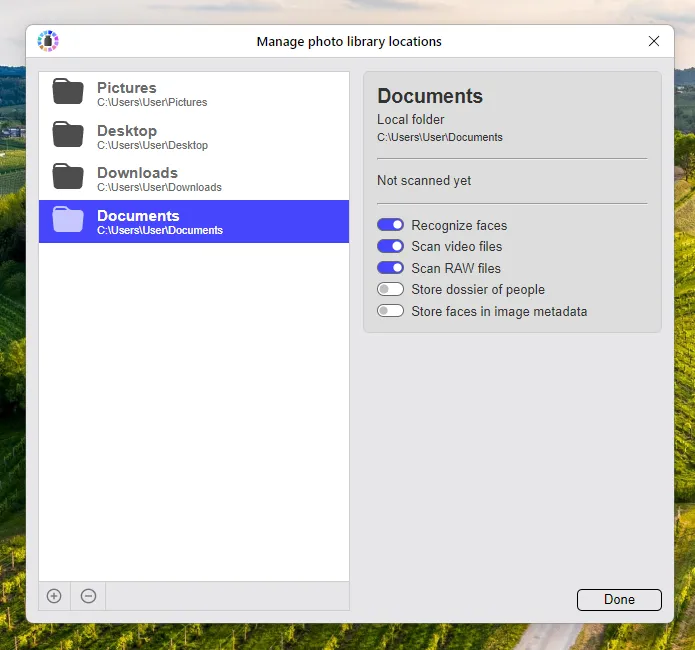
On first launch, I decided to trust Tonfotos's recommendations and added several photo sources right away. As it turned out at the next stage, that was a mistake.
The program simply gathered all the folders into a single interface, keeping their original names — names that were often meaningless, created with a "I'll rename it later" mindset, or turned out to be system files belonging to other programs.
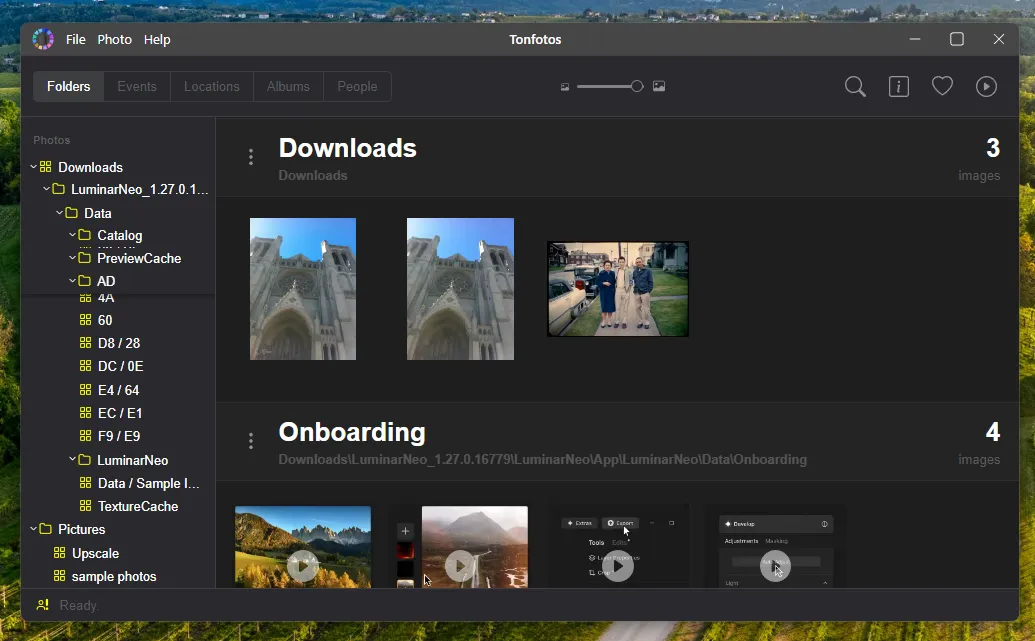
That didn't sit well with me, so I took a different approach. First, I removed all the added folders (removing sources in Tonfotos doesn't touch the actual files on disk), then I created an empty folder, which became the foundation of my photo archive.
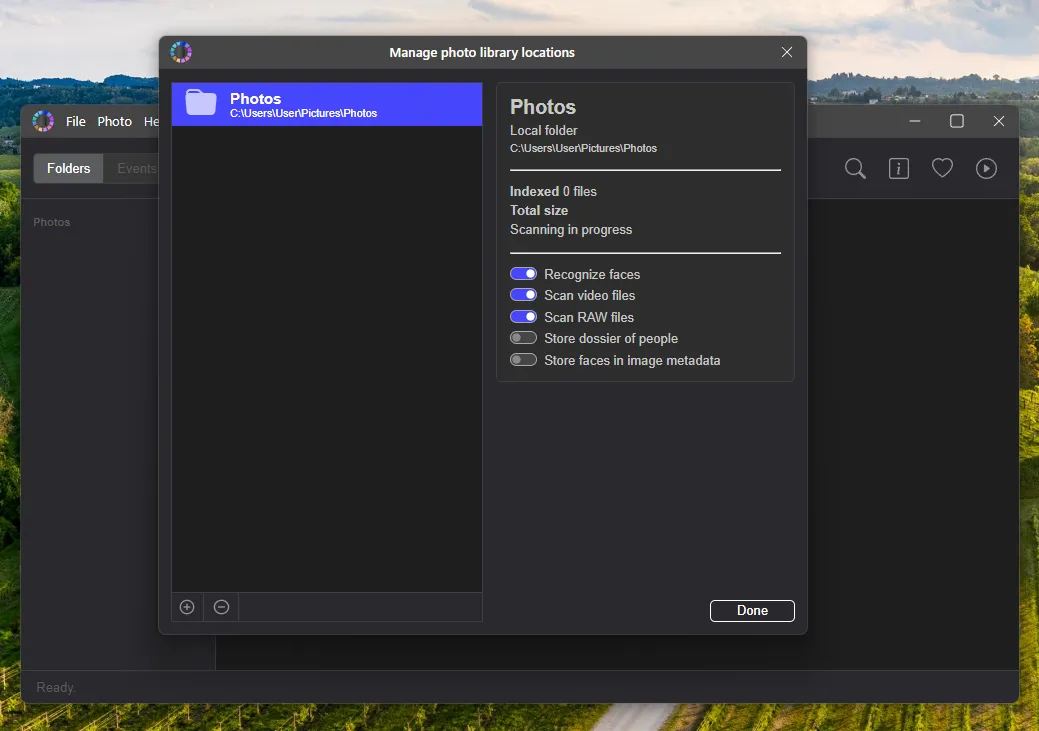
After that, I used the import feature.
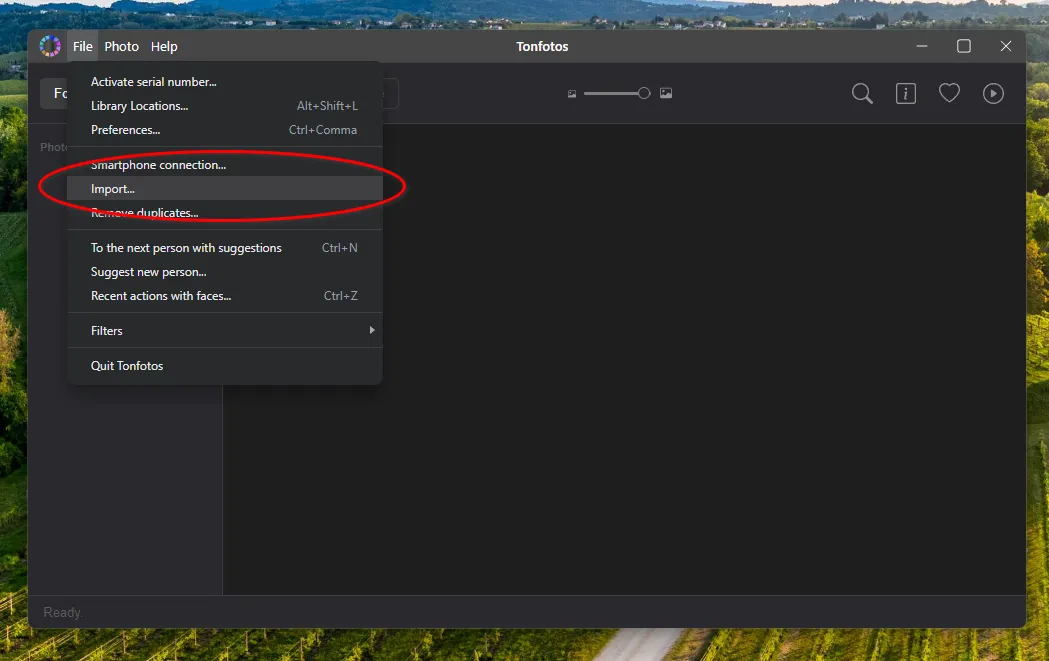
What's convenient about it is that it doesn't just copy photos into a specified folder — it builds a clear, hierarchical folder structure based on the metadata of when each photo was taken.
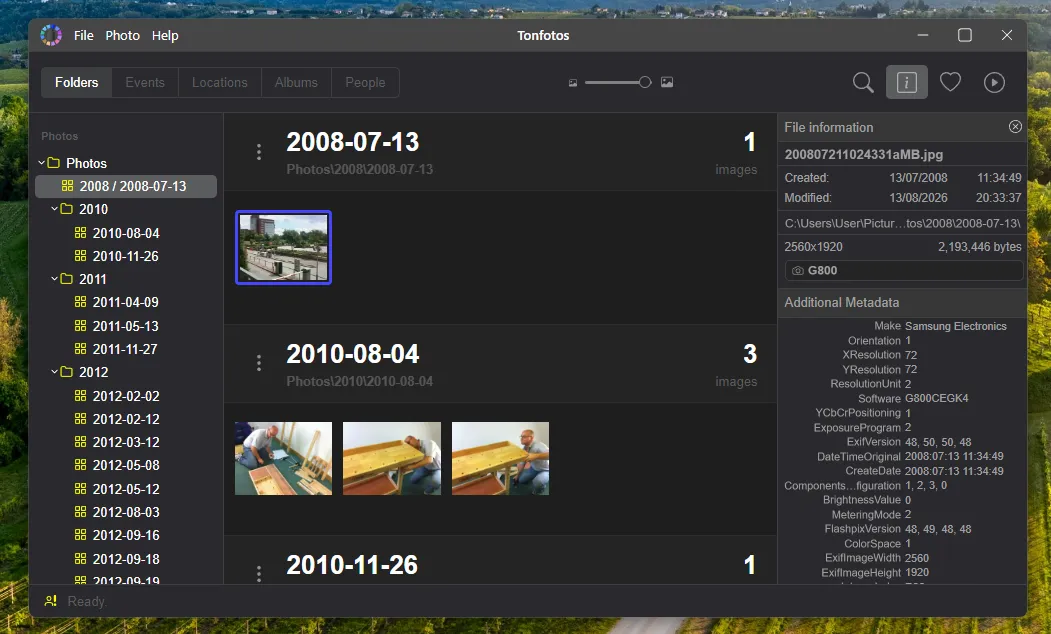
I should note that however the folders appear in Tonfotos is exactly how they're structured on disk as well. To confirm this, just open the photo archive folder through File Explorer.
Navigating and finding pixelated photos in Tonfotos
At this point I could have stopped and just started fixing pixelation photo by photo, opening each folder in turn. But Tonfotos can simplify this even further. For instance, the "Places" section shows all shots with a saved geolocation tag on an interactive map.
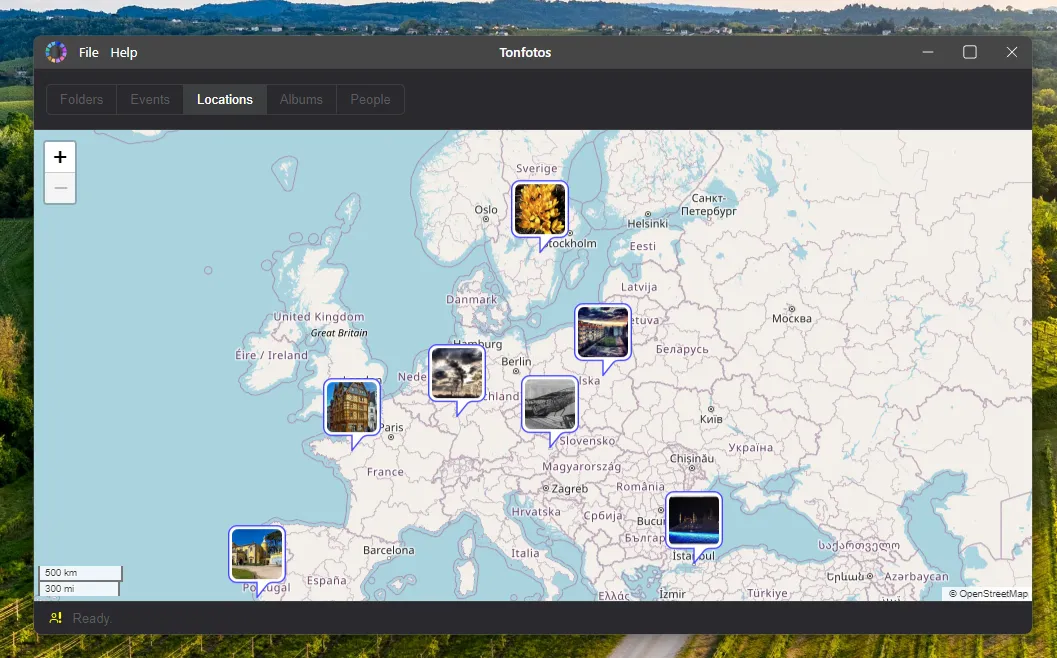
As a result, if you want to see all the photos from a 2008 vacation, you don't need to remember the exact date — you just navigate to the right location and browse everything taken there.
If you need to find every photo of a specific person, Tonfotos has a built-in algorithm for detecting and recognizing faces in images. Just tag someone's name once, and the program will automatically find every shot featuring that person.
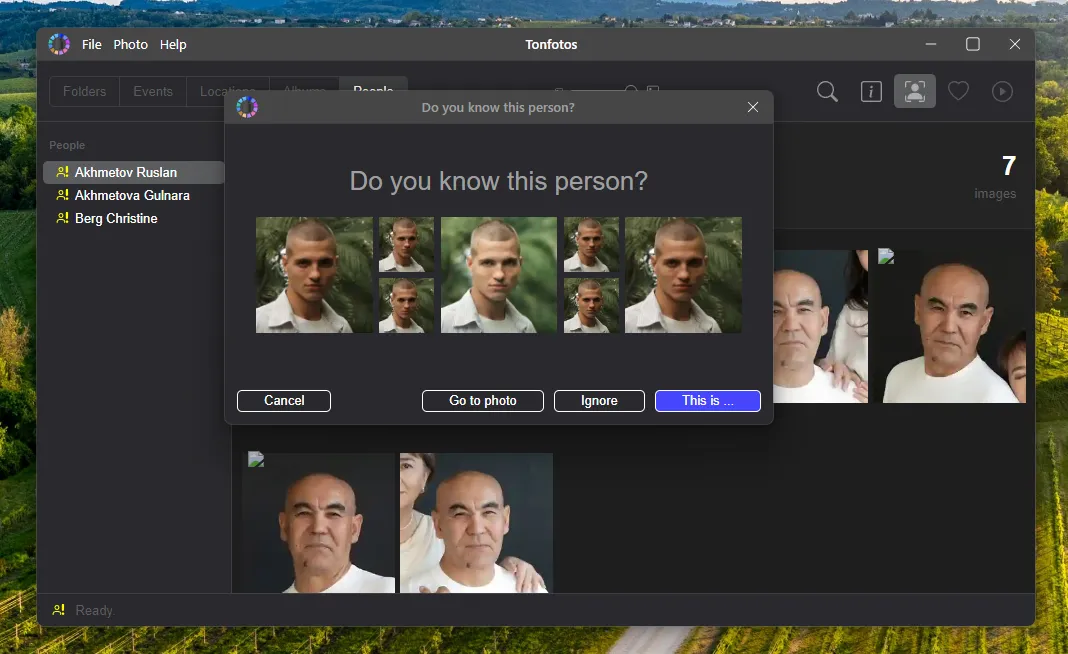
Tonfotos turned out to be more than just a photo manager for me — it became a handy tool for the initial task of sorting out shots that needed restoration. I ended up with a single photo archive where I can quickly find the shots I need by date, location, or person. Of course, Tonfotos doesn't flag pixelation as a specific defect, but at the stage of searching for and sorting old photos, it noticeably simplifies the work.
Conclusion
Restoring old digital photos today isn't just a matter of simply enlarging the image anymore. The main challenge lies in figuring out where to draw the line between improving visual quality and creating a new version of the event — one that never actually existed in the original shot.
That's why, for valuable photos, it makes sense to treat automatic processing as a supporting tool rather than a way to obtain a perfectly faithful original. The less original information a photo retains, the more cautiously you should treat the result. This approach helps preserve not only how pleasant the shots look, but also their documentary value.
For a large archive, it's worth setting up a clear process ahead of time: find the problem shots, keep the originals, decide which photos matter most, and only then move on to restoration. This keeps you from wasting time processing every single shot and lets you focus on the images that actually mean something to you.
Frequently Asked Questions (FAQ)
Can pixelation be removed from a photo on a phone?
Yes, but what a mobile app can achieve depends on the nature of the original defect. If the issue is just low resolution, a basic enhance-and-upscale step may be enough. With heavy pixelation, blur, or facial damage, the result usually depends on the quality of the AI model. For serious restoration work, it's more convenient to use a computer, where you have access to more tools and computing power.
What format is best for saving a restored photo?
For intermediate editing, formats that don't add another layer of JPEG compression are preferable. You can save the final copy for viewing or sharing as JPEG, if a small extra amount of compression isn't a dealbreaker. For long-term archiving, it's best to keep the original file and the processed master copy separately.
Can an old photo be made sharp if it was originally shot out of focus?
You can't fully bring back lost sharpness. Programs can improve how edges are perceived and try to reconstruct some details, but they can't reliably recover information that was never captured by the camera sensor in the first place. You should be especially cautious with AI face restoration: a visually appealing result doesn't necessarily match the real person.