What is the PNG File Format? Where to Use it?
Updated: July 26, 2023 Author: Andrey Isaev
Is the PNG file format suitable for storing photos? Or only for images with a transparent background? What is the best way to convert to PNG? We will answer all questions in this article.
What is the PNG format?
Portable Network Graphics (PNG) is a raster digital image storage format that uses lossless compression to make parts of an image (such as the background) transparent. It is widely used to save images created in the editor, as well as in web design when transparency is required.
Format details
The format was developed in 1995 as a replacement for the then extremely popular GIF format for exchanging images on the Internet, which is why it was called Portable Network Graphics (PNG).
In addition to the ability to store 8-bit color using a palette as in GIF, the ability to also use grayscale (16 bits per pixel) and full color image (48 bits per pixel) has been added. It is also possible to save the alpha channel (transparency layer), but there is no way to store several consecutive images, and thereby make an analogue of animated GIFs.
Like GIF, PNG uses lossless compression algorithm - Deflate, which, unlike LZW used in GIF, is not protected by a patent, and the format itself is an open standard, which means it has no restrictions on use. Including thanks to this advantage, PNG has almost completely replaced GIF in all areas of application, except for animated pictures.
What PNG is for
PNG's main advantage over other common formats such as JPEG is its lossless storage of information. Therefore, it is often used as an intermediate format for storing and exchanging images during editing. For example, screen capture programs usually offer to save the image as a PNG by default so that you can later open it in an editor without any of the distortion introduced by JPEG. And only when editing is finished, the final image is usually published in a different format so that it does not take up too much space.
Designers in their work often use ready-made PNG files with transparent backgrounds from stocks (paid libraries of ready-made images) to overlay the image of an object on their banner, advertisement, etc. instead of redrawing it or cutting it out of a photo with a background. This saves time.
Another common use case is as design elements on websites (such as icons and logos), primarily due to the transparency feature that JPEG does not have. However, the WebP format is becoming increasingly popular in this area, which combines the best of both worlds - very high lossy photo compression and the ability to have an alpha channel for a transparent background.
Image size in PNG and other formats
The question of PNG compression ratio is not as simple as it might seem at first glance. Its effectiveness very much depends on what kind of image needs to be compressed. In case of photographs, where there are a lot of smooth color transitions, then definitely, the PNG lossless compression algorithm simply has no chance compared to such specialized lossy compression formats as JPEG, WebP or HEIC. Depending on the settings, the difference in file size can be dozens of times.
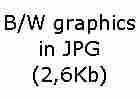
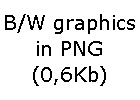
However, when it comes to compressing screenshots, computer graphics, black-and-white pictures, etc., the situation is not at all so unambiguous. The Deflate algorithm is primarily tuned to effectively compress repeating sequences, and in such pictures there are many very large repeating sequences of pixels of the same color. And in such situations, it is not uncommon for a lossless image compressed with PNG to be smaller than the same image compressed with lossy JPEG.
However, this is not all. The PNG algorithm itself does not imply loss of information - everything that is input will be recorded exactly. However, you can always optimize the image itself before saving it. The trick is to significantly reduce the color diversity in the image so that there are only 256 different colors used or even less. Then it will be possible to use only 8 bits per pixel with a palette. As in the case of JPEG, this is the loss of the original information in the picture, but it often happens that this loss is not so significant for the human eye.

The example above uses aggressive image optimization, it uses a palette of only 16 colors! Unfortunately, this resulted in some artifacts on the kitten's ear and face, but otherwise the image looks quite natural, and most importantly, it's tiny in size, only 13.7KB. If you vary the degree of image optimization (use a larger palette), then it is quite possible to choose settings with a minimum of artifacts, but a sufficiently high degree of compression, even for photorealistic images.
How to convert an image to an optimized PNG
There are a huge number of ways to convert an image to PNG, no special programs are needed for this - everything can be done using standard operating system tools - this is described in detail in the next section. However, in most cases, the picture will be very large, many times larger than in JPEG.
If you want to take full advantage of the PNG format and have control over the degree of image optimization, then you need a special program for this. For example, you can use the free version of the program Tonfotos - applications for managing photo archives. This program allows you to process a large number of images at once, as well as control how aggressive image optimization should be done.
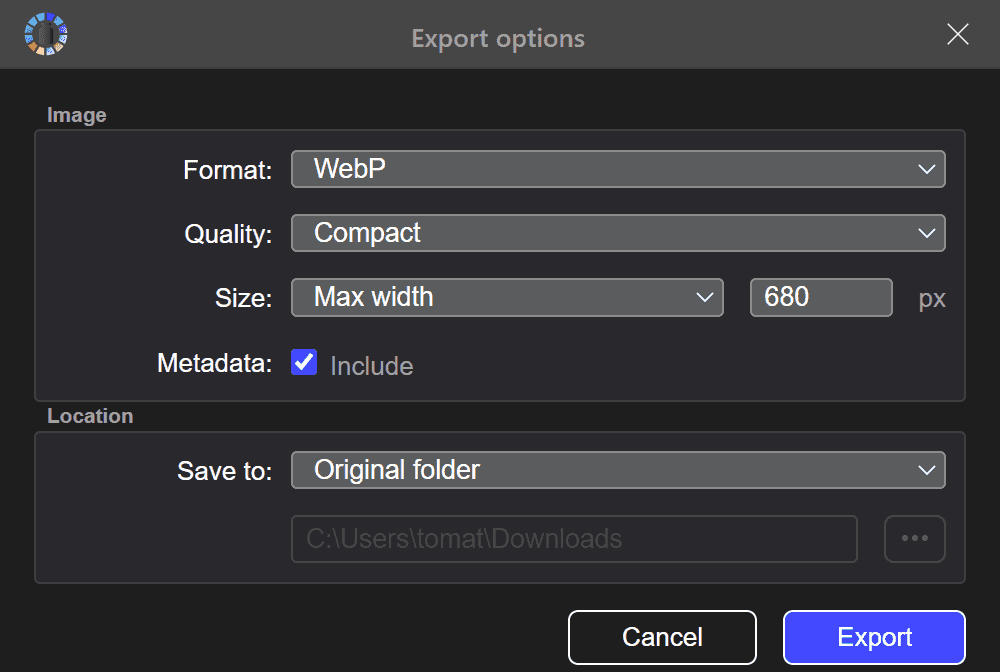
For example, if you need to prepare screenshots of an application for publication on a website, then using the "Compact" quality, it is very likely that you will get a more readable image without unpleasant defects like blurry edges as in case of JPEG image of the same size.
Detailed instructions for converting images in the Tonfotos application located here.
How to convert image to PNG without optimization
Usually, it doesn't make much sense to convert photos, photorealistic graphics and similar images from JPEG and other similar formats to PNG without using optimization. The image will simply become several times larger in size. However, there may be situations where PNG is needed, as other formats are simply not supported. In this case, the task is extremely simple to solve, and for this you do not need to download programs or look for an online converter. Everything can be done right in your OS in a few clicks.
On Windows 10 and 11
- Open a photo in build-in Photos app
- In the top bar, press the "..." button to bring up the menu
- In the menu that opens, select "Save As..."
- In the dialog that opens, select the desired format (PNG or another that you need) and a folder to save the new file
- Click "Save"
On macOS
- Open photo in build-in Preview app
- In the main menu select "File"->"Export"
- In the dialog that opens, select the desired format (PNG or other) and the folder where to save the new file
- Click "Save"
How to download PNG without background
There are a large number of sites that make money by selling access to large collections of pictures by subscription. Many of them also have a number of pictures available for free in order to "lure" potential customers. However, we will not even give a list of them, because rather than go into each and search there, it is much more convenient to use Google image search. Thus, you will immediately search on all these sites at the same time. It will be possible to set all the necessary image parameters, including the type of license, if you are only interested in free images.
How to make a PNG with a transparent background from an image
Traditionally, cutting out the background from an image has been a time-consuming task. To do this, it was necessary to carefully "trim" the contours of the object in a graphical editor. In certain cases, this could be made easier - if the background is significantly different from the object in color, for example. But even in these cases, you need to carefully monitor whether the algorithm worked correctly everywhere, and whether you need to correct its errors by hand. You can find a huge number of guides on Youtube on how to do this operation in one or another graphic editor, depending on which one you prefer. If you are just starting to learn graphics and do not know which editor to choose, and at the same time are not ready to pay for Photoshop - try the free Gimp. All these functions can be performed there, and a large number of training videos are available for it.
However, recently with the development of artificial intelligence, the most advanced editors, such as Photoshop, began to add the function of automatically separating an object from a background based on neural networks. Over time, more and more editors will support this feature, primarily, of course, paid ones.