How to Recover Permanently Deleted Photos on Any Device
Updated: January 28, 2026 Author: Vitaly
This material provides a comprehensive guide to recovering permanently deleted photos from phones and computers. It covers the fundamental principles of storing and deleting data on various devices, helping you understand when recovery is possible and when it isn't.
When selecting truly worthy photos from among numerous photo notes, it's all too easy to make a mistake and delete a precious moment. In such a situation, the most important thing is to remain calm and collected, because in many cases, all is not lost. "Delete" doesn't always mean "erase."
You're not the first or last person to make a similar mistake. That's why modern programs and operating systems have various mechanisms in place to protect user data from users themselves. These include recovery tools, which we'll discuss in this article.
There's also specialized software that allows you to recover photos that were seemingly permanently deleted, even those no longer in the Recycle Bin.
The problem is that the solution depends on many factors. Therefore, before taking any specific steps, it's important to understand how everything works to avoid making the situation worse and losing valuable memories forever.
Data storage and deletion principles
In the classic scenario, deletion is a change in the status of data, not its actual erasure. However, this rule held true until the widespread replacement of HDDs with SSDs, whose cellular flash memory introduced significant changes.
Logical data structure and the concept of "deletion"
When talking about digital photographs stored on external or internal storage, it's important to understand that they are not a single physical unit. Whether a photo is saved in JPEG, RAW, or WebP format, it is always broken down into blocks or clusters, which can be scattered across the entire SSD or HDD. What we see on our computer screens as neat folders and photos arranged one after another is the result of the device's file system.
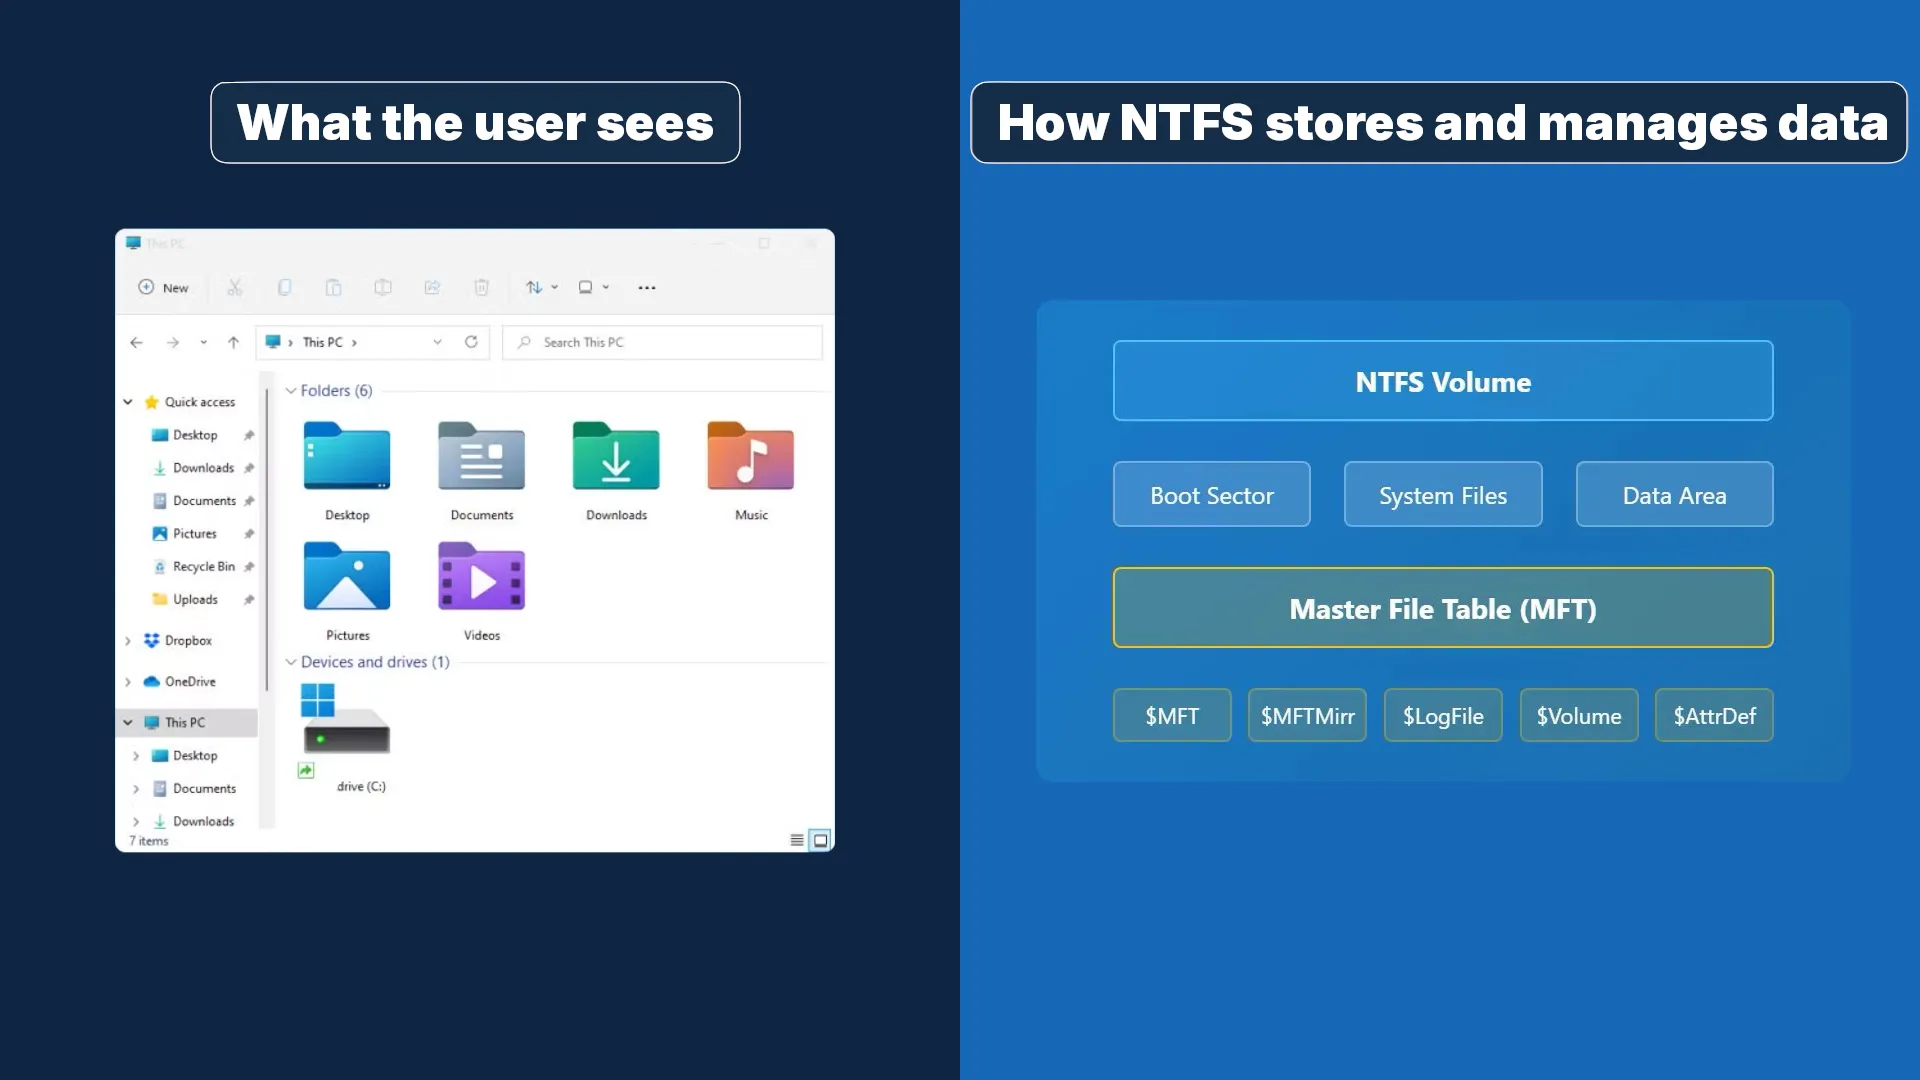
The file system here acts as a card index, storing a map of file fragment locations. In Windows (NTFS), this role is played by the Master File Table (MFT), in Linux (ext4), by inodes, and in older FAT systems, by the File Allocation Table.
The idea is that when the user clicks "Delete Permanently" or "Delete to Recycle Bin," the operating system doesn't physically move the photo files or overwrite every bit with zeros or random data, as this would require additional time and system resources. Instead, it modifies the file system metadata: the file entry in the master table is marked with a special flag indicating that this space is "free" and writable.
It's this time period between logical deletion (marking it "free") and physical overwriting with new data that creates the window of opportunity for recovery. However, its duration is critically dependent on the drive type.
The physics of HDD magnetic recording
Traditional hard drives (HDDs) store information by magnetizing microscopic regions (domains) on rotating ferromagnetic platters. A read/write head hovers above the surface and reverses the polarity of the domains to record zeros and ones.
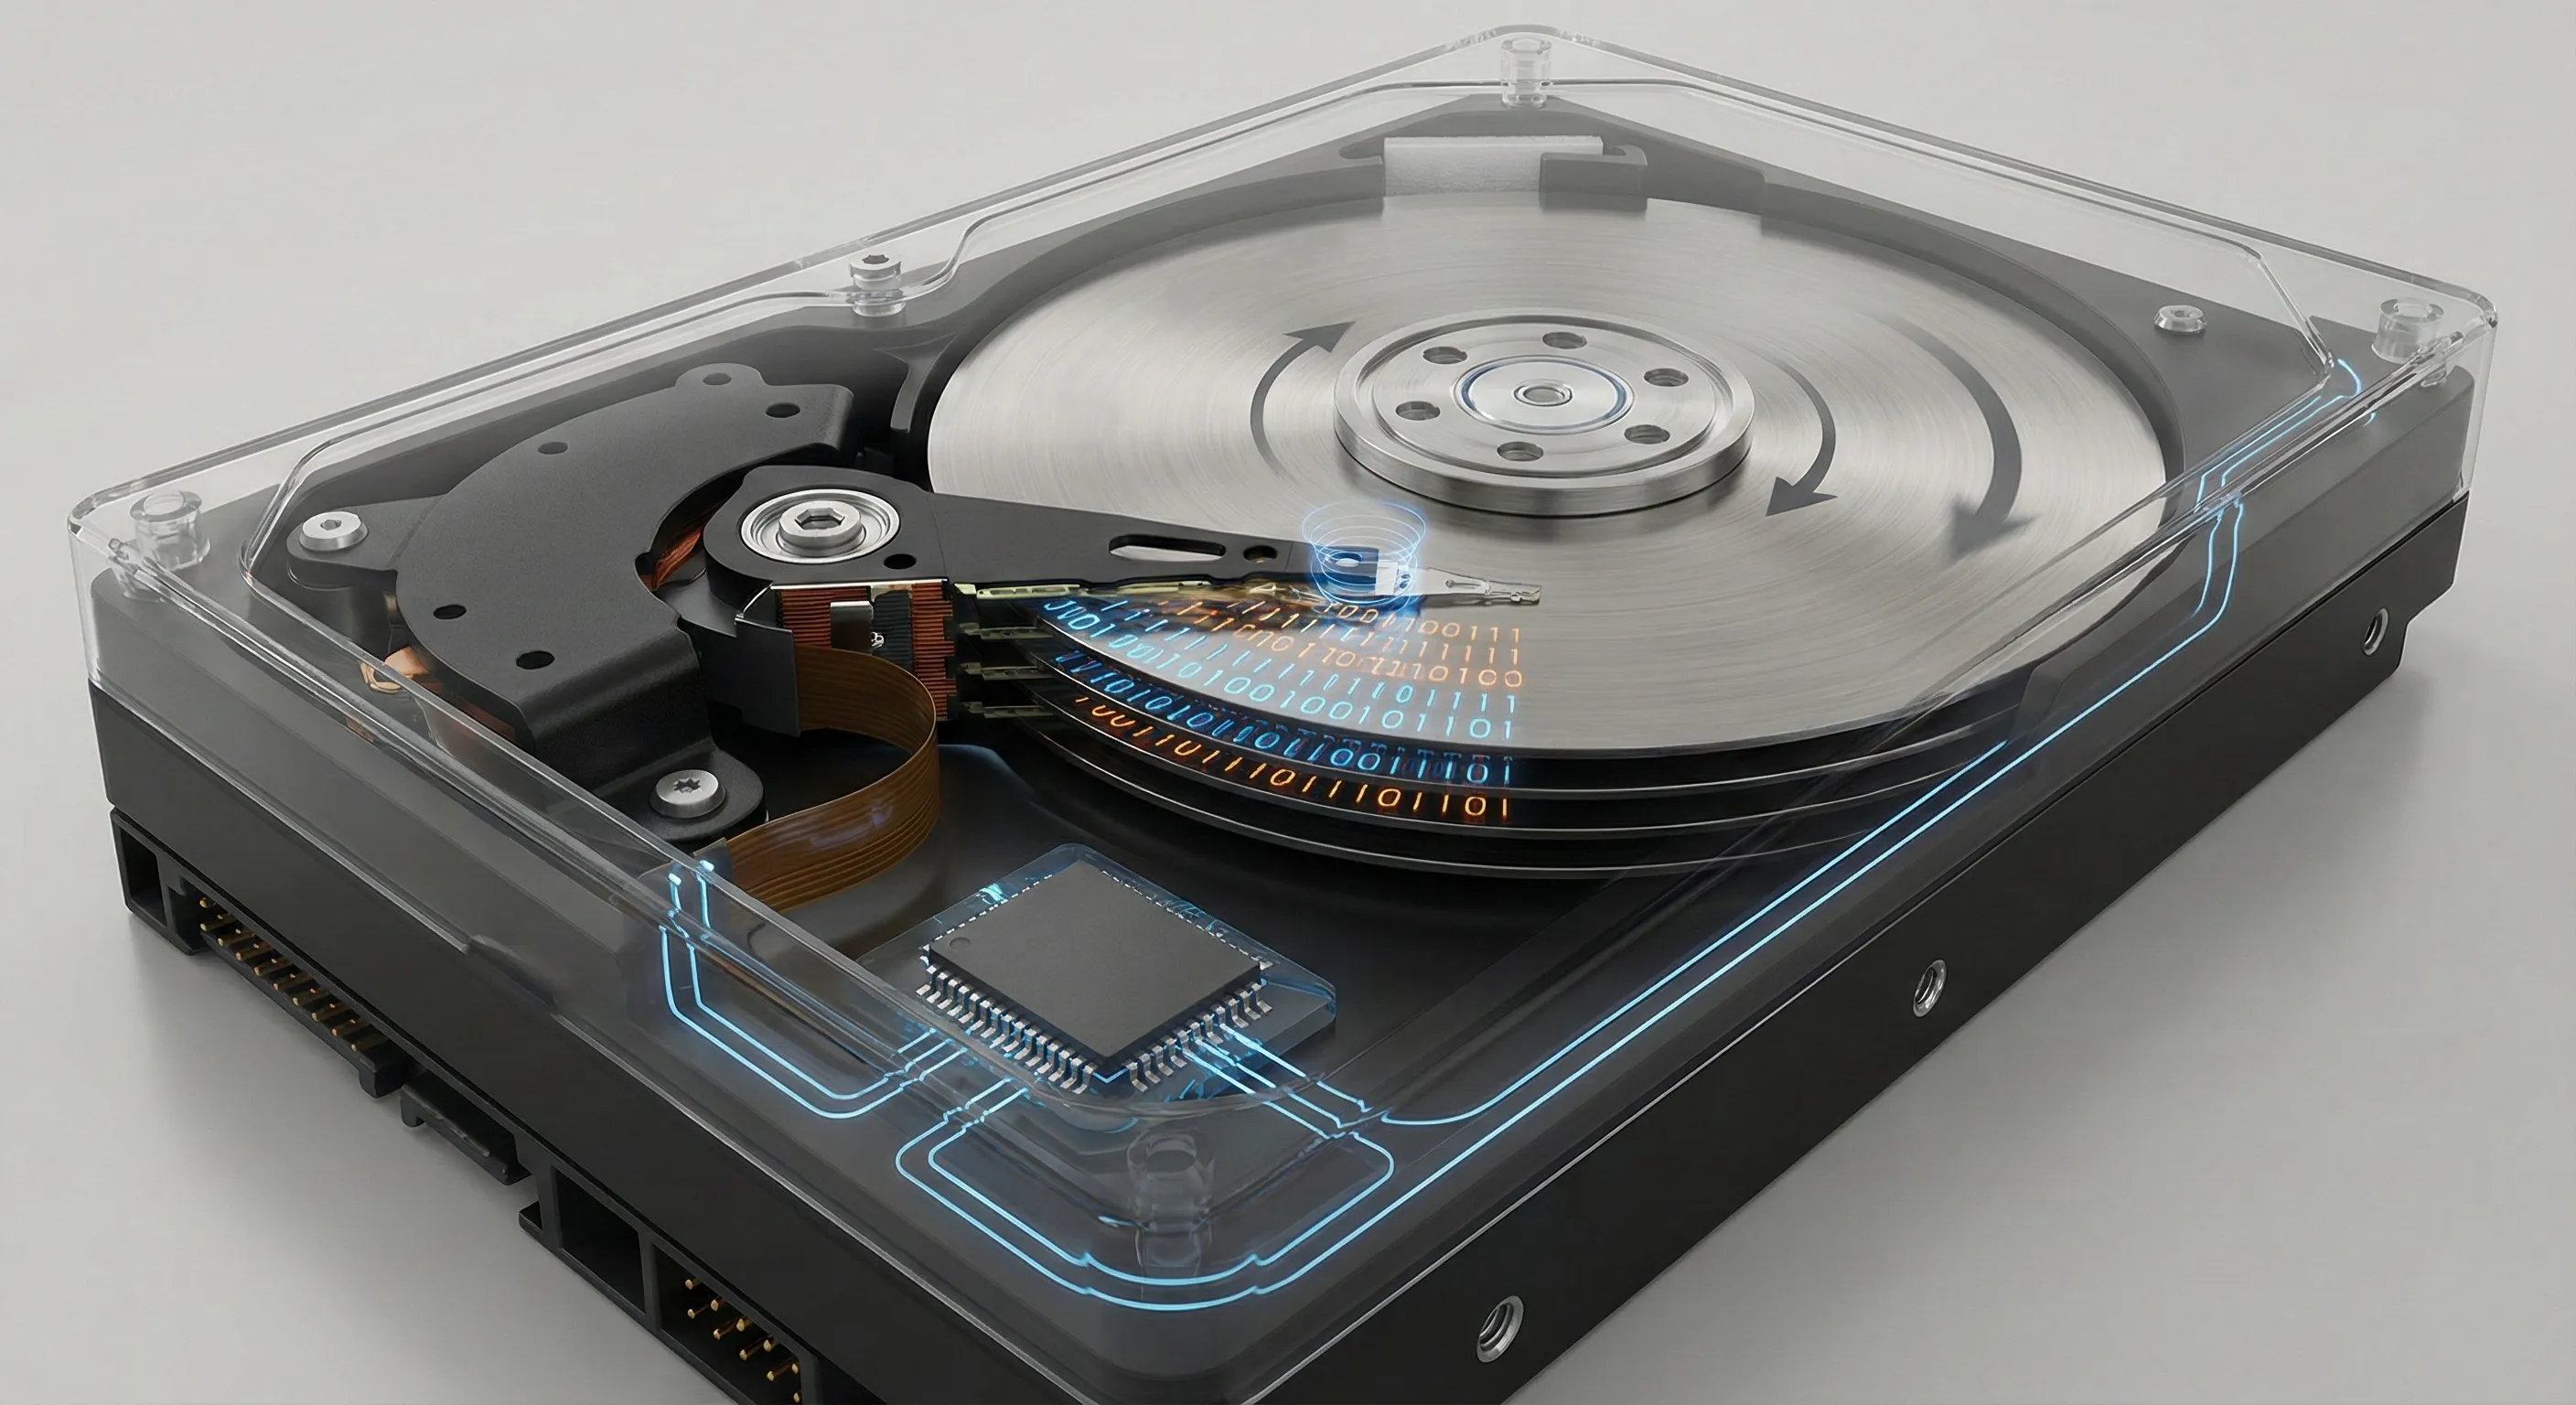
This means that as long as the area where the deleted photos were stored isn't overwritten, it will be available for recovery. It doesn't matter how long it takes. The main thing is that no new data is written to the disk before the recovery.
Important! Records include not only user documents but also program files and temporary data generated by the operating system.
If you quickly disconnect the drive (in a safe manner) after completely deleting the photos, the chances of recovering them are quite high.
The specifics of solid-state memory (SSD) operation
An SSD has a fundamentally different recording architecture. Unlike a magnetic disk, where a new value can simply be written over an old one, a flash memory cell must first be erased (reset to its original state). This erasure is performed not bit by bit, but in entire blocks, which capture data not only from the specific photo deleted but also from other photos that fall within that area.
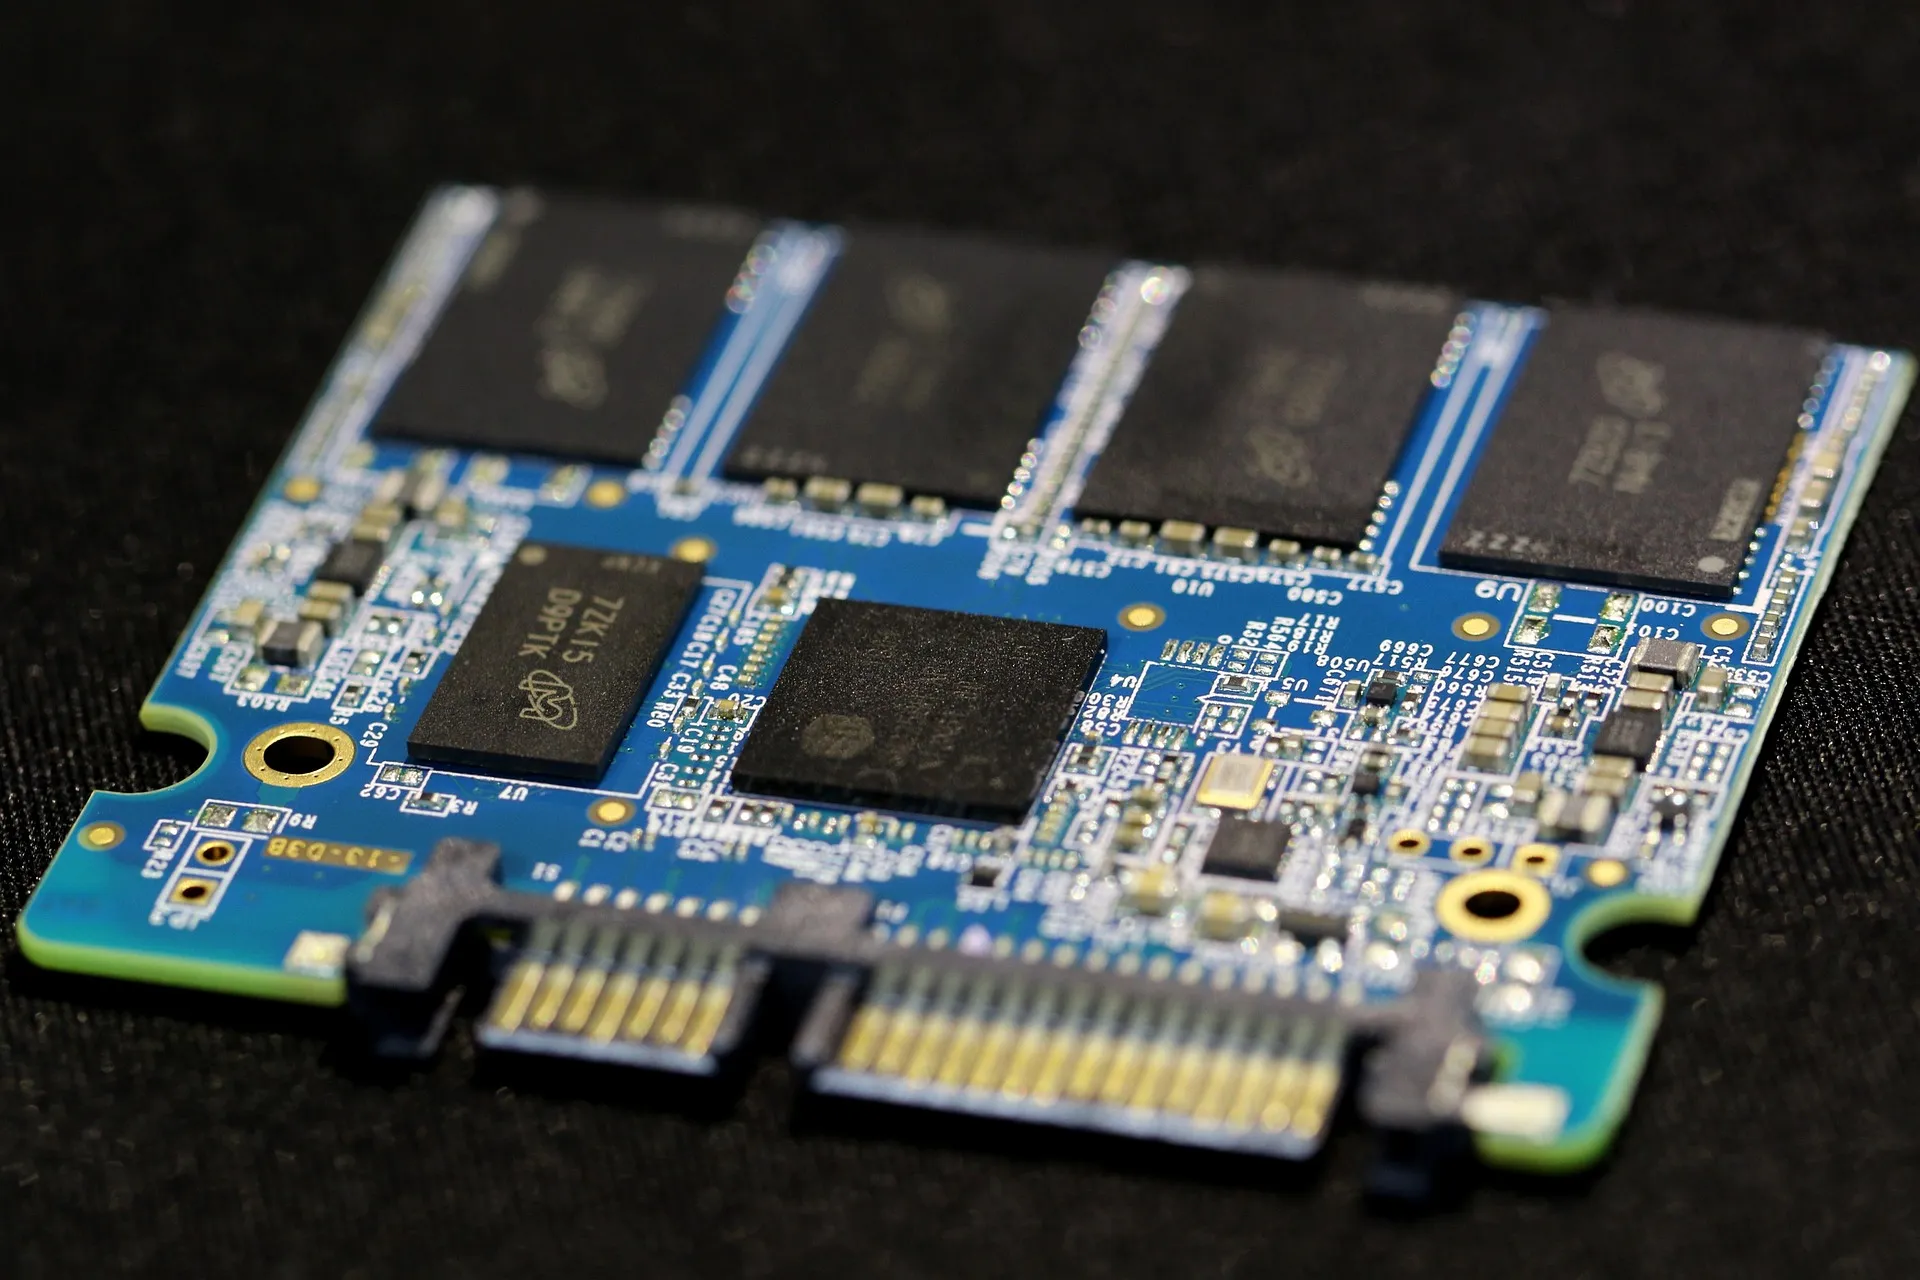
This feature creates a problem: as the SSD fills up, its performance decreases and wear increases. To address this physical issue, the TRIM command (in SATA connection interfaces) or Deallocate (in NVMe M.2) was invented. It is an instruction sent by the operating system to the SSD controller when a file is deleted. It informs the operating system that the areas occupied by the deleted file no longer contain useful information.
Upon receiving a TRIM command, the SSD controller isn't required to immediately erase the cells, but it does mark them as invalid. When the drive is idle, an internal "garbage collection" process is initiated. The controller reads valid data from the block, transfers it to a new block, and physically erases the old block, including the "deleted" photos. After this, data recovery is virtually impossible.
The problem is that in modern operating systems (Windows 10/11, macOS, Android, iOS), the TRIM command is sent almost instantly after emptying the Recycle Bin. The recovery window on internal SSDs is reduced to minutes or even seconds.
Another difficulty arises when physical erasure hasn't yet occurred, but the controller, knowing that data has been marked as deleted via TRIM, often returns zeros or garbage data when attempting to access these addresses (even by low-level software). This is done specifically for security and optimization purposes.
That's why, despite the popularity of SSDs, experts recommend storing photos and important documents on HDDs, and using the solid-state drive exclusively for running the operating system and applications. For phones, regularly back up the data to the hard drive.
Recover Deleted Photos on Android
The type of device plays a significant role in successful photo recovery. This is due to the different memory logic and available capabilities on smartphones and computers.
Earlier in the blog there was an article about how to recover deleted photos on iPhone,, now let's look at how the process differs on Android devices.
Historically, Android smartphones have been considered more open and offer more user experience. However, this only applies to older versions of the operating system. Modern Android is more similar to iOS than ever before.
Features of accessing Android internal storage
Before Android Oreo, access rules for user and system files were fairly liberal. The operating system behaved more like a classic Linux distribution, only with a mobile-specific shell. For example, shared storage behaved like a traditional writable directory.
Applications with access rights to internal storage could:
- list files;
- freely read/write in common areas;
- File managers were closer to the semantics of ls/cp/rm.
This behavior was reminiscent of Linux with shared home directories. As a result, the user had numerous options for recovering photos or other accidentally deleted data.
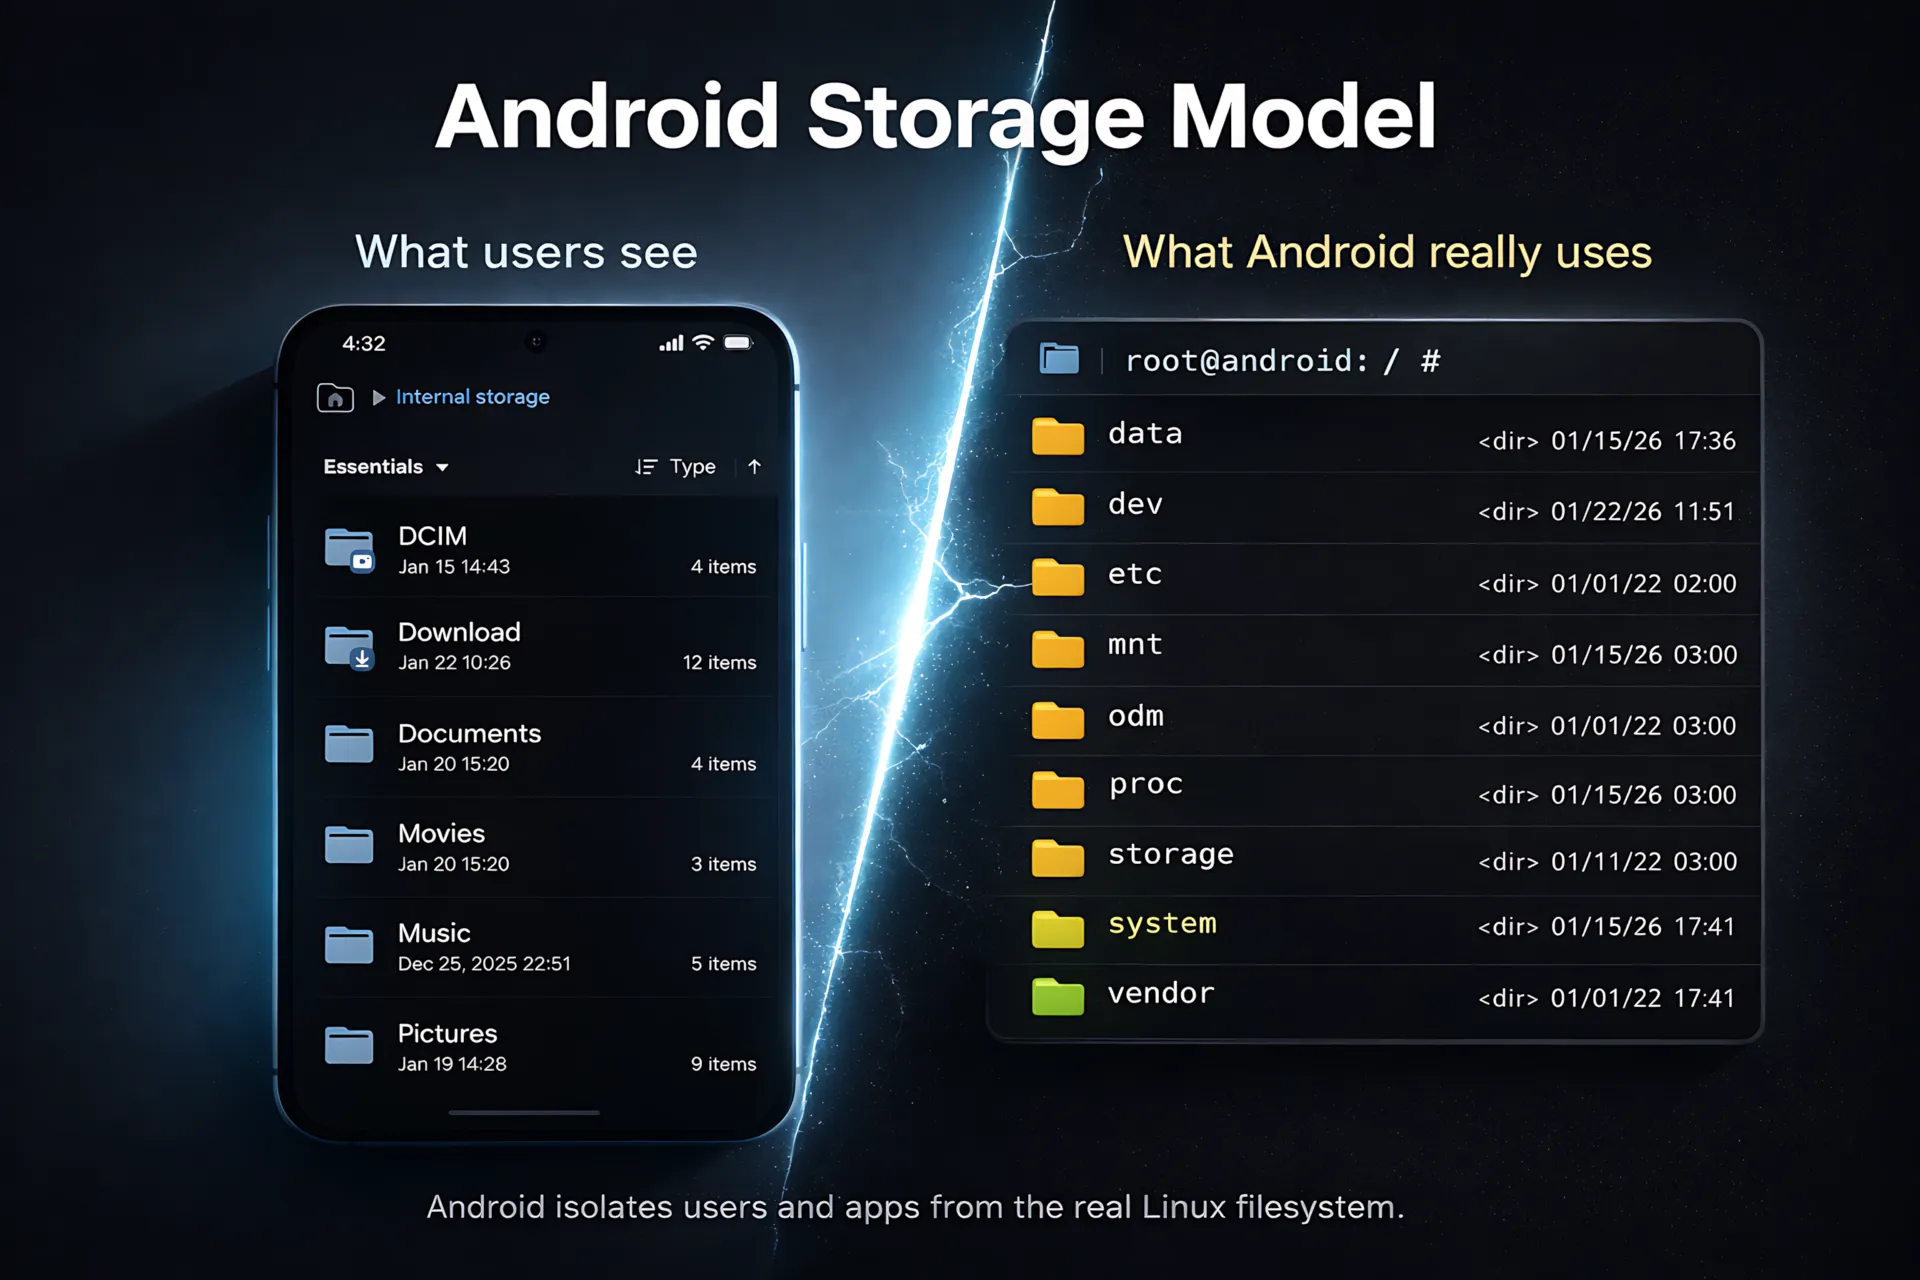
The situation gradually changed with each new version. In Android 16, the user is not given direct access to the file system at all—only virtual storage. To attempt to recover deleted photos in this situation, the phone must be rooted (have superuser rights). However, such actions can not only void the warranty but also cause serious problems with the device, including complete failure.
Furthermore, the rooting process itself requires pre-installing apps or flashing modified firmware images to the phone's memory, which automatically overwrites deleted photos. This also applies to installing file recovery apps from Google Play.
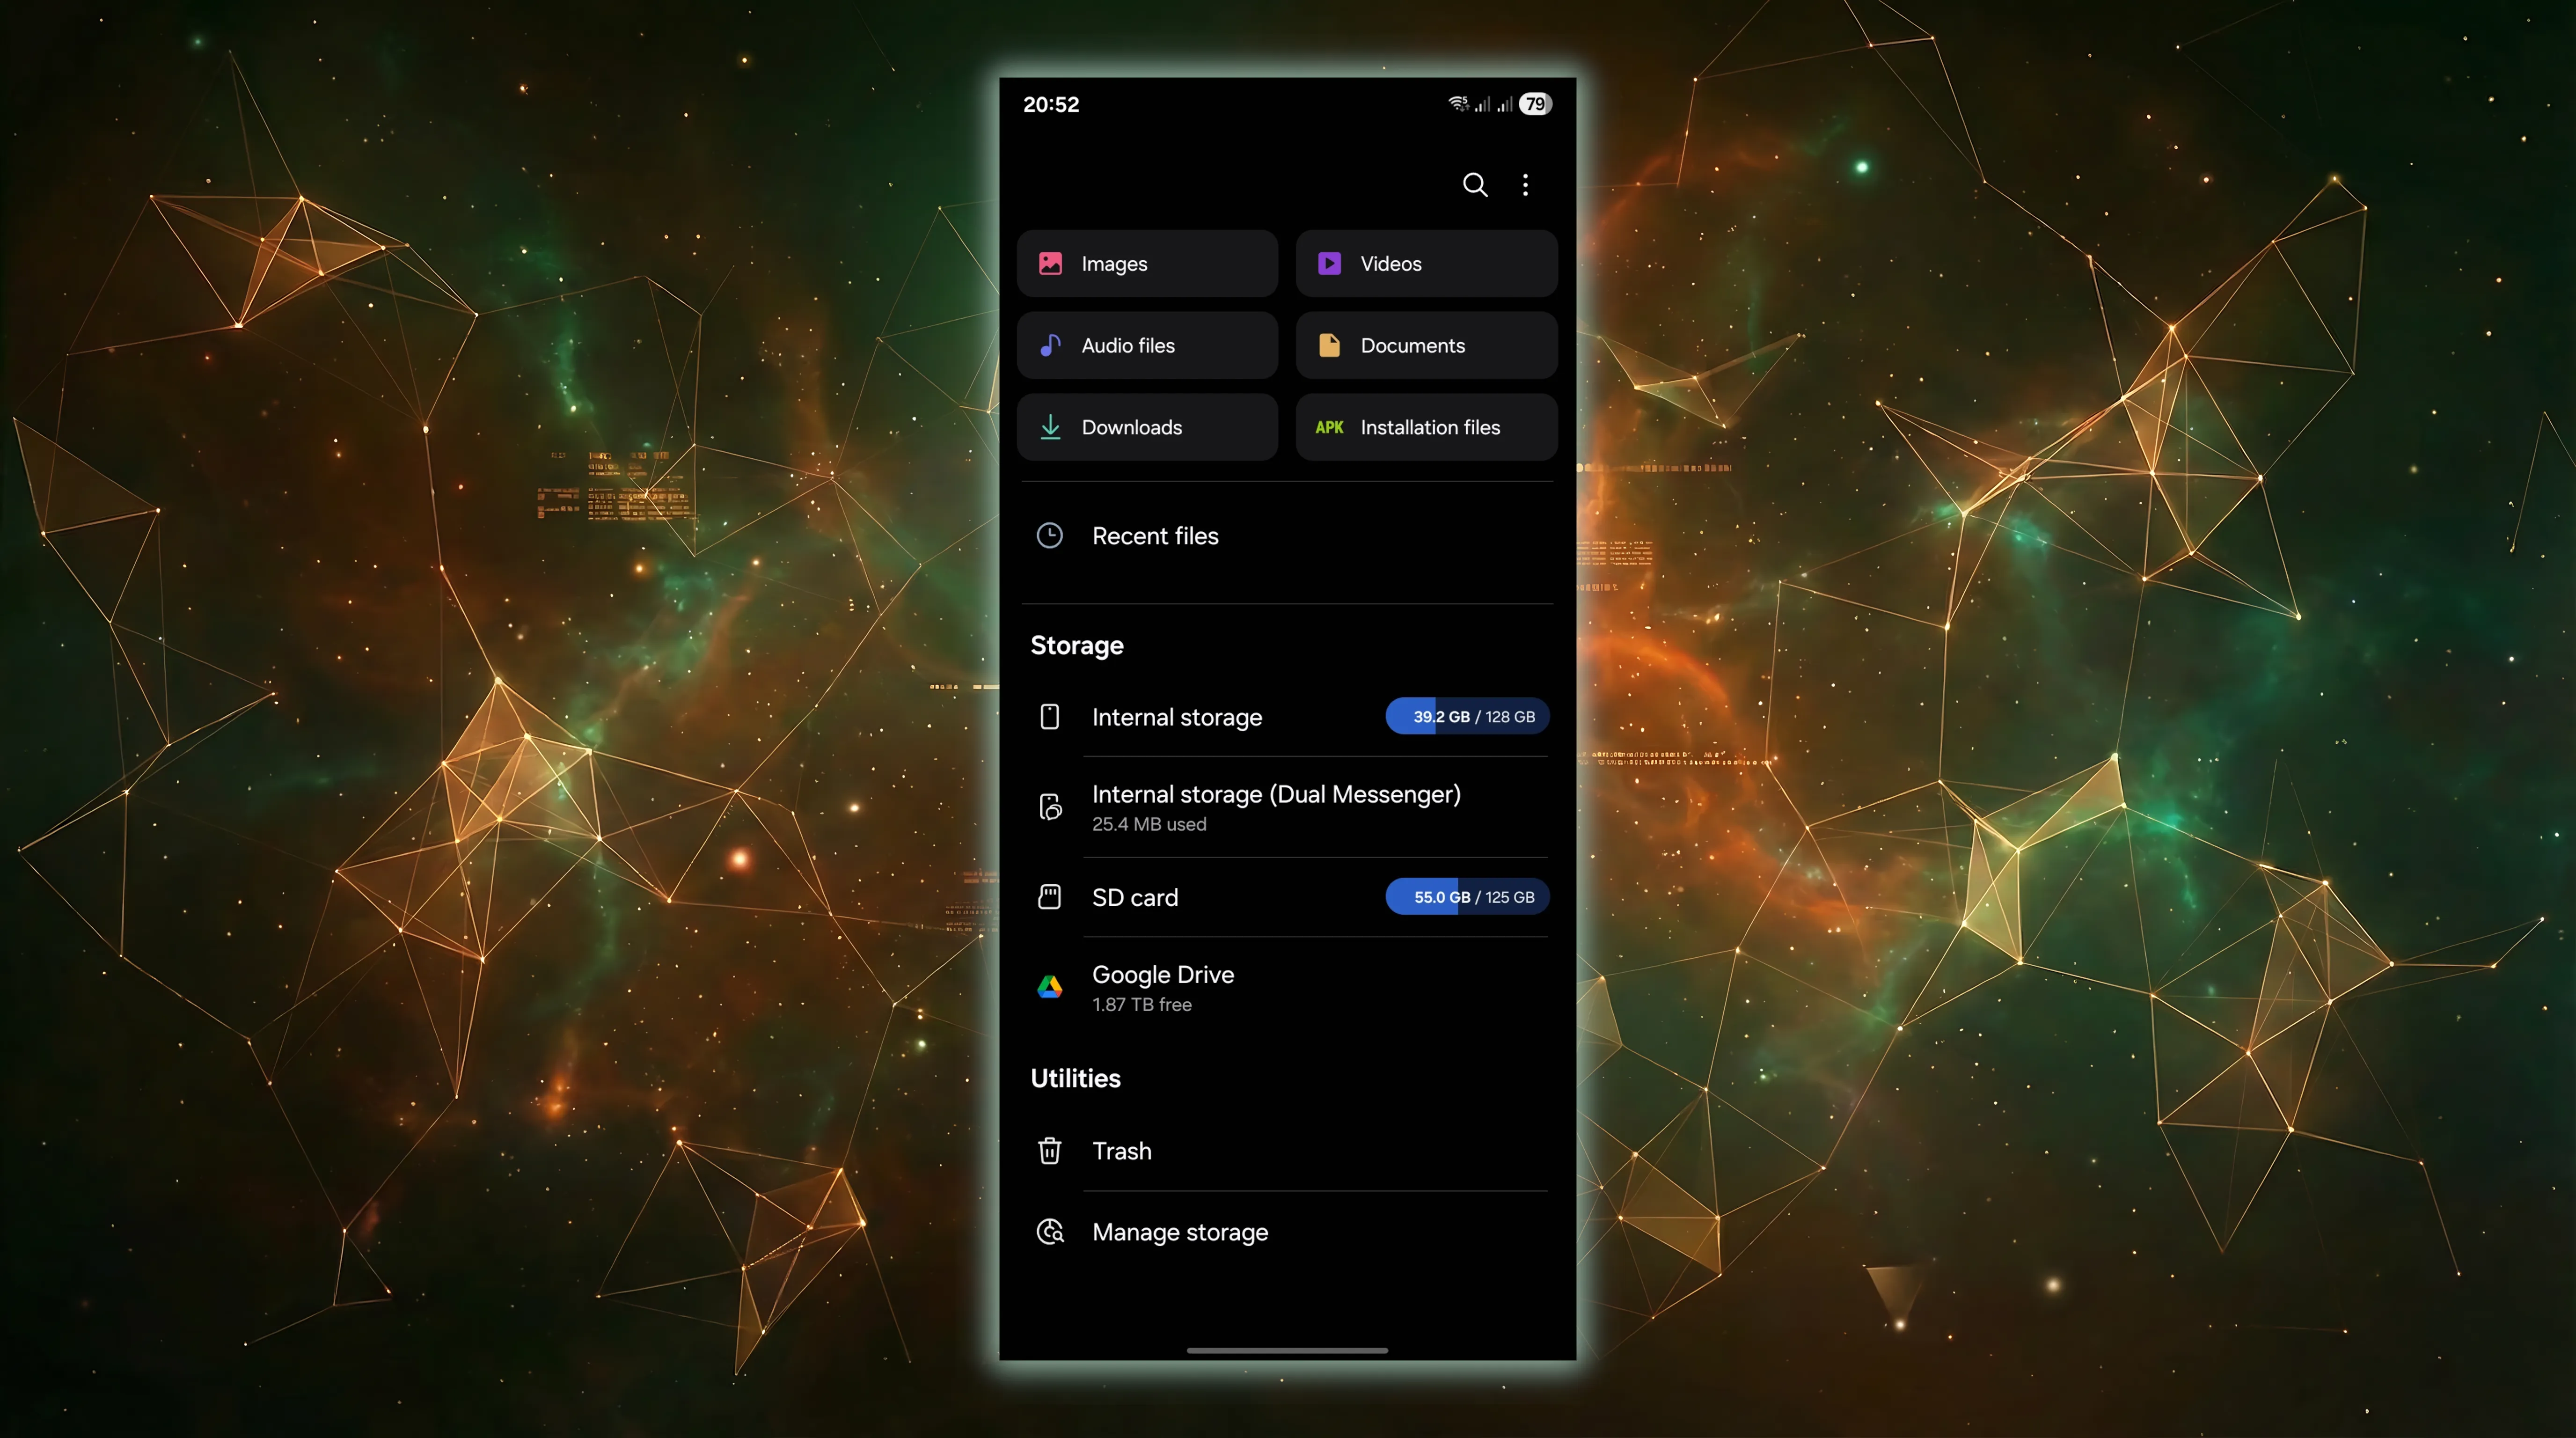
Features of Android's work with external storage devices
Unlike internal storage, Android gives users more control over data on SD cards. For starters, they have a full file system (FAT32), making it significantly easier to recover permanently deleted photos.
Furthermore, starting with Android 11, third-party apps are restricted by default from accessing external storage cards. They can only be used to store user files. However, this depends on the specific Android version. Some manufacturers allow apps to use the SD card for their own purposes.
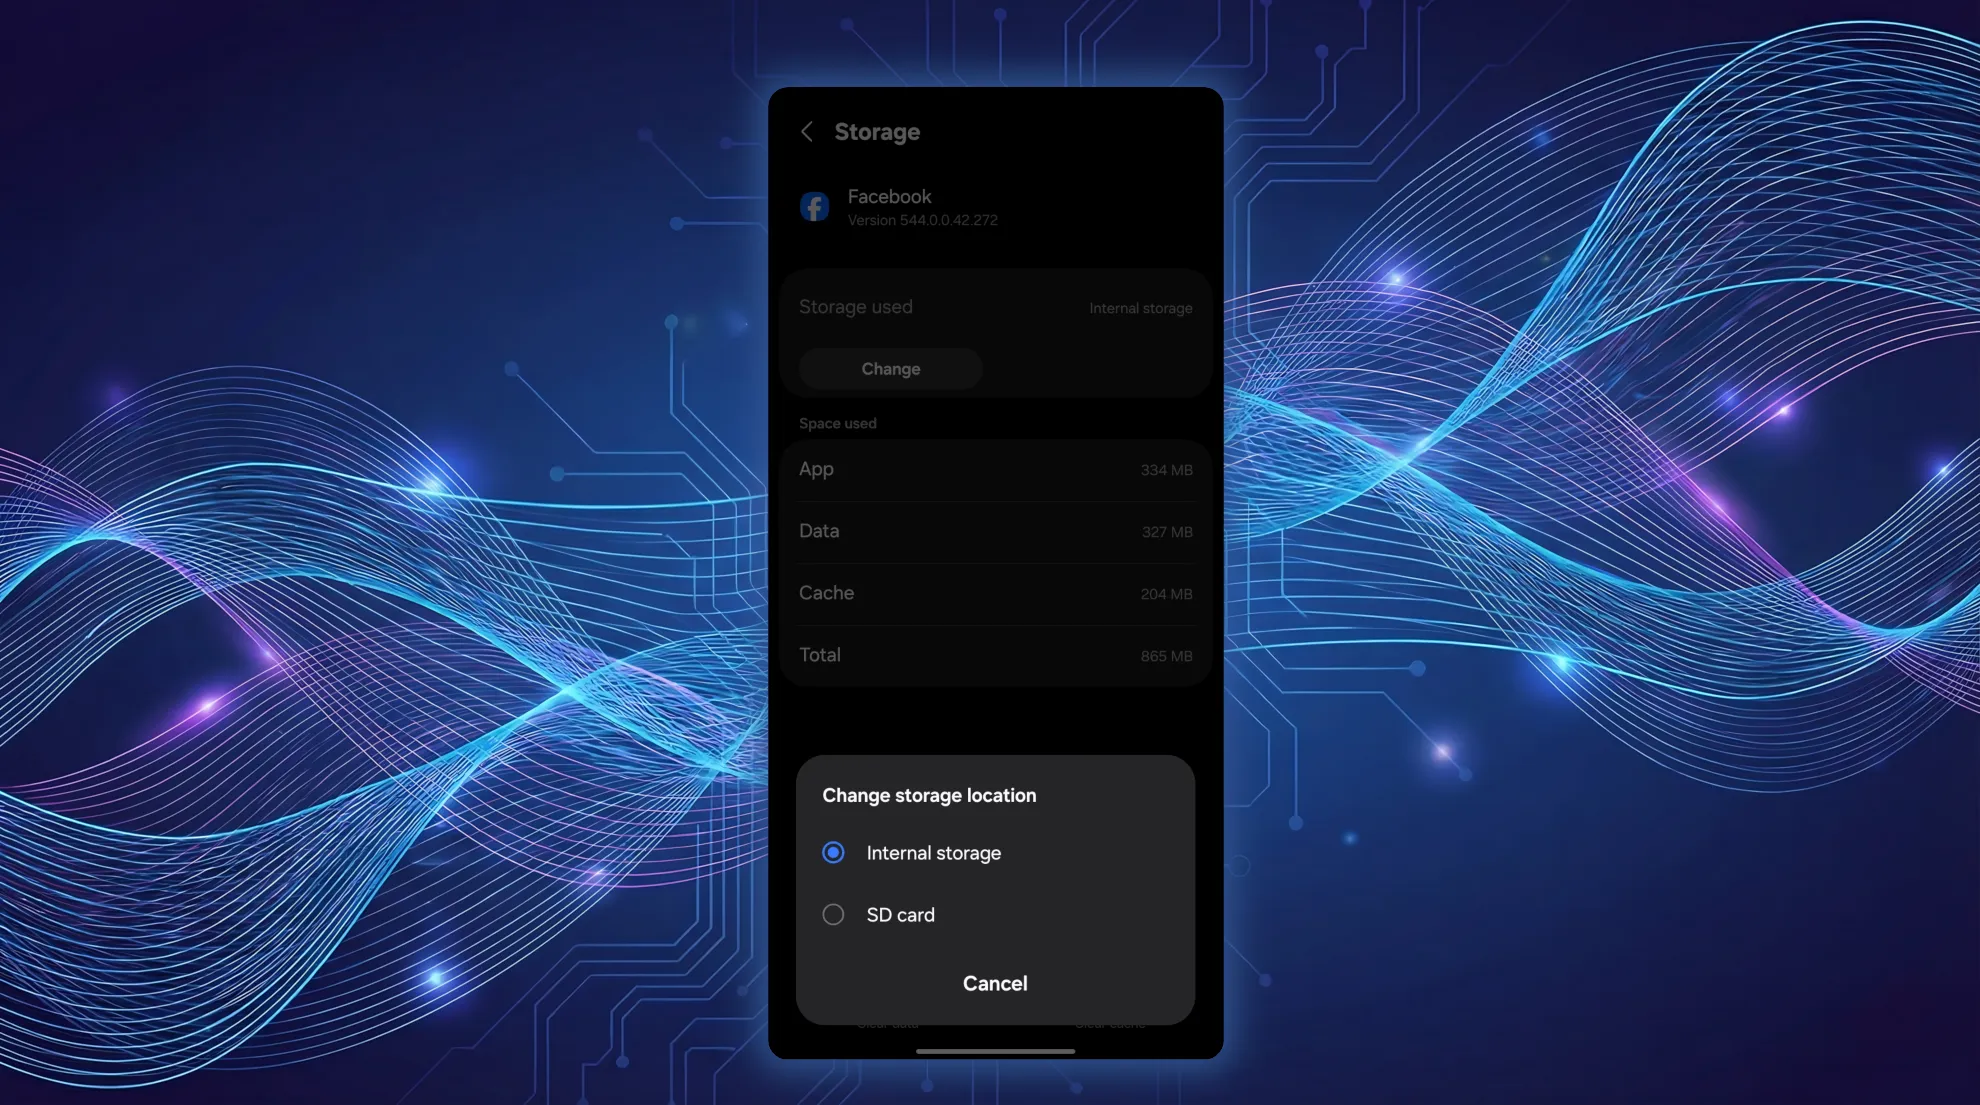
Therefore, if the Camera app is configured to save photos to the SD card and app data uploading is disabled, there's a high chance of recovering deleted photos. You can easily remove the camera from your phone and connect it to a computer, where you can use specialized software.
How to Recover Photos Deleted in the Files App
By default, when you delete any file on your phone, including photos, the Files app moves them to the Recycle Bin and stores them there for 30 days. If the user doesn't take any action to restore them, all data that has been deleted for 30 days is permanently deleted.

It's worth noting that the location of the Recycle Bin depends on the specific Android desktop environment. For example, in One UI, it's located in the main My Files window.
How to Recover Deleted Photos in Google Photos
Google Photos compares favorably to Files not only in its additional photo sorting and cataloging features but also in its more comprehensive recovery options. It offers two Trash options: local and cloud. The difference is that the local option can store deleted photos for up to 30 days, while the cloud option can store them for 60 days. Therefore, even if some photos weren't synced and were deleted, they can still be recovered in Google Photos.
How to Recover Permanently Deleted Photos in Windows
Unlike mobile operating systems, Windows provides direct access to its NTFS file system. Its key element is the Master File Transfer (MFT), which contains file attributes, including file names, timestamps, access rights, and a list of data clusters. All user-friendly programs for recovering permanently deleted photos rely on reading this portion of the file system. They scan the MFT for records marked "deleted." If the record is preserved and the clusters aren't overwritten, recovery occurs instantly, preserving the file name and folder structure. This makes NTFS one of the most recovery-friendly systems, provided TRIM isn't enabled.
Additionally, Windows has a powerful built-in mechanism called Volume Shadow Copy Service (VSS). This is a special feature that creates snapshots of the file system on a schedule or when installing updates or programs.
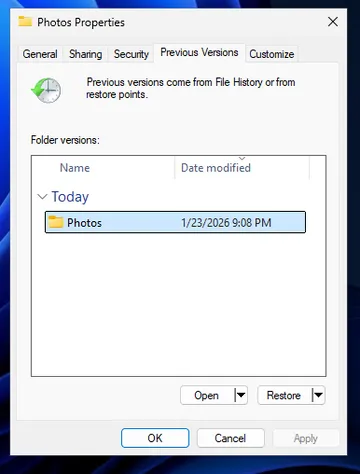
To check if a photo is available, right-click the folder where the photos were stored, select "Properties" and then "Previous Versions." If the system created restore points, you can find a copy of the folder from a previous date and restore the files, even if they were deleted from the Recycle Bin and overwritten.
You can create a restore point manually instead of waiting for the schedule. To do this, open "Settings," "System," and scroll to the bottom of "About." There you'll find a link to "Advanced system settings." Here, you'll first need to specify the drives, then add the allocated space (5% by default) so that the restore point includes not only system files but also user files.
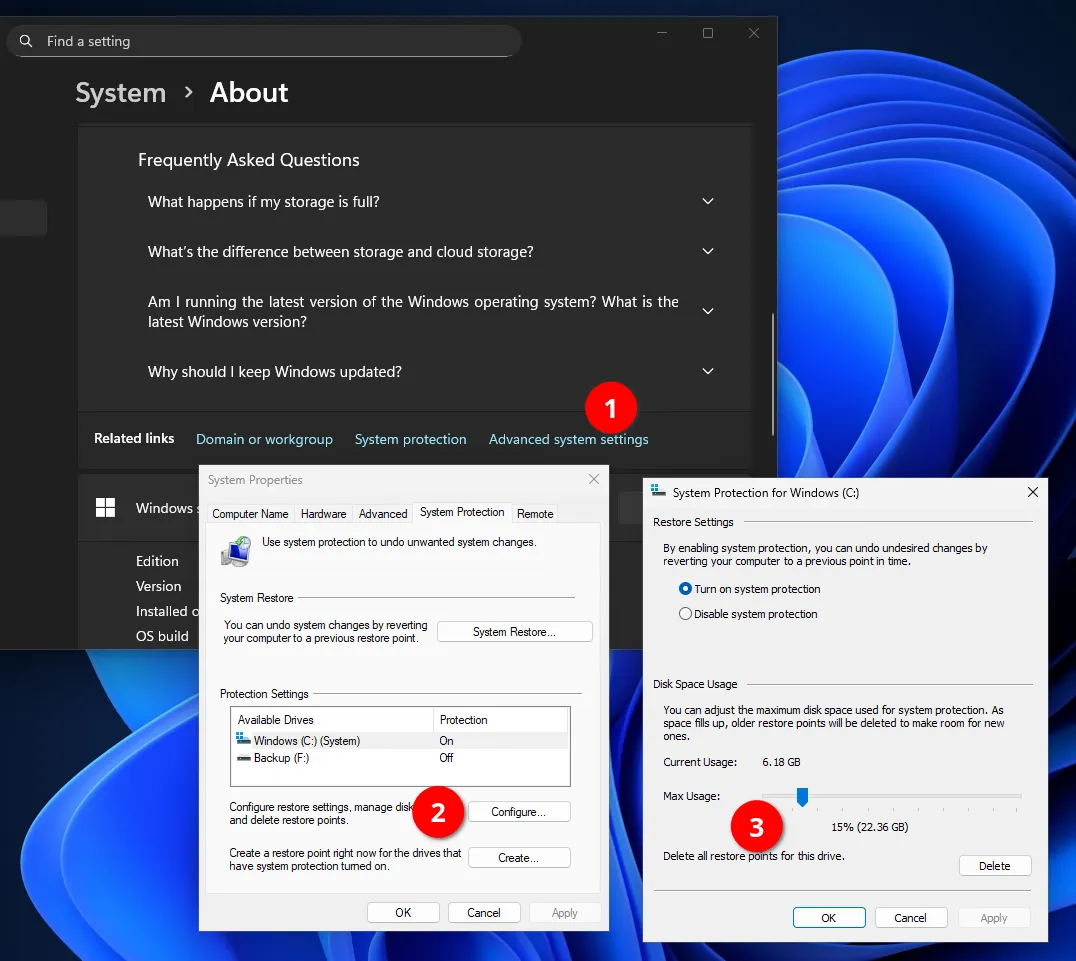
Once the preliminary settings are complete, you can click "Create." Windows will prompt you to name the new snapshot and will automatically add the date.
If you accidentally delete a valuable photo in the future, return to these settings and click "System Restore." In the dialog box, select the date of the last photo taken.
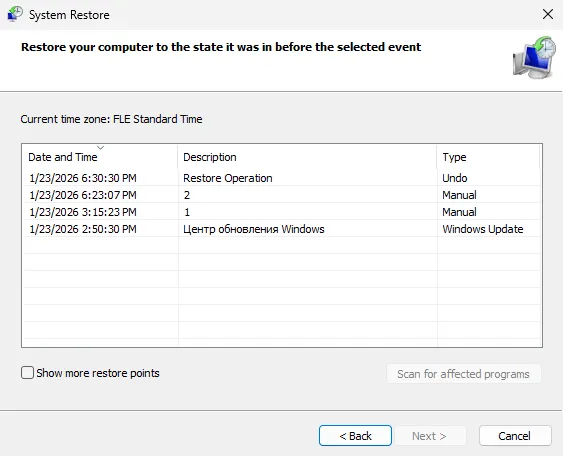
Restoring to the specified point will require a Windows reboot. The speed of this process depends on the computer's performance and the size of the snapshot.
Recovering Photos on macOS: Time Machine and Local APFS Snapshots
macOS is rightfully considered one of the most reliable data protection systems, thanks to the tight integration of the APFS file system and built-in backup tools. If you've deleted photos on your Mac, it offers two powerful protection mechanisms.
APFS Local Snapshots
This little-known tool creates regular local snapshots of the macOS file system directly to the internal drive. It works somewhat similarly to Windows' "Restore Points," except that by default it backs up not only system files but also user files.
Time Machine takes snapshots every 60 minutes and before installing system updates or changing files in the user's default folders.
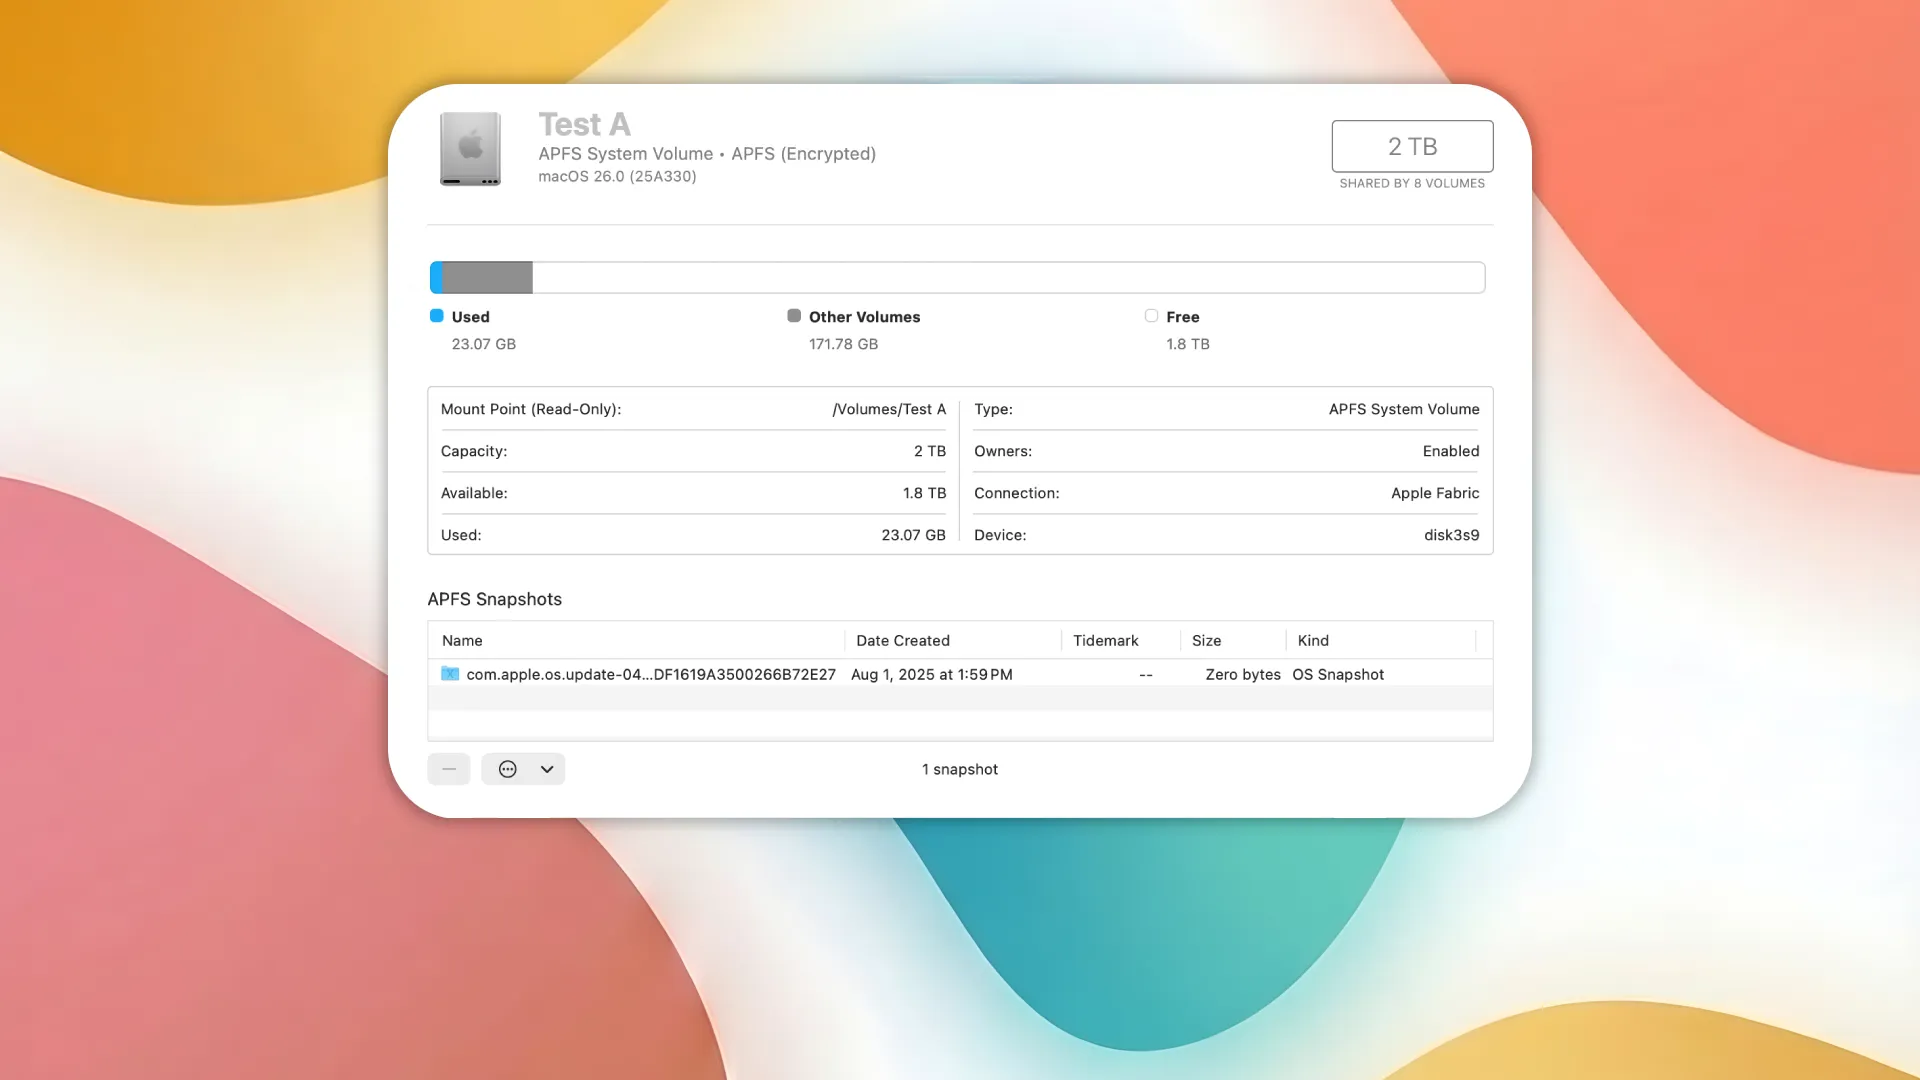
Remarkably, these photos don't take up much space because they use Copy-on-Write technology. If you deleted the photo folder an hour ago, it's almost certainly still stored in a local snapshot.
How to recover data from a snapshot:
- Open the folder where the deleted photos were located.
- Click the Time Machine icon in the menu bar and select Enter Time Machine.
- Use the timeline on the right to rewind time.
- Once you see your files, select them and click "Recover".
You can delete “unnecessary” photos using Disk Utility.
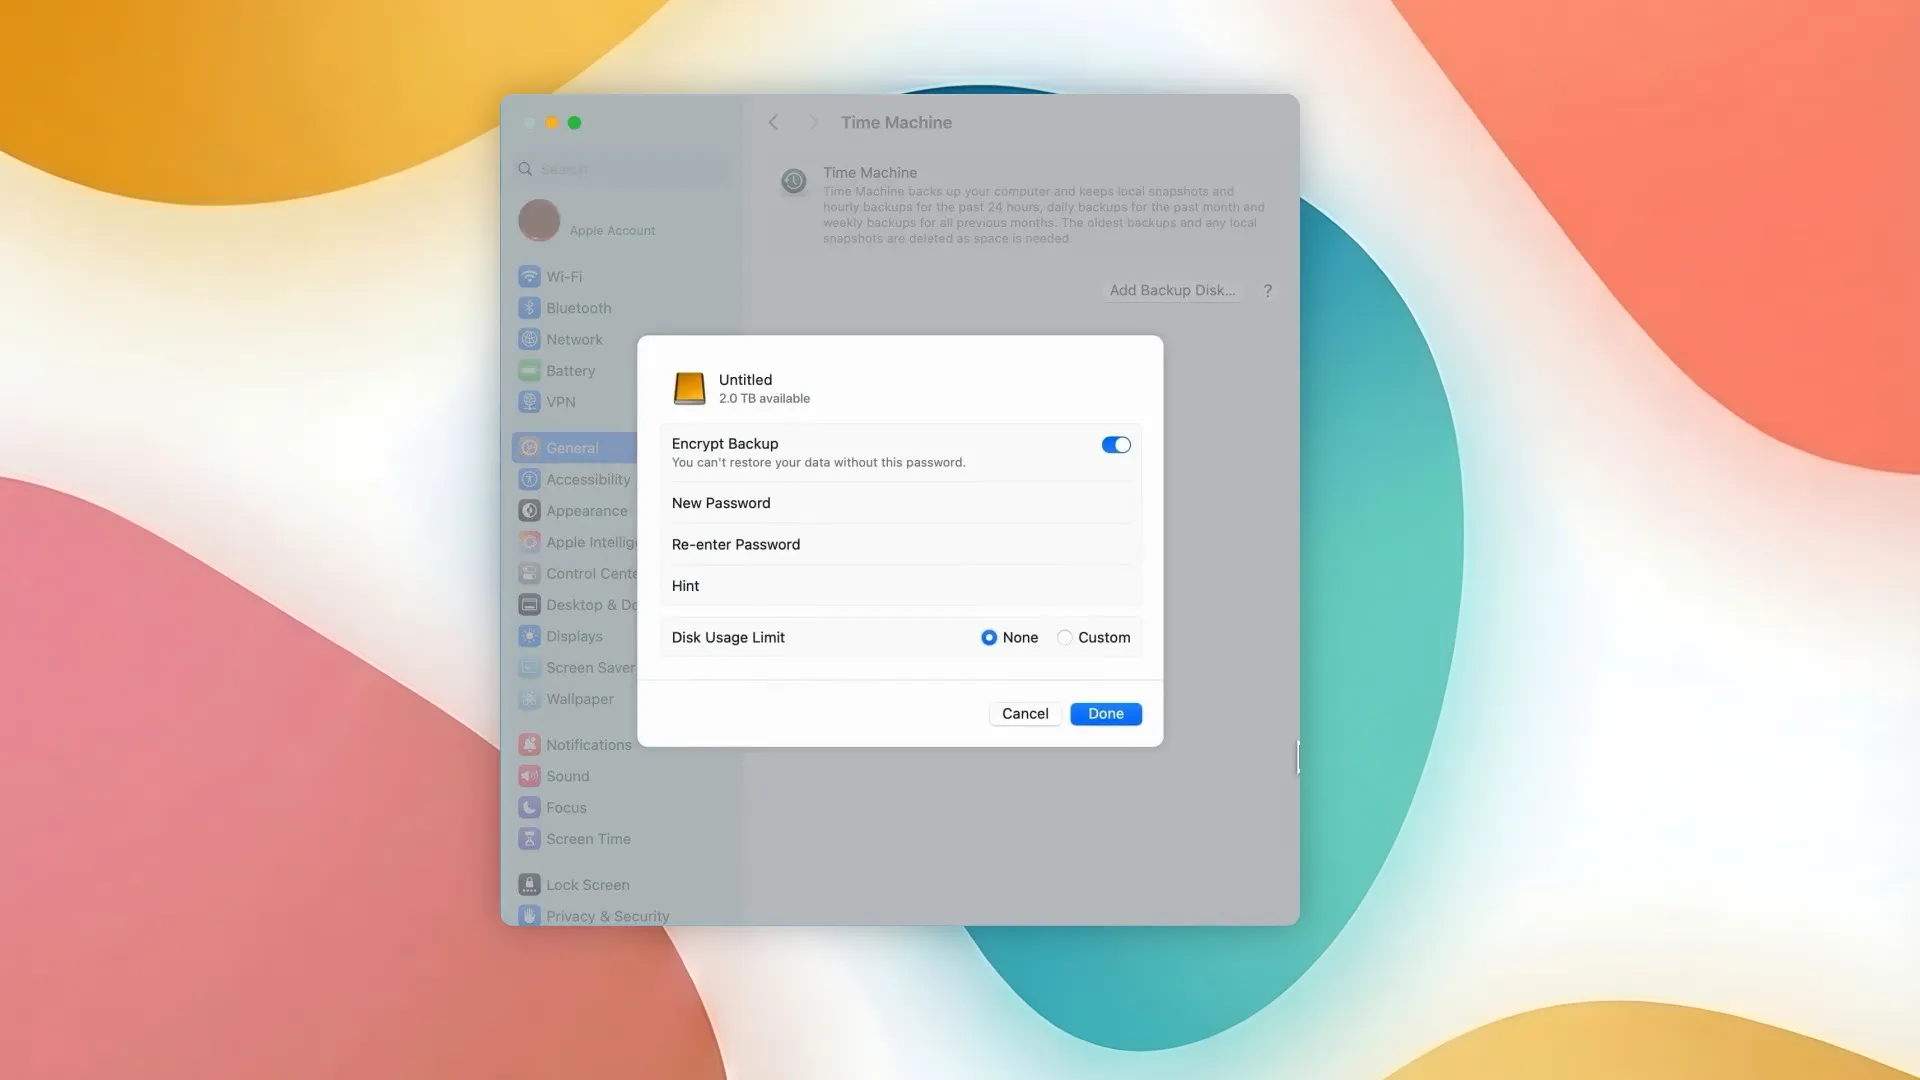
Time Machine backup
Time Machine is a macOS system utility designed to easily and automatically back up photos and other files from an internal drive to an external drive or NAS. Regular use of this tool increases the chances of success to 100%, even if the data was deleted long ago.
With Time Machine, you can create backups not only of system files but also of specific folders, or, conversely, exclude unnecessary ones. The system stores hourly backups for the last 24 hours, daily backups for the last month, and weekly backups for as long as the disk space is available. Once the disk is full, Time Machine automatically deletes the oldest backups.
You can use an HDD or SSD as an external drive. The latter will provide high-speed photo backups, but are considered less reliable in the long run.
To activate, go to System Preferences > General > Time Machine. Click "Add a backup disk" and select your external drive. The system may prompt you to erase it and format it to the appropriate APFS case-sensitive format. Set the backup frequency.
If you need to permanently restore a deleted photo, go to the Time Machine interface and find a specific photo with the date when the file was in place.
Specialized programs for recovering permanently deleted photos
Here's a quick clarification regarding restoring permanently deleted photos on phones. If you somehow deleted photos on your device and also emptied the trash in Google Photos or Apple Photos, the chances of recovery are slim to none. Only if your cloud storage support team cooperates and backs up your photos from technical backups. However, with Google, for example, only users with a Google One subscription can contact a specialist directly.
Modern smartphones are designed to make data unrecoverable, even in a lab. The exception is SD cards connected to Android phones in storage mode, which aren't encrypted like internal memory.
Therefore, all mobile apps that promise to permanently recover deleted photos, if not mislead the user, at least fail to specify what exactly they are recovering. In reality, such apps do not access the device's physical memory and cannot retrieve deleted blocks of data. Instead, they scan areas accessible to the system: application cache, temporary files, image thumbnails, copies from instant messaging apps, or data that was not actually permanently deleted.
It's a different story with laptops and personal computers, where the operating system allows third-party programs to directly access the file system of the internal or external drive. Let's look at some free options.
Recuva
When it comes to free and accessible software for Windows, Recuva from Piriform (the creators of CCleaner) is the most well-known solution. It's an excellent tool for those who accidentally emptied the Recycle Bin or formatted (quick format) a USB flash drive.
The program has a clear interface, and a user-friendly setup wizard makes photo recovery simple, even for those with limited technical experience.
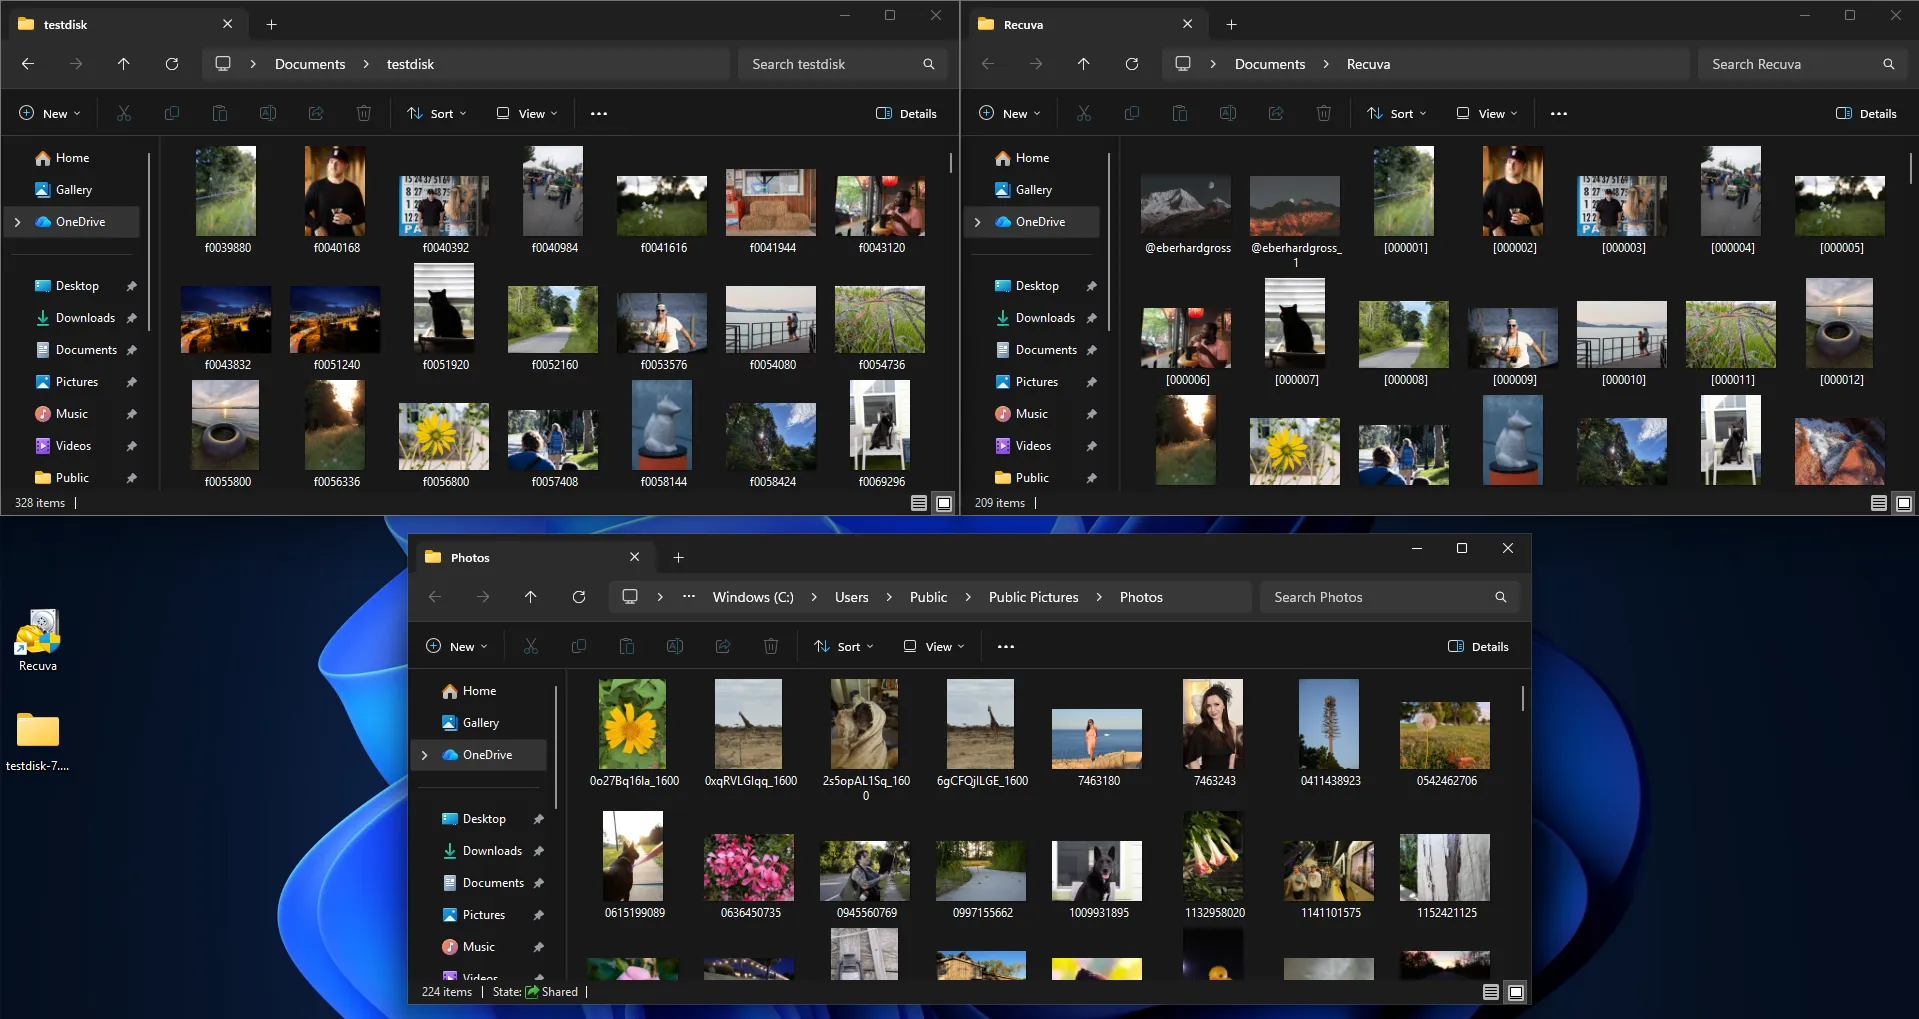
To test Recuva's effectiveness, let's take a flash drive containing previously saved photos and perform a quick format. This is essentially the same process as emptying the Recycle Bin. Note the initial number of files on the drive.
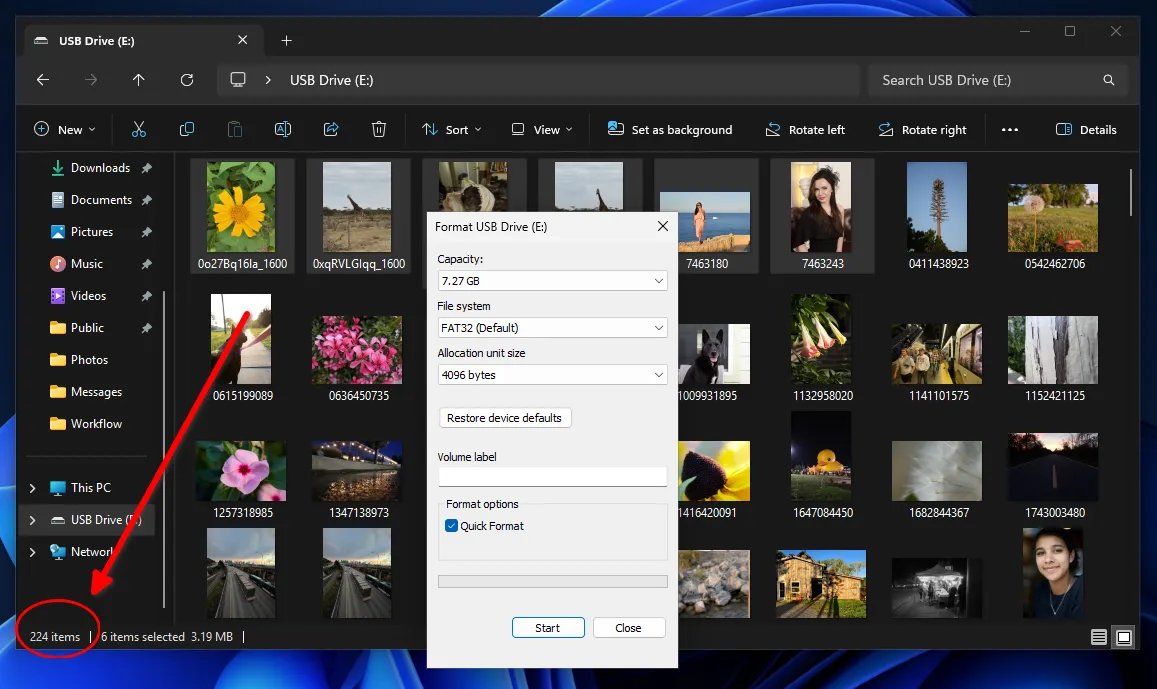
The photo recovery process in Recuva is divided into three stages.
- File type. You can select "Pictures" specifically. This will speed up the process, as the program will ignore system junk and documents.
- Location. If you know the folder the photos were stored in, be sure to specify it. Searching "Everywhere" on a 1 TB drive can take hours, while scanning a specific directory takes seconds. For a USB flash drive, it took about 9 minutes.
- Deep Scan. This option should only be enabled if a standard scan has failed. In this mode, Recuva searches files by signatures (headers), ignoring corrupted file tables.
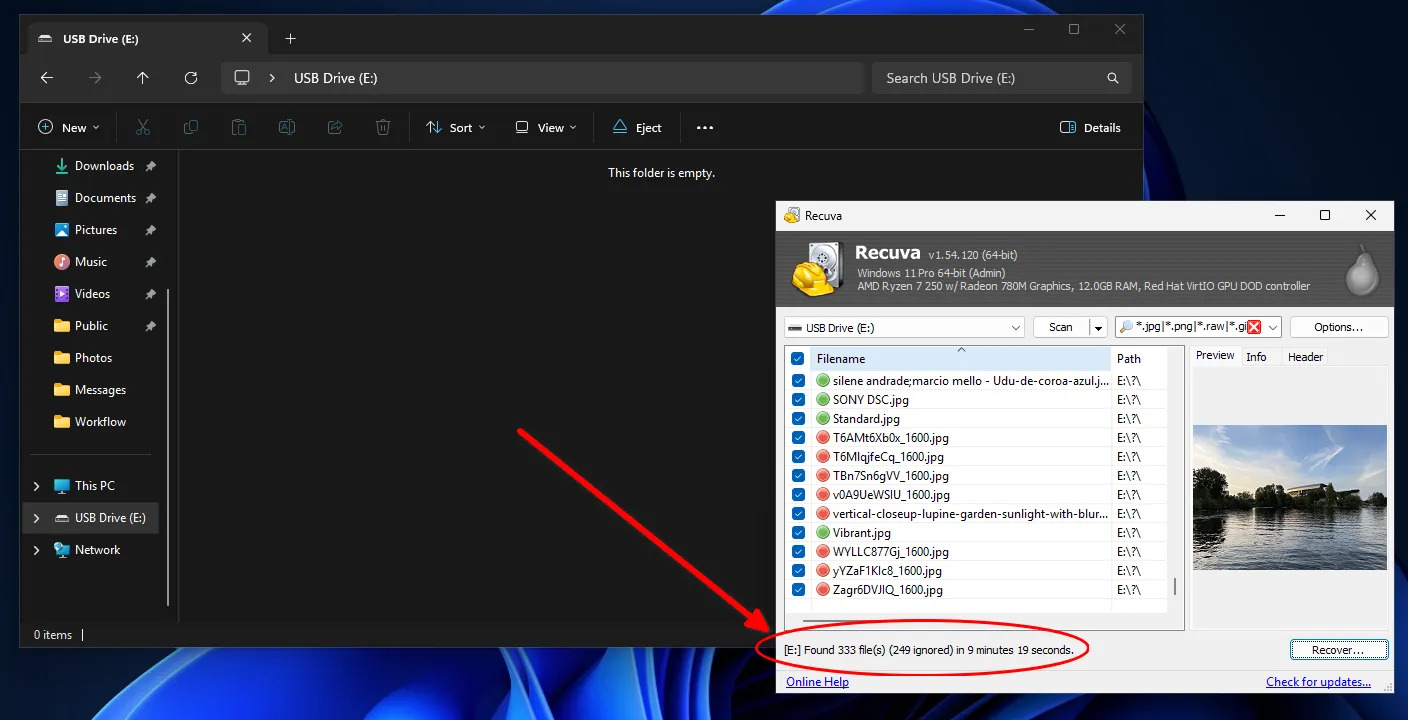
Once the search is complete, Recuva displays a list of found objects with color markers that represent estimates of the chances of photo recovery.
- Green. Status: "Excellent." The file hasn't been overwritten and is almost 100% recoverable.
- Yellow. Status: "Medium." Some of the clusters where the photo was stored are already occupied by other data. The file may open with dead pixels or gray stripes.
- Red. "Lost" status. The file has been completely overwritten. Although the program sees its name in the MFT, the snapshot data itself no longer exists on the disk.
Important rule! Never recover photos to the same drive from which they were read. If you're recovering photos from a flash drive, save them to your computer's desktop. If you're recovering photos from the D: drive, save them to the C: drive or an external drive. Otherwise, the program may overwrite parts of the files it hasn't yet read.
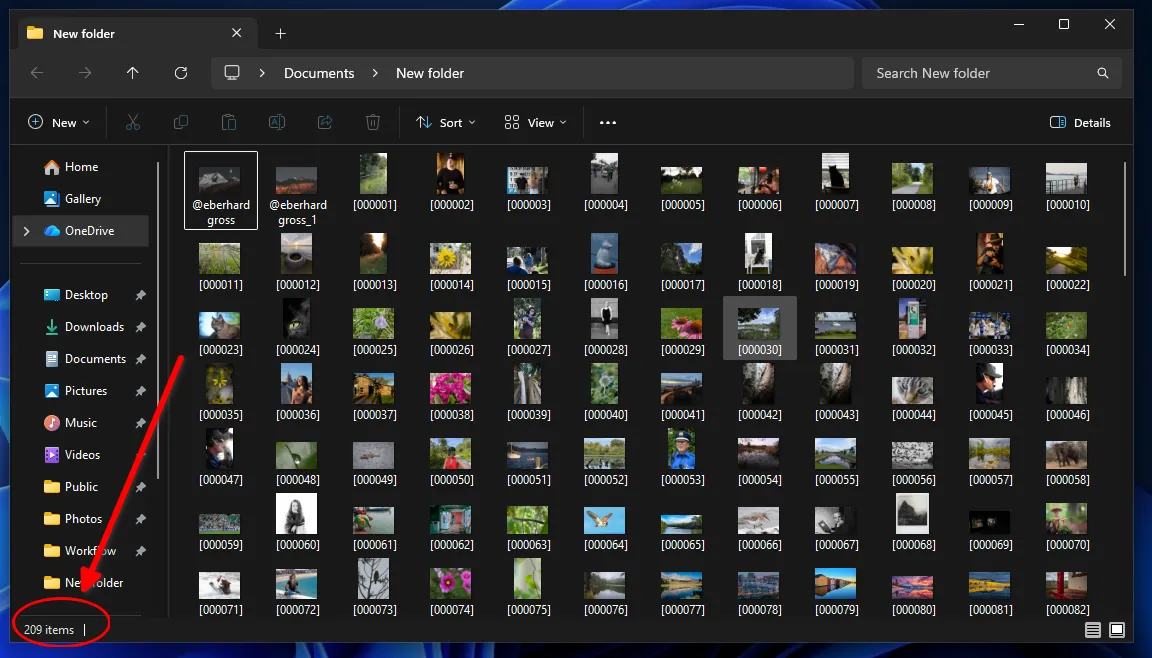
In our case, the number of recovered files was significantly larger than the original size. However, some of them didn't load thumbnails and couldn't be opened by the viewer.
Interestingly, despite performing no other actions other than a quick format, Recuva was unable to recover any of the photos. This may be because Windows immediately creates system folders and files after this procedure.
PhotoRec
This is a more powerful tool for recovering permanently deleted photos, demonstrating good results even when the logical file system structure (MFT or FAT) is completely destroyed or the drive has been deeply formatted. However, PhotoRec doesn't have a graphical interface and operates via the command line.
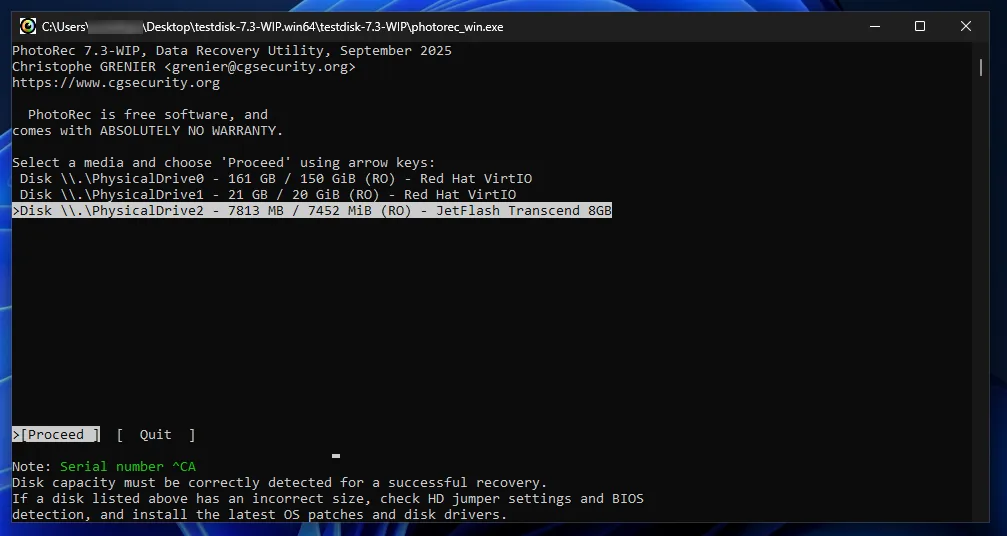
Unlike most programs, PhotoRec doesn't attempt to read the drive's "card file." Instead, it scans the drive's physical sectors for specific byte sequences—signatures.
Each file type (JPEG, PNG, RAW camera files) has a unique header. PhotoRec recognizes these markers in the data stream and literally "cuts" the file's contents from the header to its logical end. This allows for photo recovery even from storage media considered "empty" or "unallocated" by the operating system.
Besides this, console control has its advantages.
- Speed and stability. The console interface uses minimal system resources, which is critical when working with damaged or slow drives.
- Cross-platform. The tool works equally well on Windows, macOS, and Linux.
- Support for specific formats. The program recognizes over 480 file extensions, including professional uncompressed photo formats (CR2, NEF, ARW).
Since the program doesn't access the file table, it can't restore the original file names and folder structure. All rescued photos will have technical names (e.g., f0123456.jpg) and will be organized into recup_dir folders. However, for restoring priceless family archives, this is a minor issue.
When using a previously used flash drive as an example, QPhotoRec was able to recover even photos that were recorded a long time ago, before being prepared for the test.
How to avoid recovery
Having understood the TRIM mechanism used in modern SSD drives and mobile operating systems, it becomes clear that recovery is always a gamble with a low chance of success. Therefore, the most effective photo protection tool is not recovery software, but proper archive organization.
Most cases of "irrecoverable" data loss occur due to chaos, when photos are scattered across different folders, phones, and cloud storage. In an attempt to tidy up, users often delete unnecessary items, unaware that they were the only copy.

As a preventative measure, it's worth considering a home archive manager, such as Tonfotos. The program isn't designed to recover already-erased data, but it does address the root cause of data loss—a lack of consistency.
- Automating the "3-2-1 rule». Tonfotos lets you set up automatic photo import from smartphones and external drives to a single local storage location on your HDD. Magnetic drives are a much more reliable permanent storage medium than your phone's flash memory or SSD.
- Indexing of disparate sources. The program scans all your drives and network shares (NAS), creating a unified view. You can clearly see where the original is located and avoid deleting it by mistake, confusing it with a temporary copy or thumbnail.
- Safely remove duplicates. The app finds identical photos and removes them, ensuring at least one copy remains in the archive.
- Smart search. Thanks to face recognition and date navigation (Timeline), you don't have to manually move files between folders. The less manual file system manipulation you perform, the lower the risk of accidentally hitting the "Delete" button.
Using this software, you create a "cold" copy of your digital legacy. Even if the cloud service blocks your account or your smartphone's controller immediately executes a TRIM command after an accidental deletion, your primary archive in Tonfotos on your external hard drive will remain intact.